-
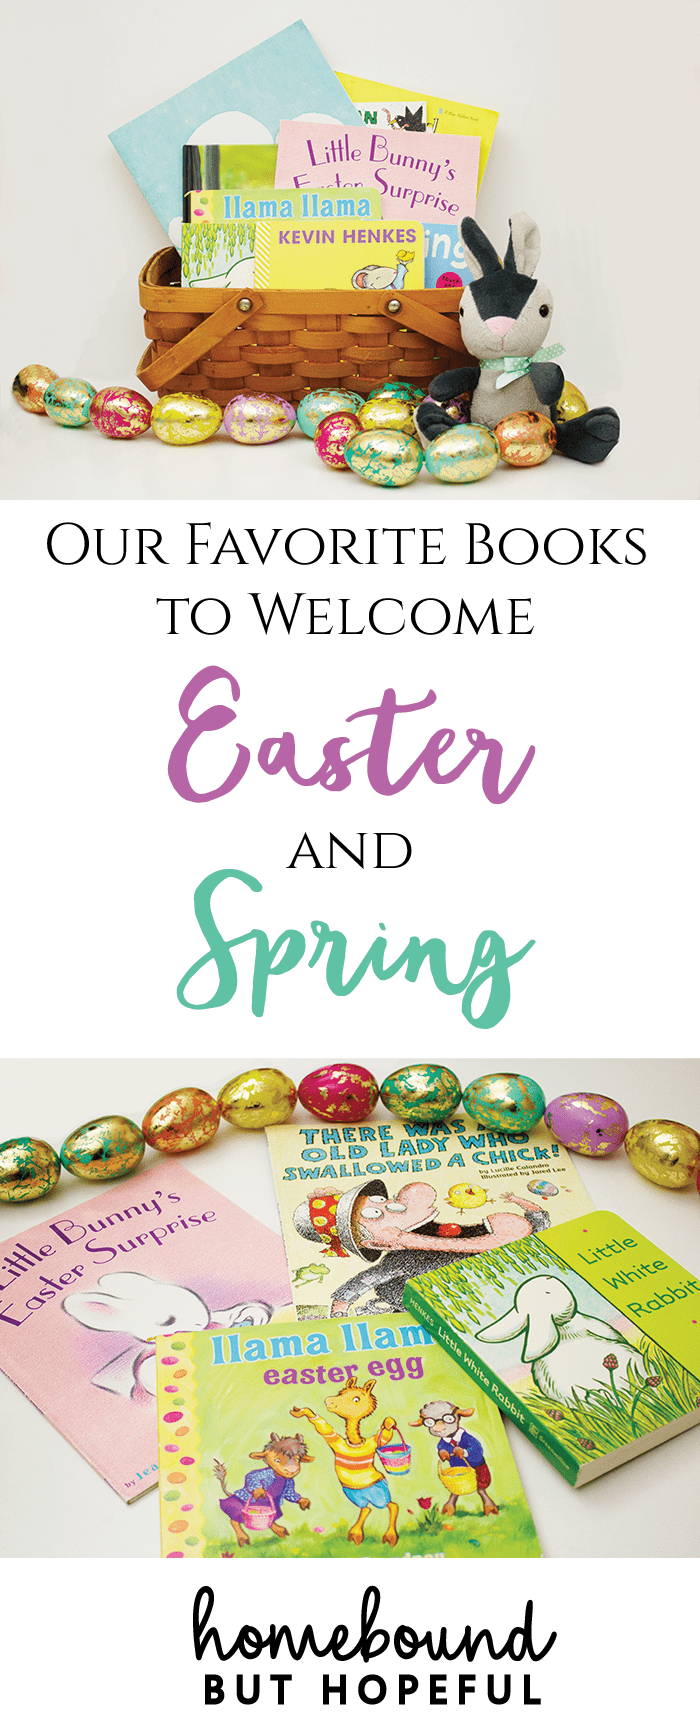
Our Favorite Books to Welcome Easter and Spring
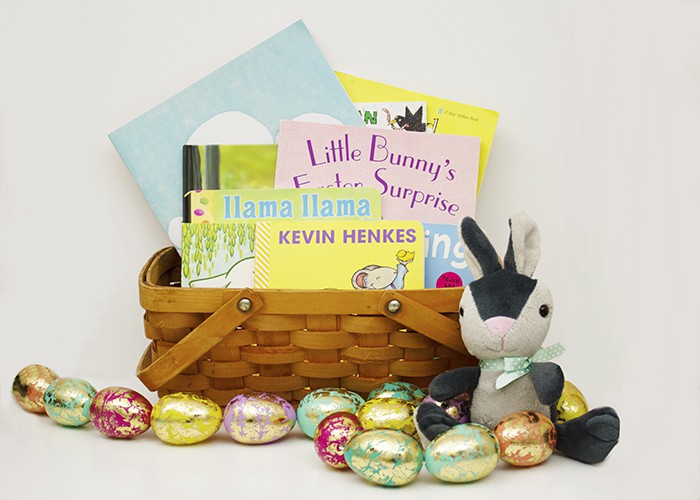
It will come as no surprise that we have a fairly extensive home library for our boys. To avoid total book overload, I tend to rotate seasonal books in and out throughout the year. I recently pulled out our titles for Easter and spring, and thought I would share some of our favorites with you. If your Easter Bunny is still busy gathering goodies to fill baskets, any of these paired with my simple spring tangrams would be a great start! (And if you have Amazon prime, you’ve got still time to order!)
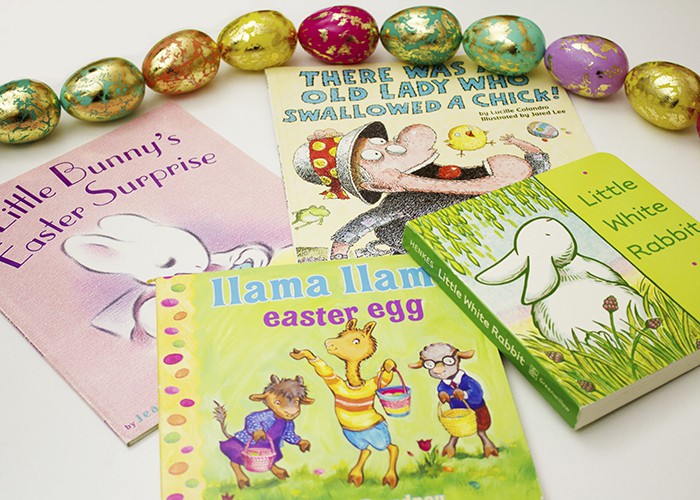
There Was an Old Lady Who Swallowed a Chick!
written by Lucille Colandro, illustratred by Jared LeeThere Was an Old Lady Who Swallowed a Chick! is a part of one of #thebigone’s favorite series. He pretty much loves anything with an ick factor. This series celebrates all sorts of occasions in the style of the old lady who swallowed a fly. The rhymes in each volume ultimately end with the old lady vomiting- an instant hit with my kiddo. In this fanciful version, the old lady swallows all sorts of Easter goodies, and then hops until a full assembled basket comes flying from her belly. It’s fun and silly, and will keep kids giggling.
Little Bunny’s Easter Surprise
written by Jeane Modesitt, illustrated by Robin SpowartAs I’ve mentioned in the past, I often choose books initially based on their illustrations. This was the case with Little Bunny’s Easter Surprise. We already owned Mama, If You Had a Wish, from the same author and illustrator. I love the light, chalky renderings of sweet little bunnies in both. Little Bunny’s Easter Surprise is a sweet story about Little Bunny, who gets to surprise her family on Easter morning. Since #thelittleone joined our family, #thebigone has relished his role as a big brother, so I knew he would love to see Little Bunny hiding a basket for Baby Bunny in particular.
Llama Llama Easter Egg
by Anna DewdneyOur family has been huge fans of Anna Dewdney for many years. We’re especially fond of the Llama Llama series. (We actually used to read Llama Llama Wakey-Wake to #thebigone every morning before pulling him out of his crib, and would finish our days with Llama Llama Nighty-Night each night!). Llama Llama Easter Egg is a quick, bright read about Llama Llama celebrating Easter with his family and friends. It is a board book, which makes it sturdy for little fingers to hold. The text is brief, to capture short attention spans. The painterly illustrations are beautiful and colorful- I can never get over how much personality Dewdney was able to convey in her work.
Little White Rabbit
by Kevin HenkesKevin Henkes is another author/illustrator that our family can not get enough of. We first read Julius, the Baby of the World to #thebigone while I was pregnant with #myrunawaybunny, and we’ve been hooked ever since. Little White Rabbit is a cheerful little boardbook about an imaginative rabbit that will have kids pretending to be rocks and butterflies. Henkes’ airy, light illustrations have a distinctive spring-time feel.
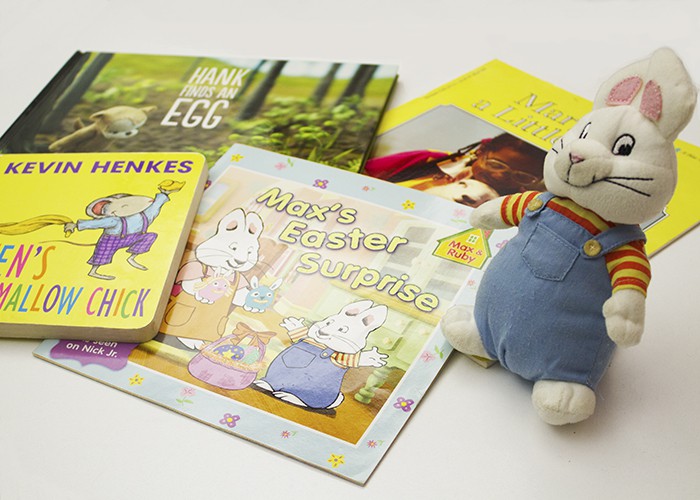
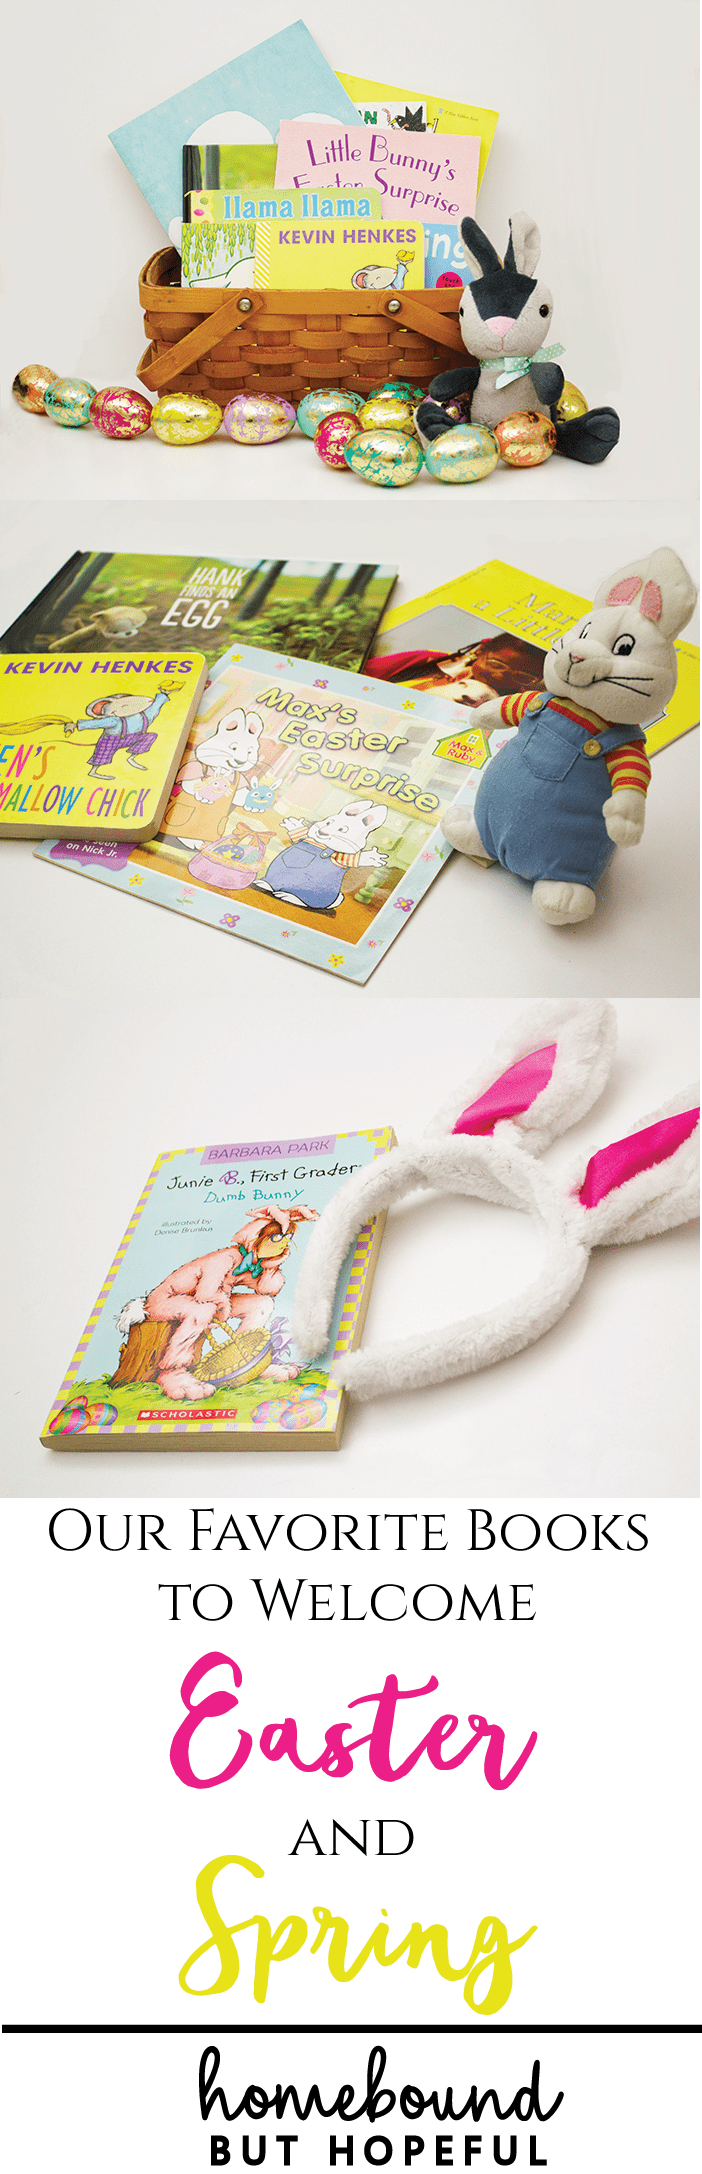
Max’s Easter Surprise
Grosset & Dunlop / Rosemary WellsIn my (not-so-expert) opinion, you can’t talk about Easter or bunnies without at least a brief mention of Max & Ruby. The sister & brother rabbit duo best known for basically never having parental supervision (aside from occasional visits from Grandma) were favorites of #thebigone when he was young. In Max’s Easter Surprise, the siblings are working to decorate Easter eggs. Max takes a fanciful approach to creating an Easter parade, which is sure to inspire some imaginative Easter play in your homes as well.
Mary Had a Little Lamb
written by Sarah Josepha Hale, photo-illustrations by Bruce McMillanAlthough this is technically not an Easter or spring book, it still feels entirely appropriate. I don’t know about anyone else, but when I think ‘spring’, my mind tends to include fuzzy baby animals like chicks and lambs. Mary Had a Little Lamb is a photo-illustrated book of the classic nursery rhyme. I love that the photos add a modern touch to a classic song. The text is perfect for pre- or very early readers, as they essentially just need to recite the nursery rhyme to successfully ‘read’ the book. I picked it up initially as a reading confidence booster for #thebigone, and it definitely did the trick!
Hank Finds an Egg
by Rebecca DudleyAlso not technically spring or Easter themed, Hank Finds an Egg does focus around an egg, which is why I picked it up for #thebigone on Easter. Rebecca Dudley has created an absolutely beautiful book about a sweet little creature named Hank. Hank happens across a stray egg and goes to great lengths to return it to it’s nest. The book is without text, which makes it perfect for little ones who are not yet reading. Wordless books are the perfect way to encourage storytelling, as well as ‘reading the pictures’ which is an important pre-reading skill. Hank Finds an Egg features stunning photographic illustrations of small scenes created by Dudley- the whole book feels as though you are peeking into a magical little forest diorama, and I can’t get enough of it.
Owen’s Marshmallow Chick
by Kevin HenkesYes, it’s another recommendation from Henkes- don’t be surprised, I told you we love him! Owen’s Marshmallow Chick is one board book in a series that centers around Henkes’ classic characters & their sweet treats. The repetitive text is great for young listeners who will be able to predict what happens next. Owen is as cute as any of Henkes’ little mice, and watching his love develop for his yellow marshmallow chick is just so cute. (Seriously, guys- adorable mouse, in footed jammies, holding his blankie, and kissing his marshmallow chick good night?! Does it get better than that?!)
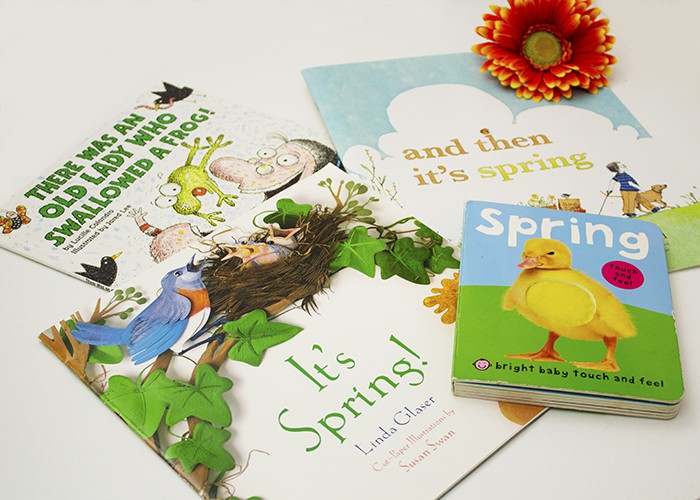
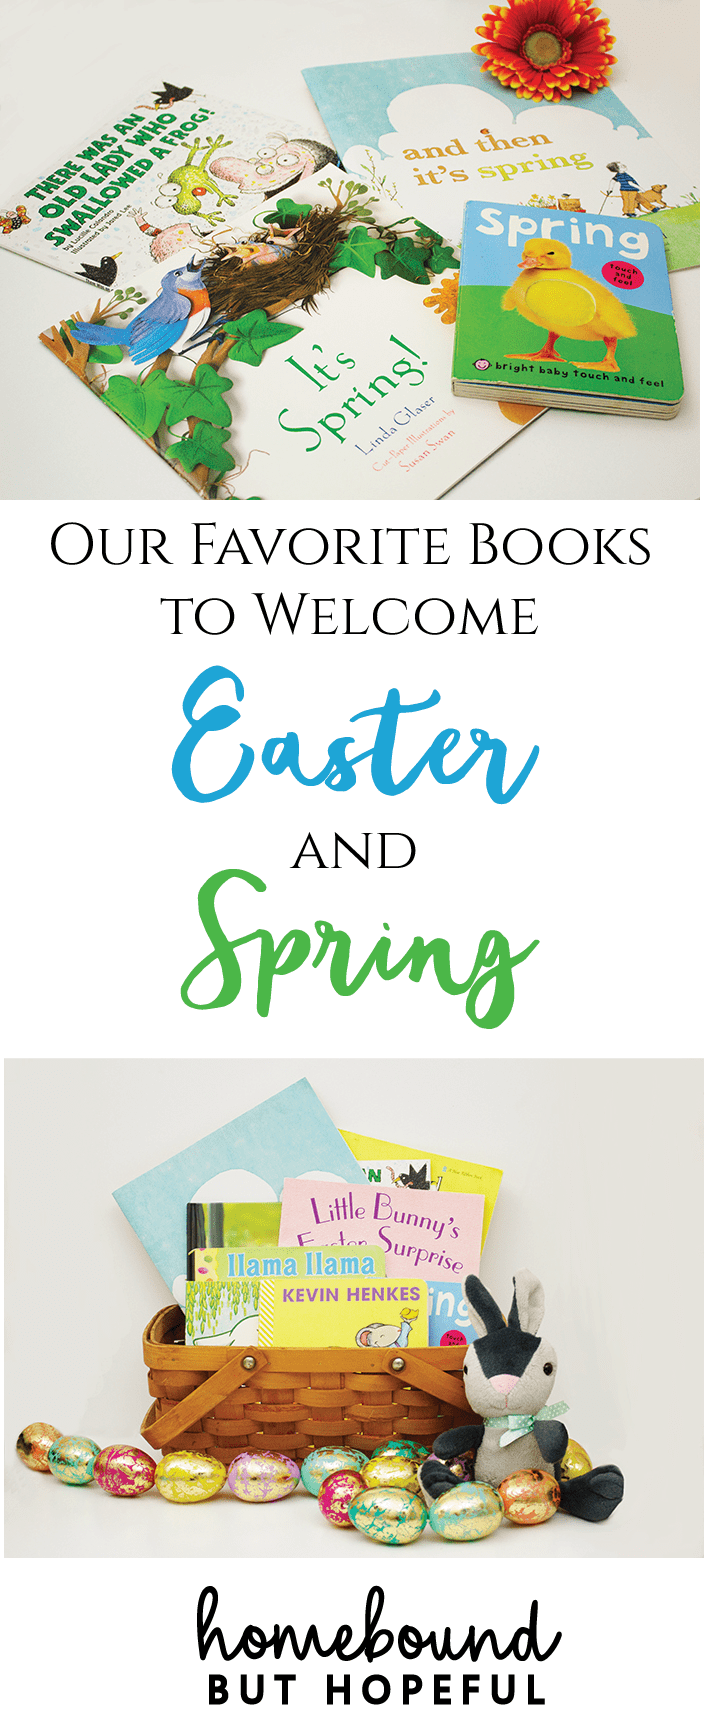
Spring
Bright Baby Touch And FeelI originally purchased this sturdy board book for #thebigone’s first spring in 2011. Five years later, it’s still in great shape, despite being read over and over by both of my boys. It’s a bright interactive book with clear, simple images that relate to spring on each page. The illustrations make it perfect for prompting speech with toddlers. The touch and feel aspect engages them and adds a sensory component to reading time. The entire series is a hit in our home, and I’m sure your little ones will feel the same way.
There Was an Old Lady Who Swallowed a Frog!
written by Lucille Colandro, illustrated by Jared LeeYup, here’s another repeat on the list. I can’t help it guys- we like what we like. There Was an Old Lady Who Swallowed a Frog! again follows the rhyming scheme of the old lady who swallowed a fly. This version finds the old lady swallowing all sorts of springy items. Honestly, it’s one of the grosser versions I have seen so far, finding her belly full of dirt, worms, bugs, and a frog. Ultimately, she elicits laughter from my kiddos when she burps up a spring garden. It’s a funny and engaging book, perfect for kids who like just a touch of ‘ick’ with their reading.
And Then It’s Spring
written by Julie Fogliano, illustrated by Erin E. SteadThis was a recent purchase for our family, and it was the illustrations that hooked me again. (Erin E. Stead is well known for the illustrations in A Sick Day for Amos McGee, so the style may be familiar to you). And Then It’s Spring follows a young boy from the end of winter to the arrival of spring. He prepares his garden while brown is still all around him, and waits week by week for the green of spring to come. It’s a cute story to include when you are focusing on either the spring season, or plants/gardening with your kids.
It’s Spring!
written by Linda Glaser, cut-paper illustrations by Susan SwanI have to confess, I’m a total sucker for cut-paper illustrations, which is why we own this book. I could look at it for hours, even without the text, because I find that art form incredible. (And secretly, I like to think I’d be good at it, but really, who knows?!) However, the story written in It’s Spring! is lovely as well, making it a perfect addition to any home library in spring. The text is full of descriptive phrases, novel vocabulary, and hints at the sensory experiences of the season- scents, sounds, sights, etc. This would be a perfect read to pair with a spring time sensory nature hunt, or perhaps as inspiration for a nature collage as a nod to the cut-paper style.
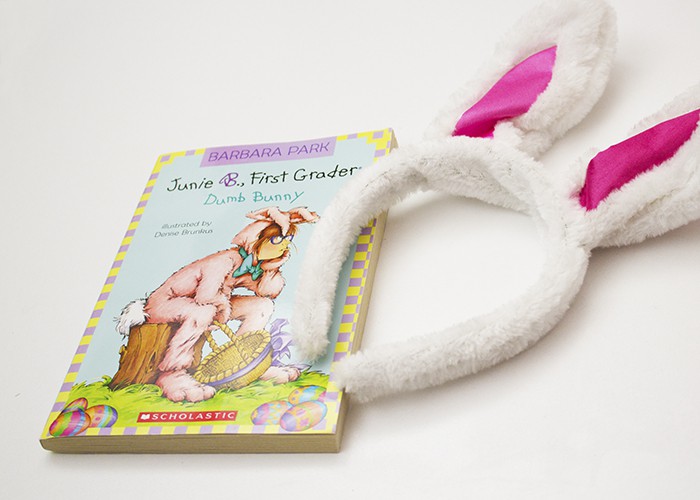
Junie B., First Grader: Dumb Bunny
written by Barbara Park, illustrated by Denise BrunkusAlthough #thebigone still enjoys having picture books read to him some evenings, and will happily read them out loud to his little brother, he’s actually becoming quite the independent bookworm. In his own reading time, he tends to now prefer chapter books, so I’m including a favorite Easter book for his age range as well. Junie B. Jones is a character we love for her silly, sassy nature- I see a lot of #thebigone in Junie. Junie B., First Grader: Dumb Bunny shows Junie and her friends celebrating the Easter holiday with an egg hunt- with Junie as the Easter Bunny! This series is perfect for readalouds as well as independent readers. (And seriously, the audio versions are hysterical, and perfect for road trips!)

Which of your family’s favorites are missing from my Easter and spring themed reading list? Let me know in the comments!
-
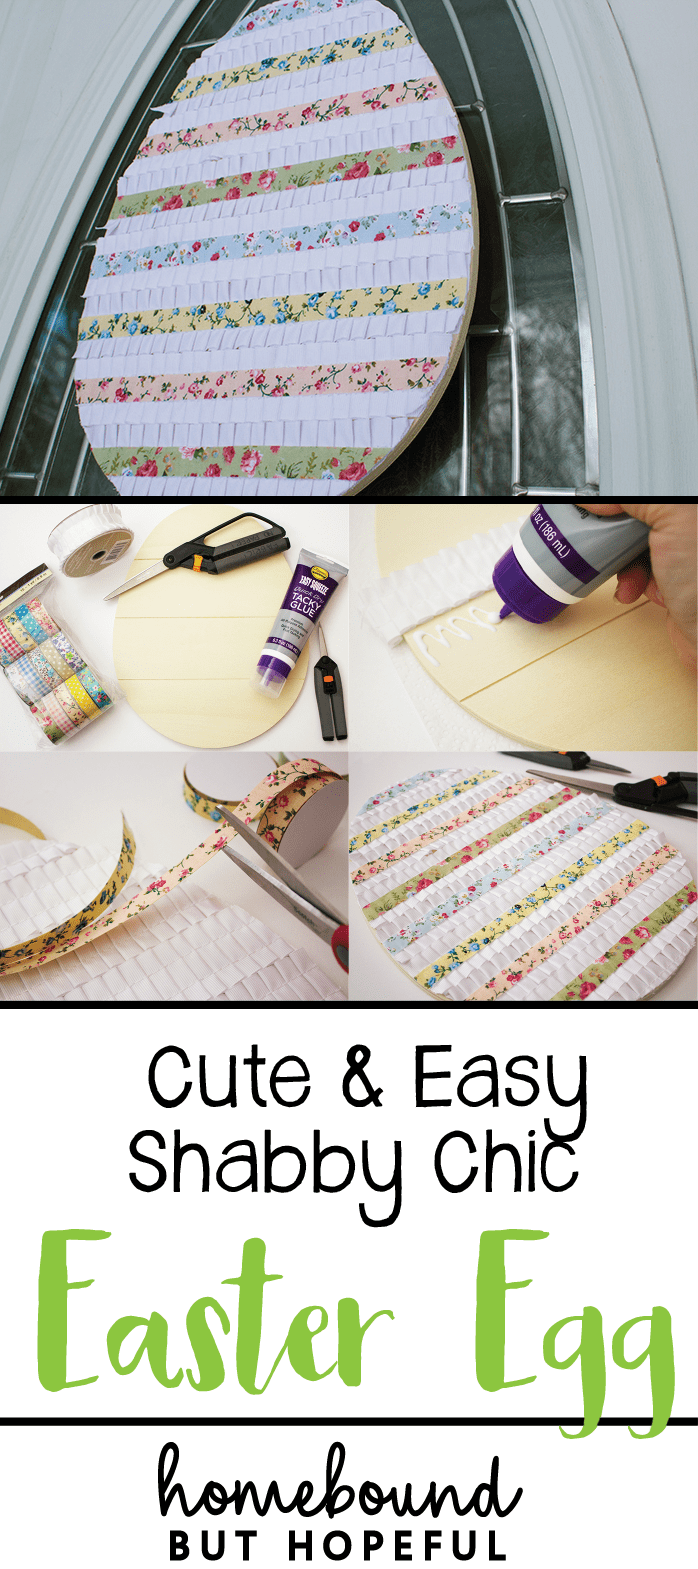
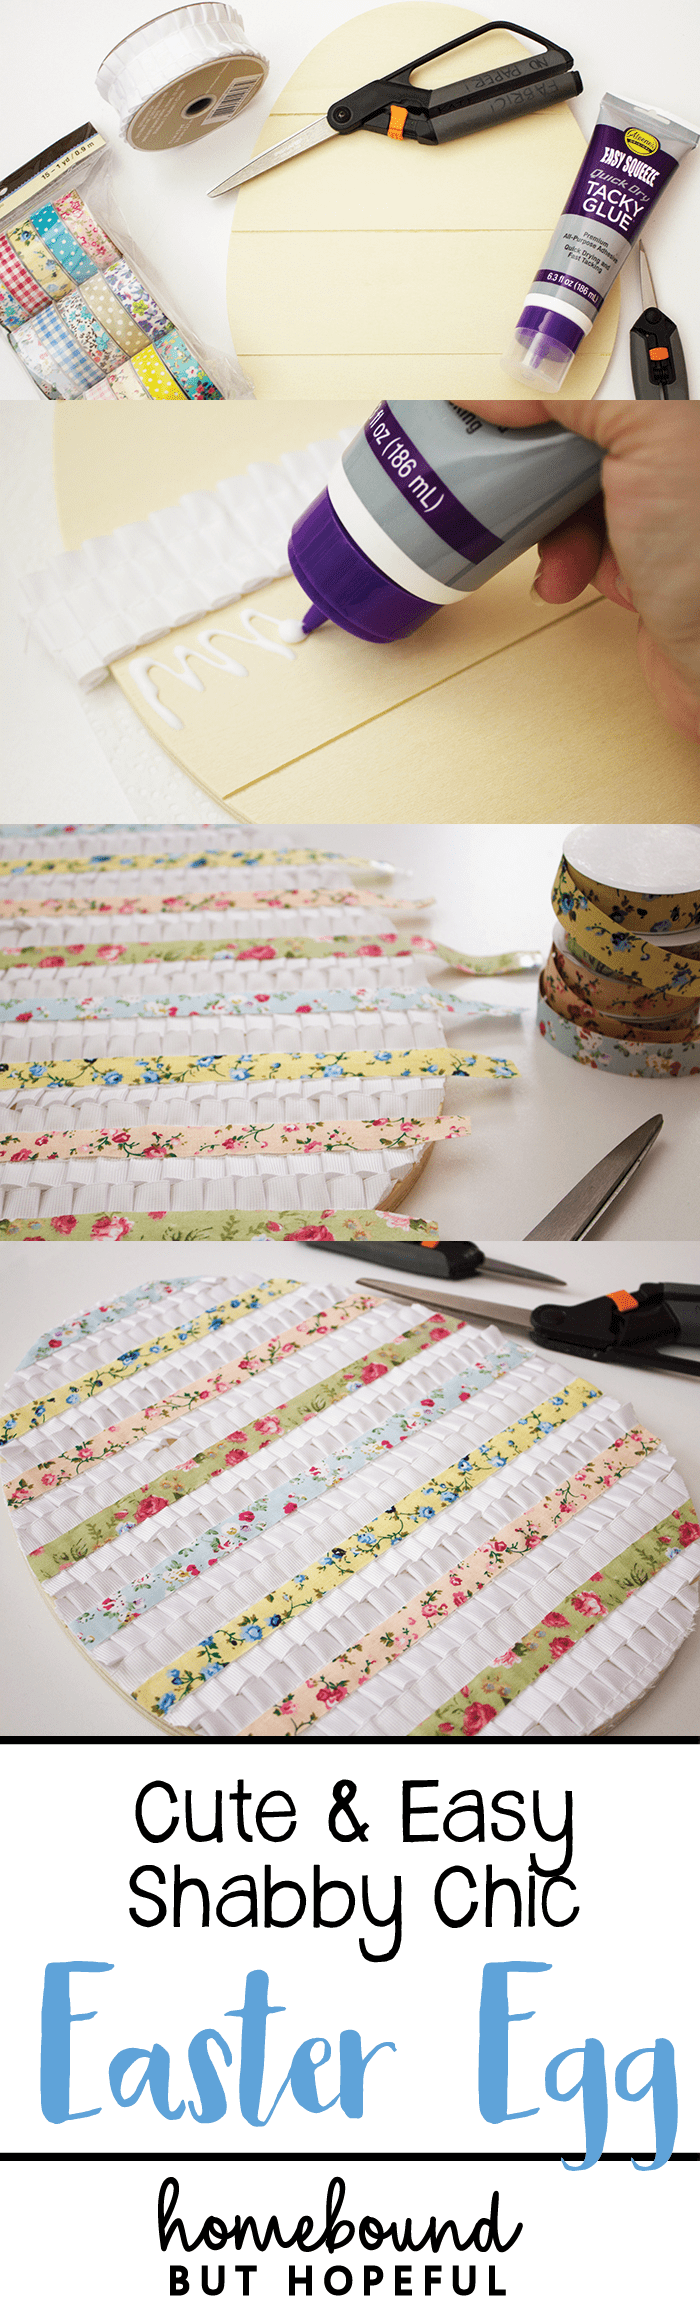
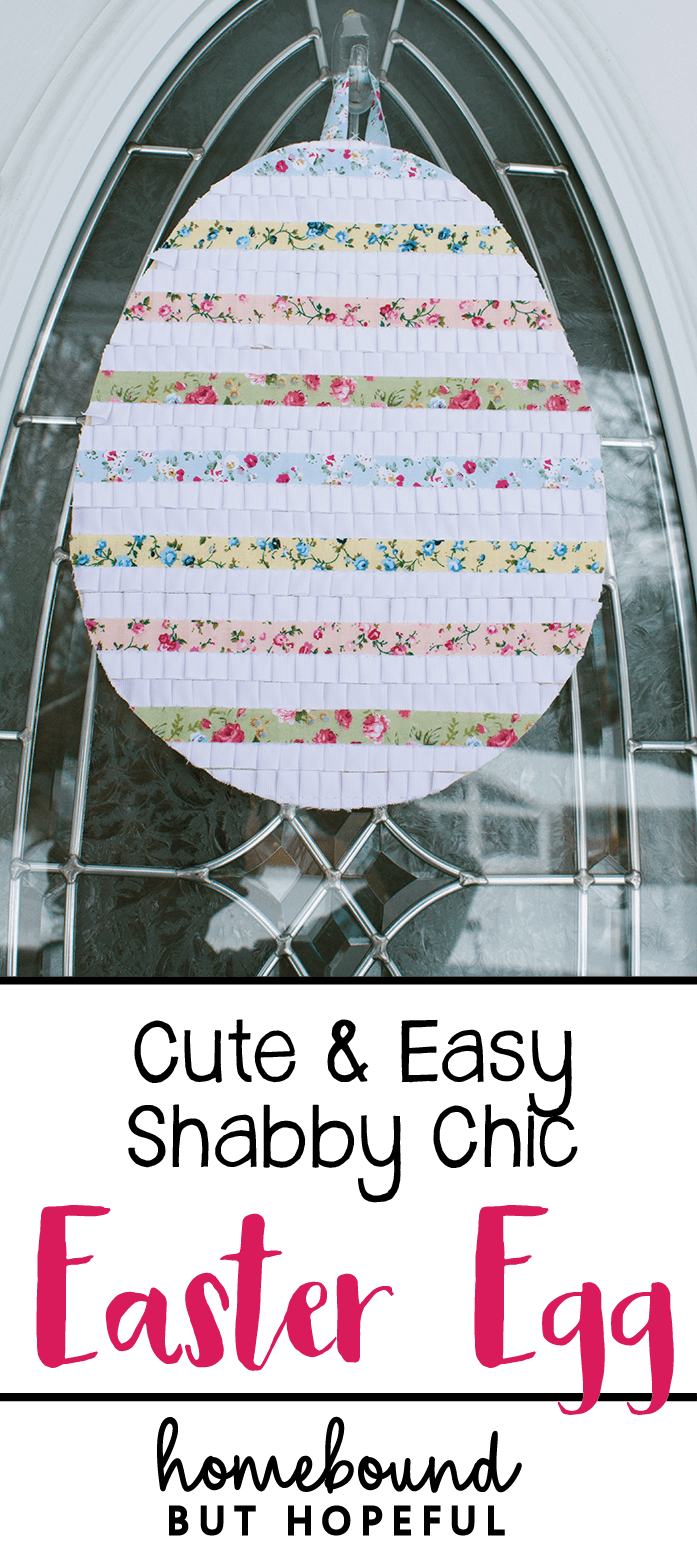
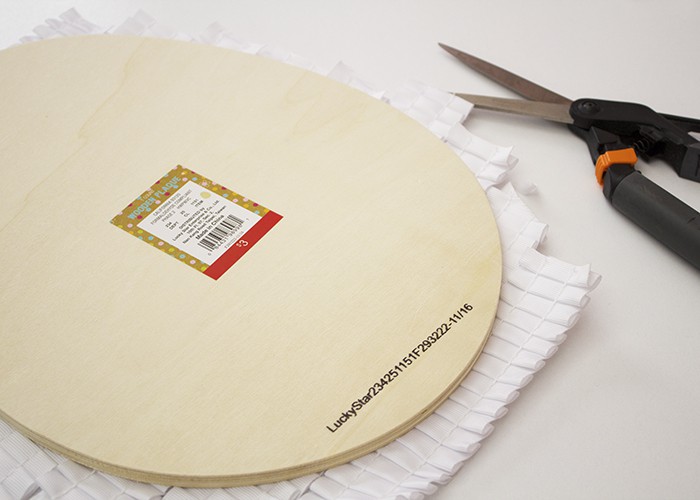
Egg-ceptionally Easy Shabby Chic Easter Egg Craft
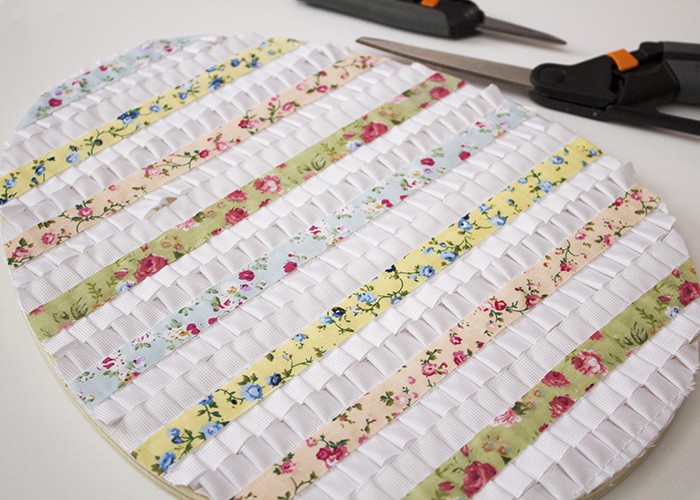
As the only girl in a house full of boys, there are times when I need a fix of ruffles or flowers. Easter is such a perfect time to introduce these elements. Pastels, ruffles, and delicate florals pair perfectly with the spring holiday. I put together this beautiful but surprisingly simple shabby chic Easter decoration during some mama crafting time. If you’re in need of feminine holiday details, read on!
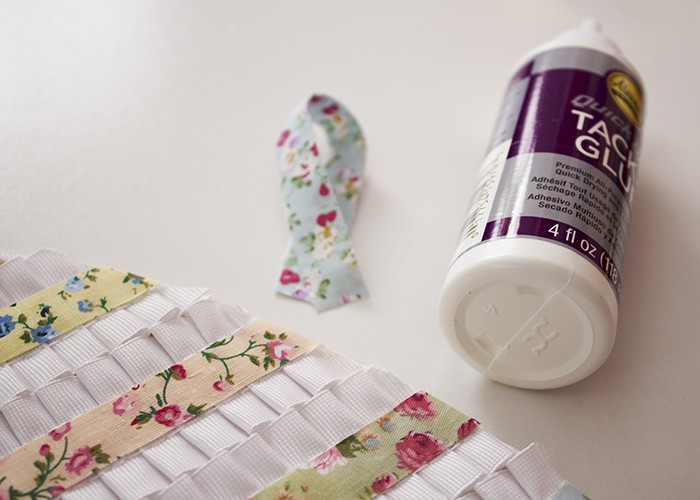
shabby chic easter supplies:
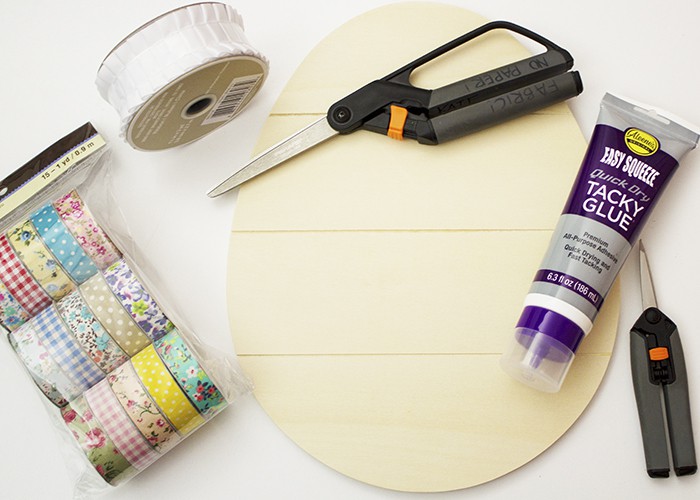
- Egg base. These can easily be found at most hobby or craft stores. You may also be lucky enough to score one from the One Spot at Target like I did!
- Craft glue, or hot glue.
- Scissors.
- White ribbon, ruffles, or lace trim.
- Ribbon, floral tape, or other trim. (Should be thinner than white trim above).
- Twine, ribbon, or other material for hanging.
- White acrylic craft paint. (Optional)
- Sponge paintbrush. (Optional)
How i made it:
- If your white trim is very sheer or has a lot of holes, you may want to start by painting your egg base with white acrylic paint. I used a very solid ruffle so I skipped this step, but it’s up to you. Allow the paint to dry completely before moving on to the next step.
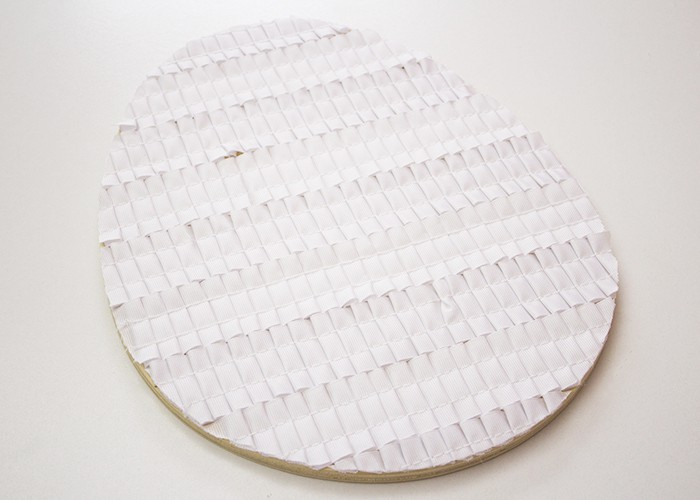
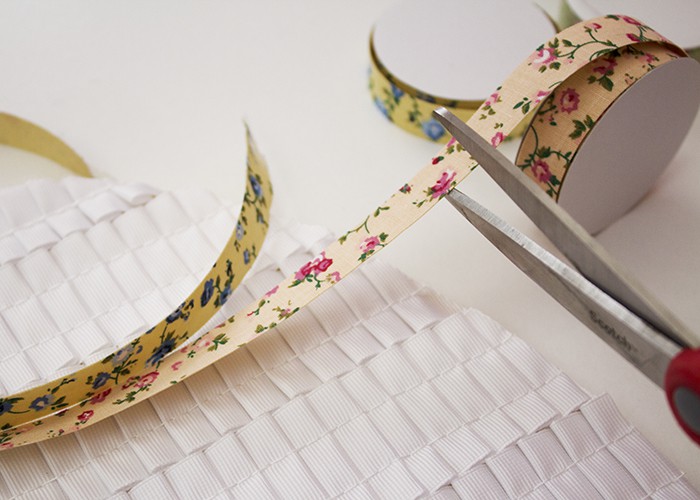
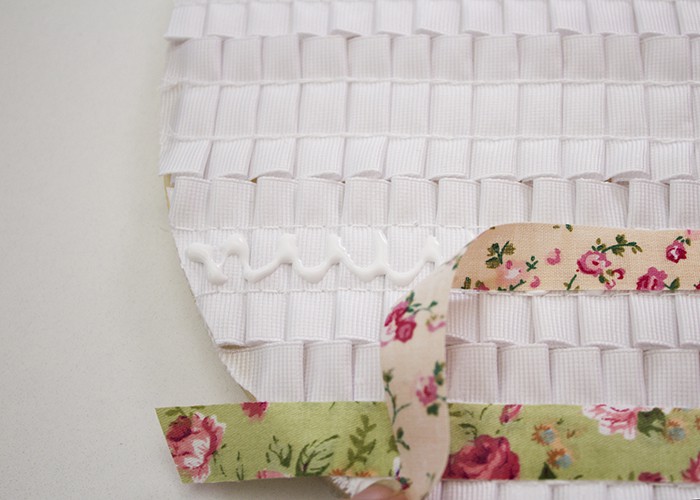
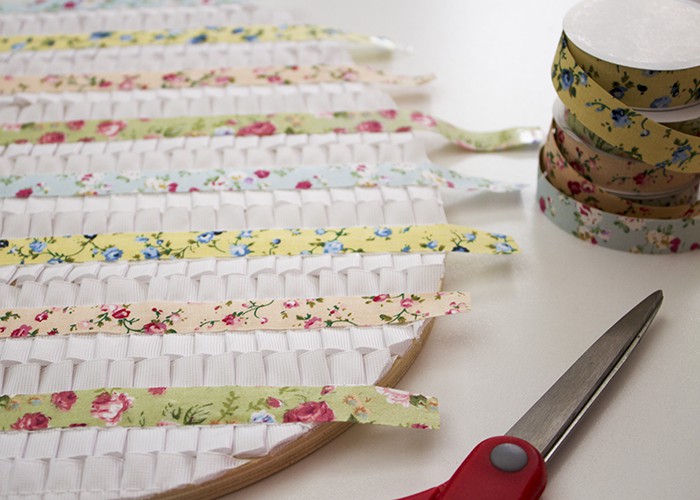
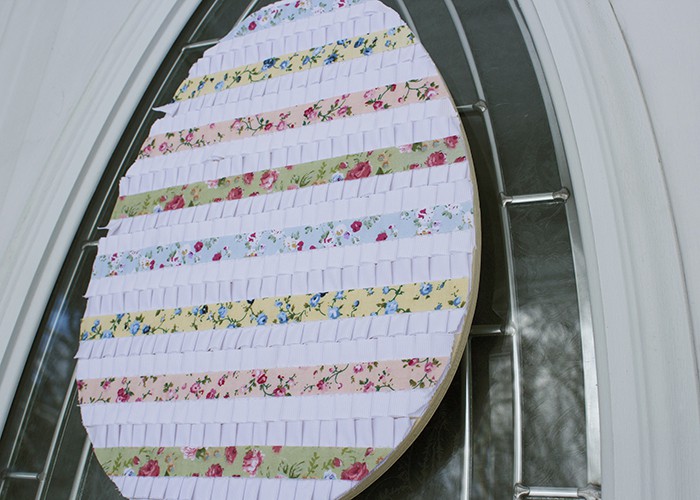
- I took a very laid back approach to this project- perfect is not needed with anything shabby chic. Next I roughly cut several strips of white trim slightly longer than the width of the base. Finally I glued a strip of my white ruffle trim as straight as I could horizontally across the middle of the egg base.
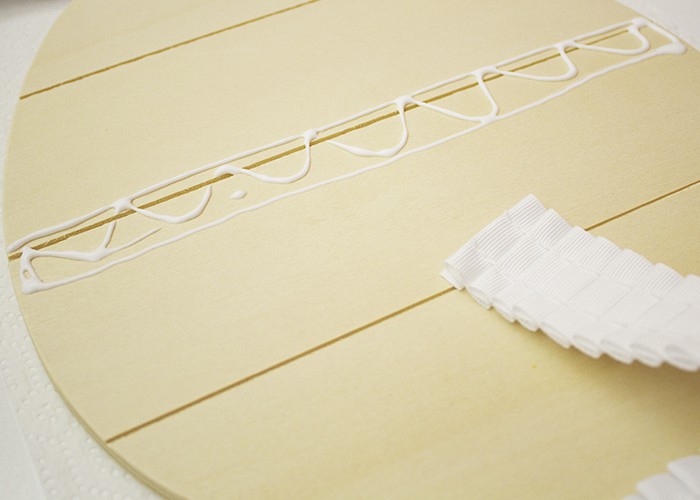
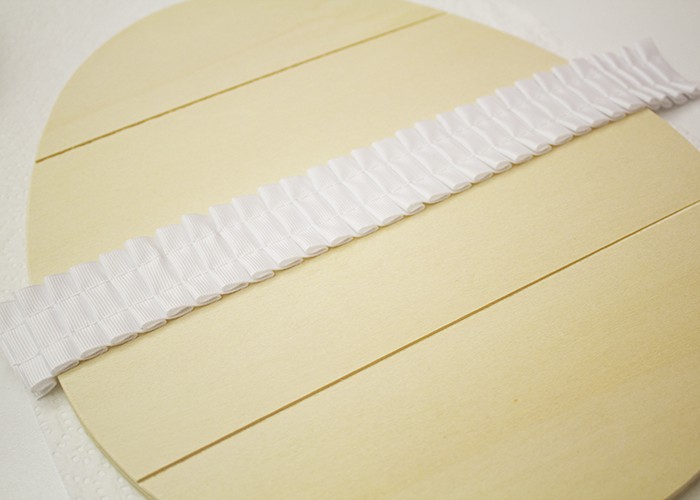
- Using that first strip as a guide, I glued additional white ruffles above and below. Completely fill the egg base with white ruffles, and allow the glue to dry completely.

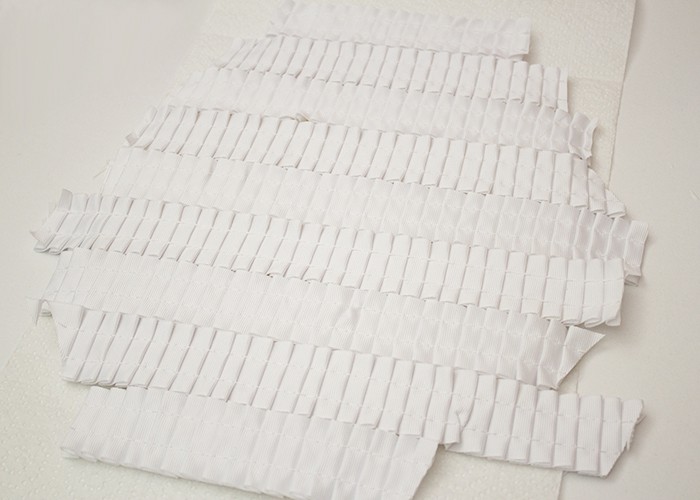
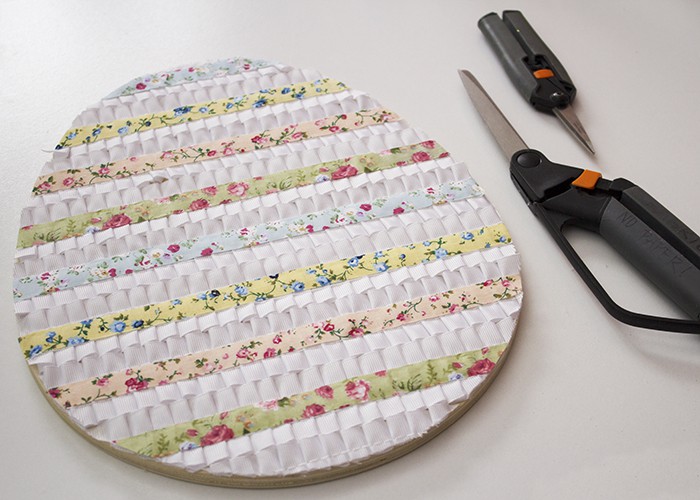
- After the glue was dry, I used scissors to carefully trim the ruffles down to the edge of the base.
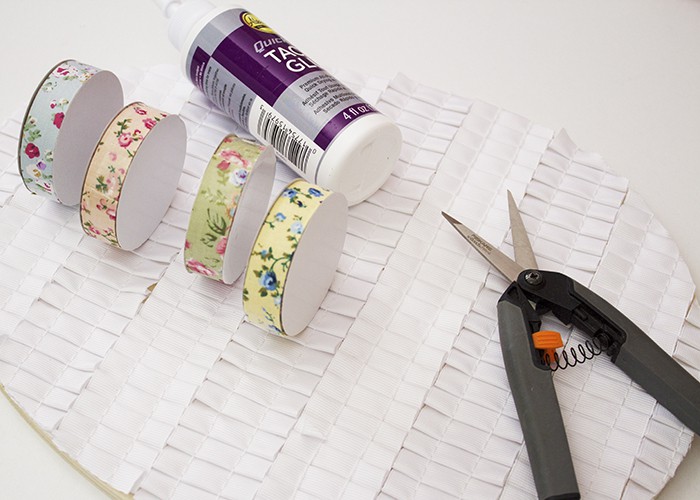
- Next, I essentially repeated steps 2 and 3 for the floral trim (instead of the ruffle). I cut the floral taping to lengths slightly wider than the base. I glued the strips down the center of the ribbon, replicating the designs found on decorated Easter eggs. When the glue was completely dry, I trimmed the excess.
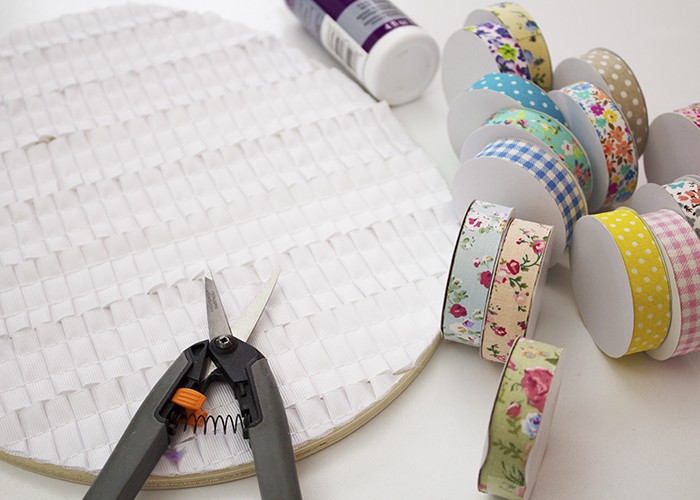

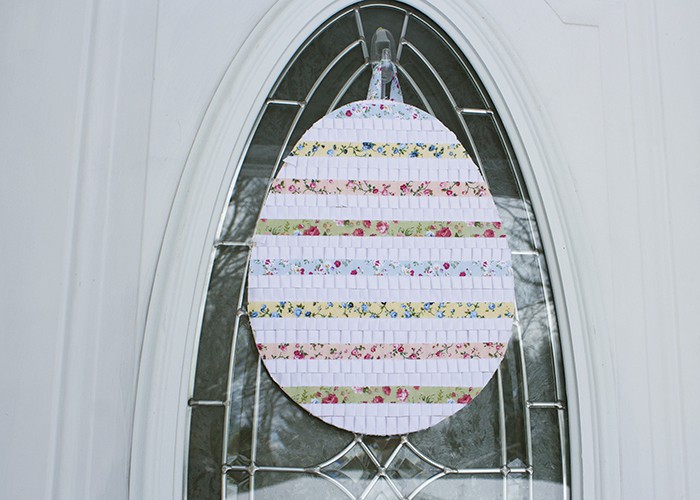
- Finally, I created a hanger using some additional floral taping. I added the loop to the back of the egg, and allowed the glue to dry completely.
- Once your hanger is in place, your shabby chic Easter egg decoration is ready to be hung. This looks great on a front door or is equally festive hanging within your home.
What sort of holiday decorations do you prefer- shabby chic like this, or something more modern? Let me know in the comments below!
-
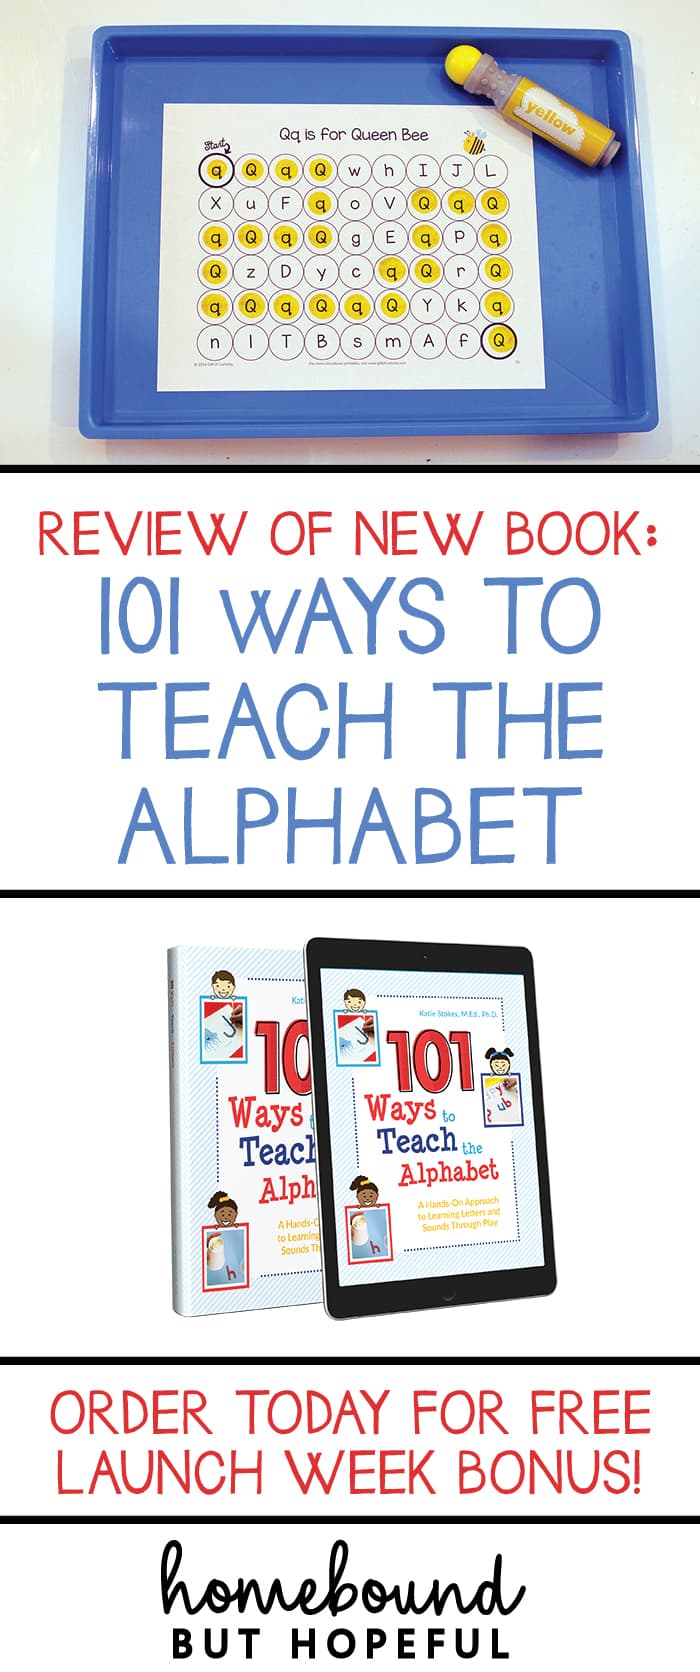
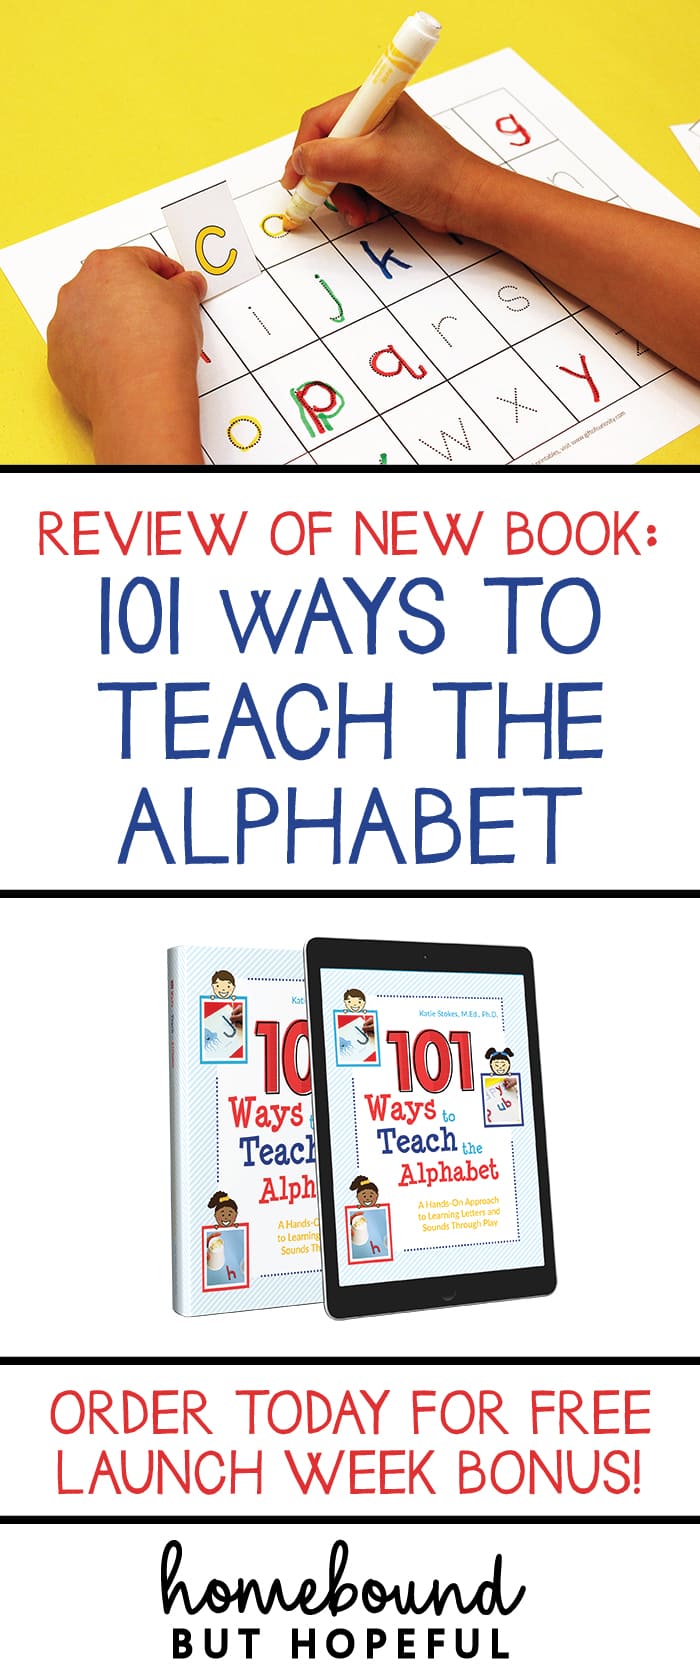
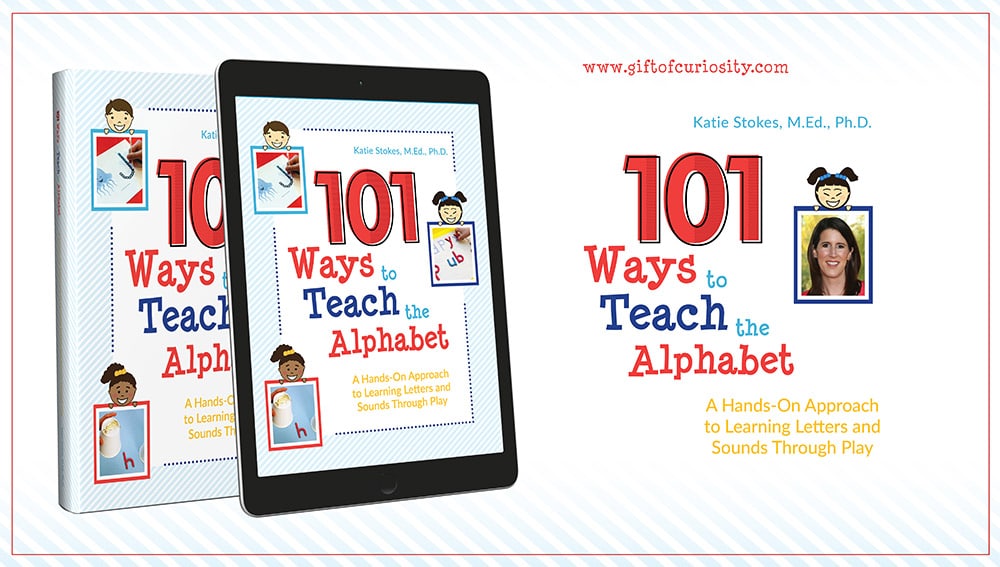
101 Ways to Teach the Alphabet (Review With Bonus!)

When #thebigone was young, I worked full time outside of the home. He attended educationally based daycare centers until I stopped working when he was four. The centers had high standards and strong curriculum, so I never worried about him learning his alphabet. Now that I am a stay at home mom I have #thelittleone with me full time. The pressure of making sure #thelittleone learns everything is slowly building. Without a background in education, I’m feeling unsure about my abilities to effectively teach him. Rationally, I know that playing and reading is exactly what kids need to learn. But the nervous mama side of me needs some concrete guidance. I was thrilled to discover 101 Ways to Teach the Alphabet, and am excited to be able to share it with you today.
Credit for all photos in this post: Gift of Curiosity
Standard Disclosure: This post contains affiliate links. I may receive a commission from purchases you make through the links in this post (at no additional cost to you), which allows me to continue providing free content on the blog.
101 Ways to teach the alphabet
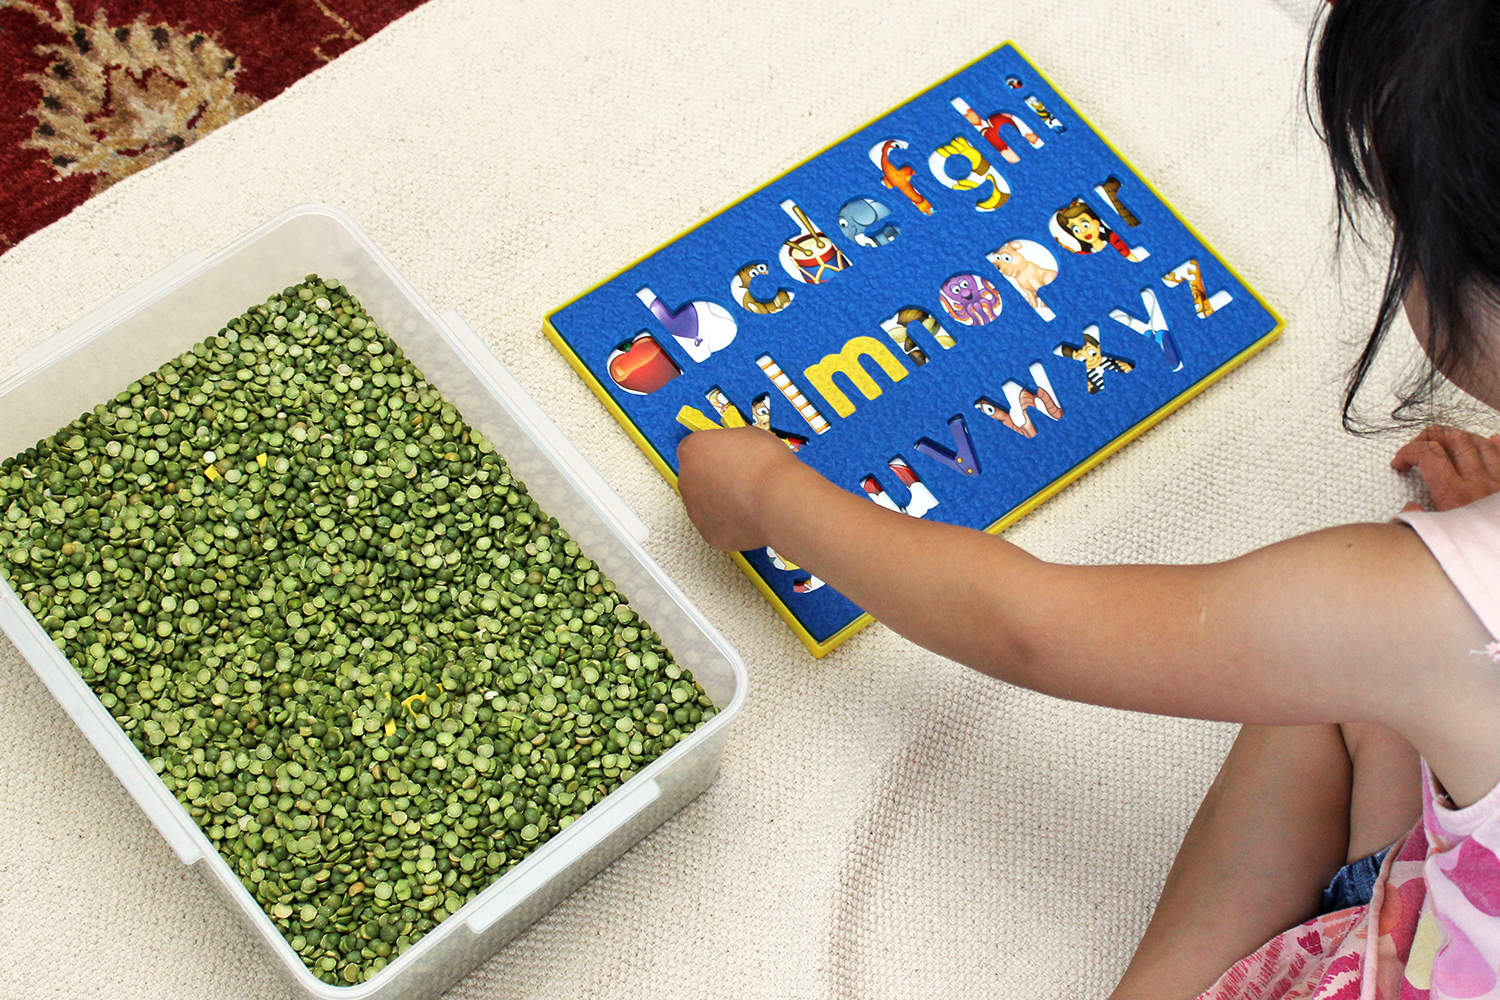
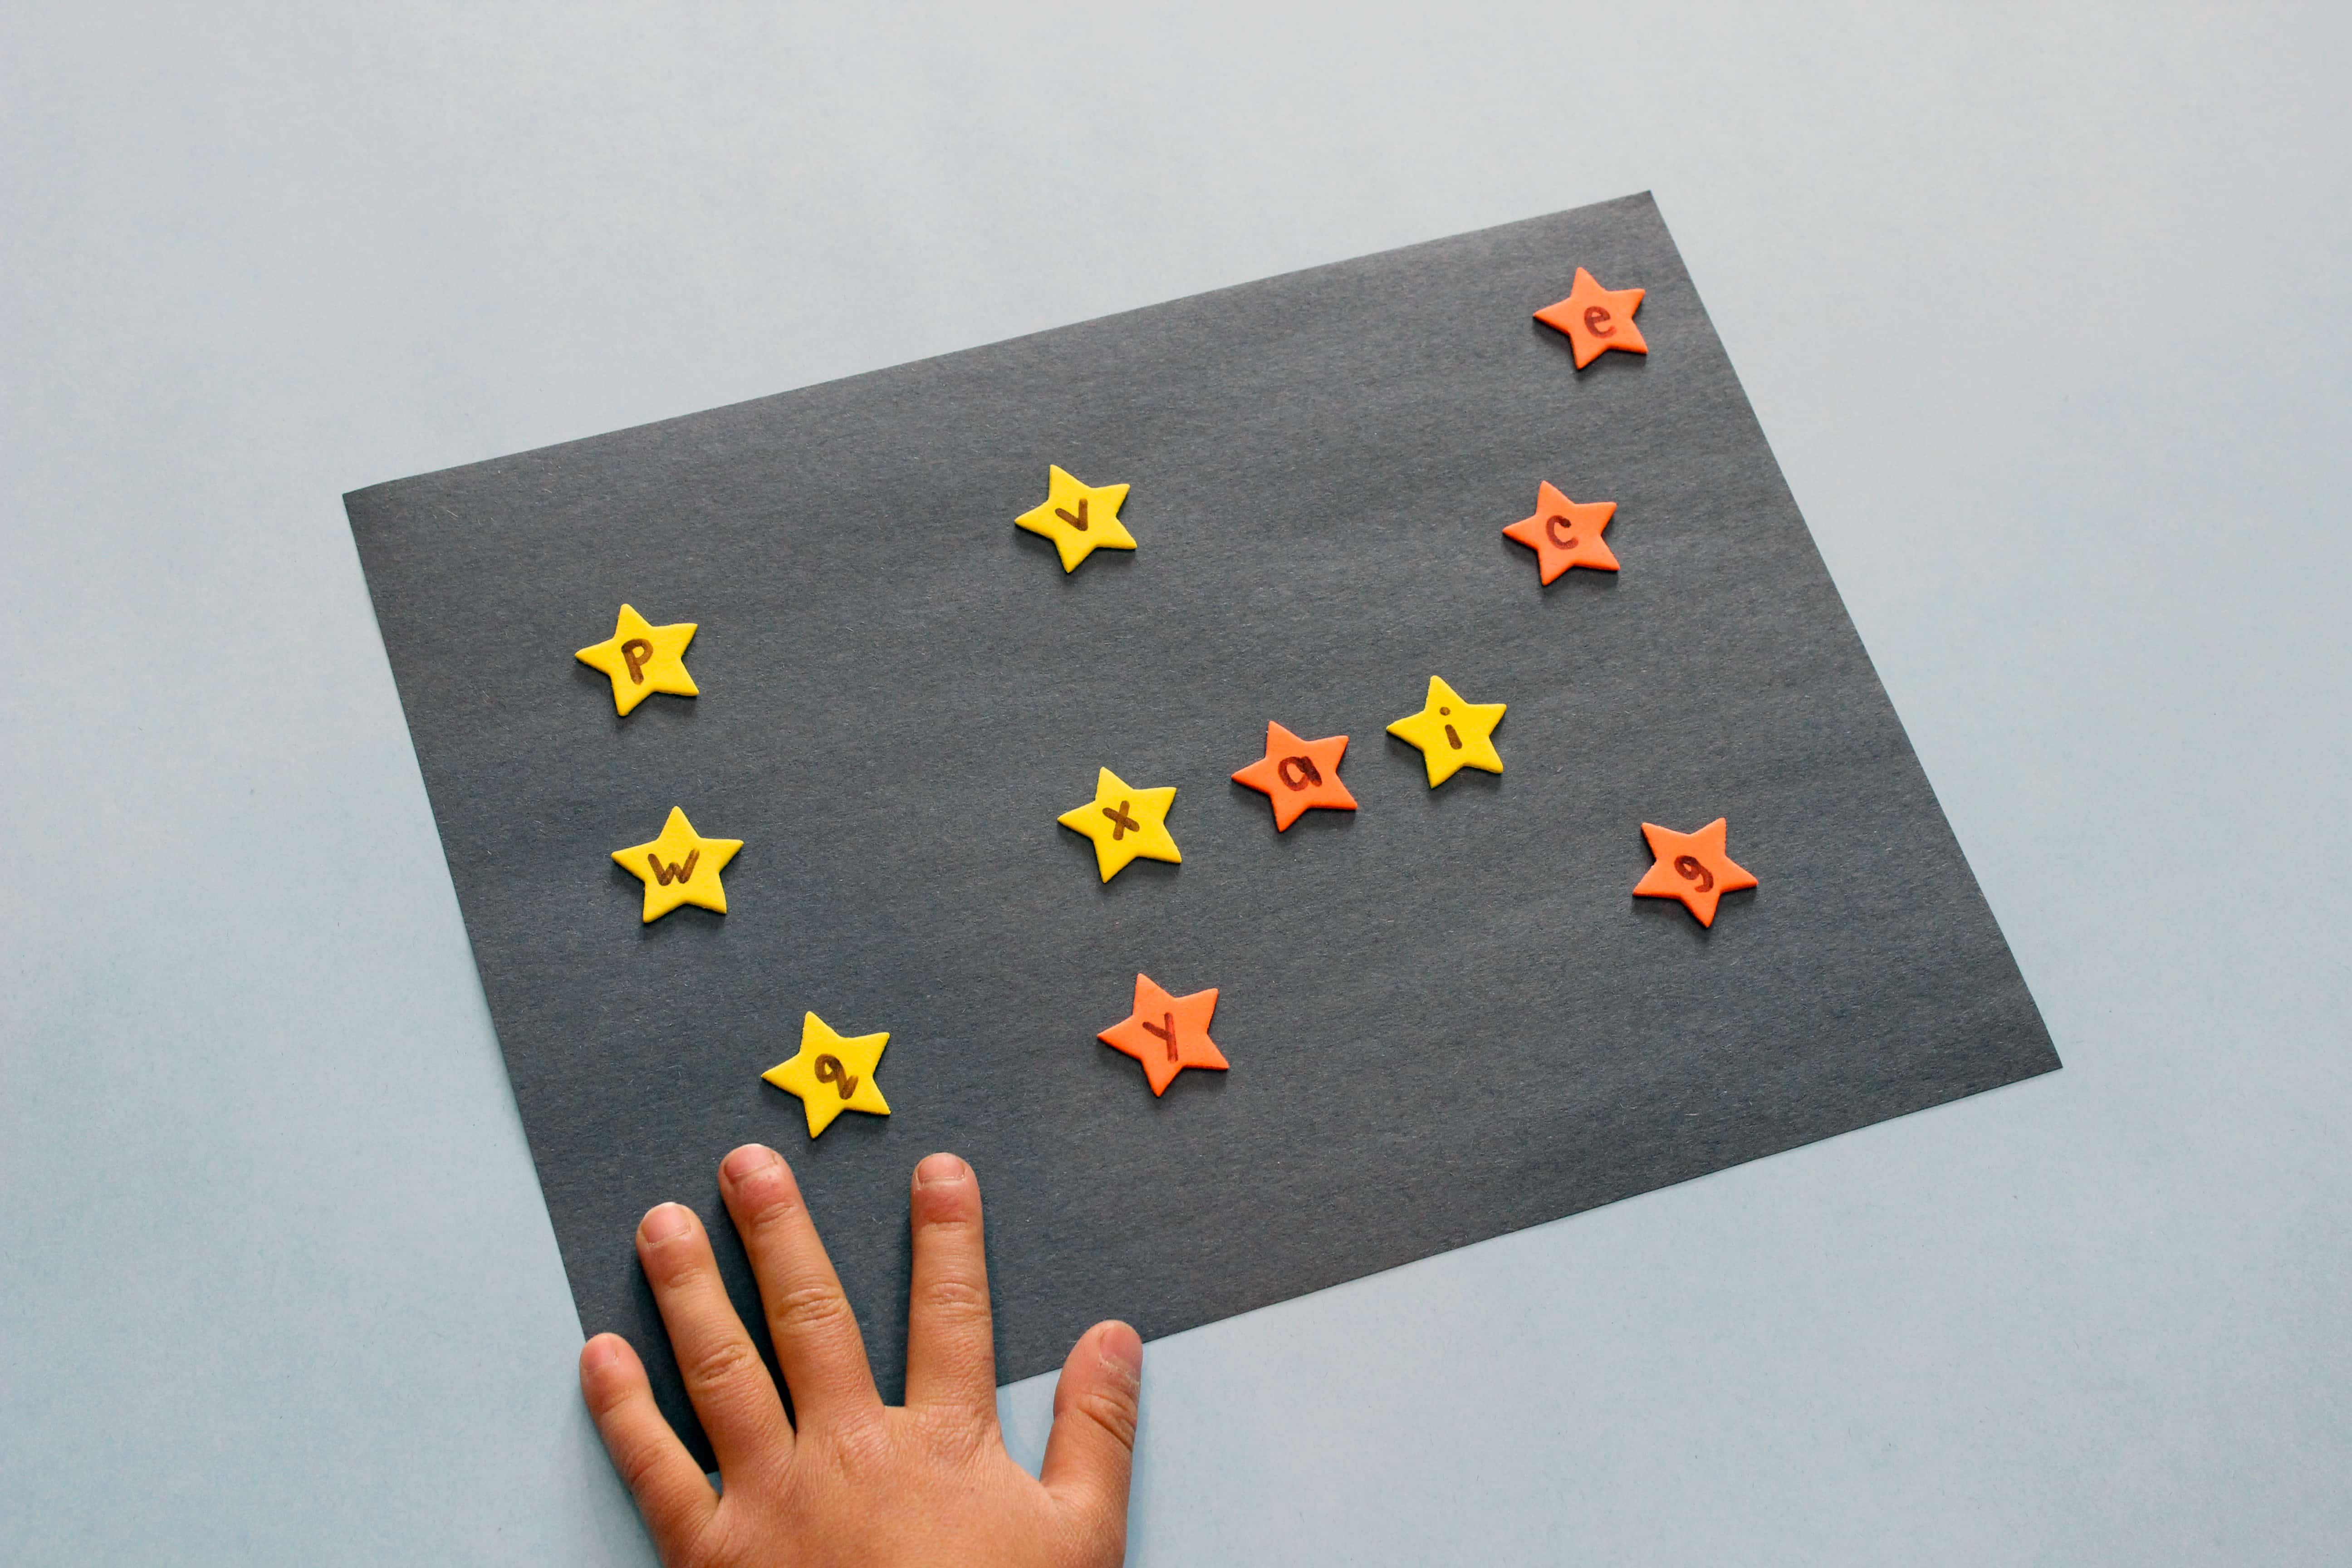
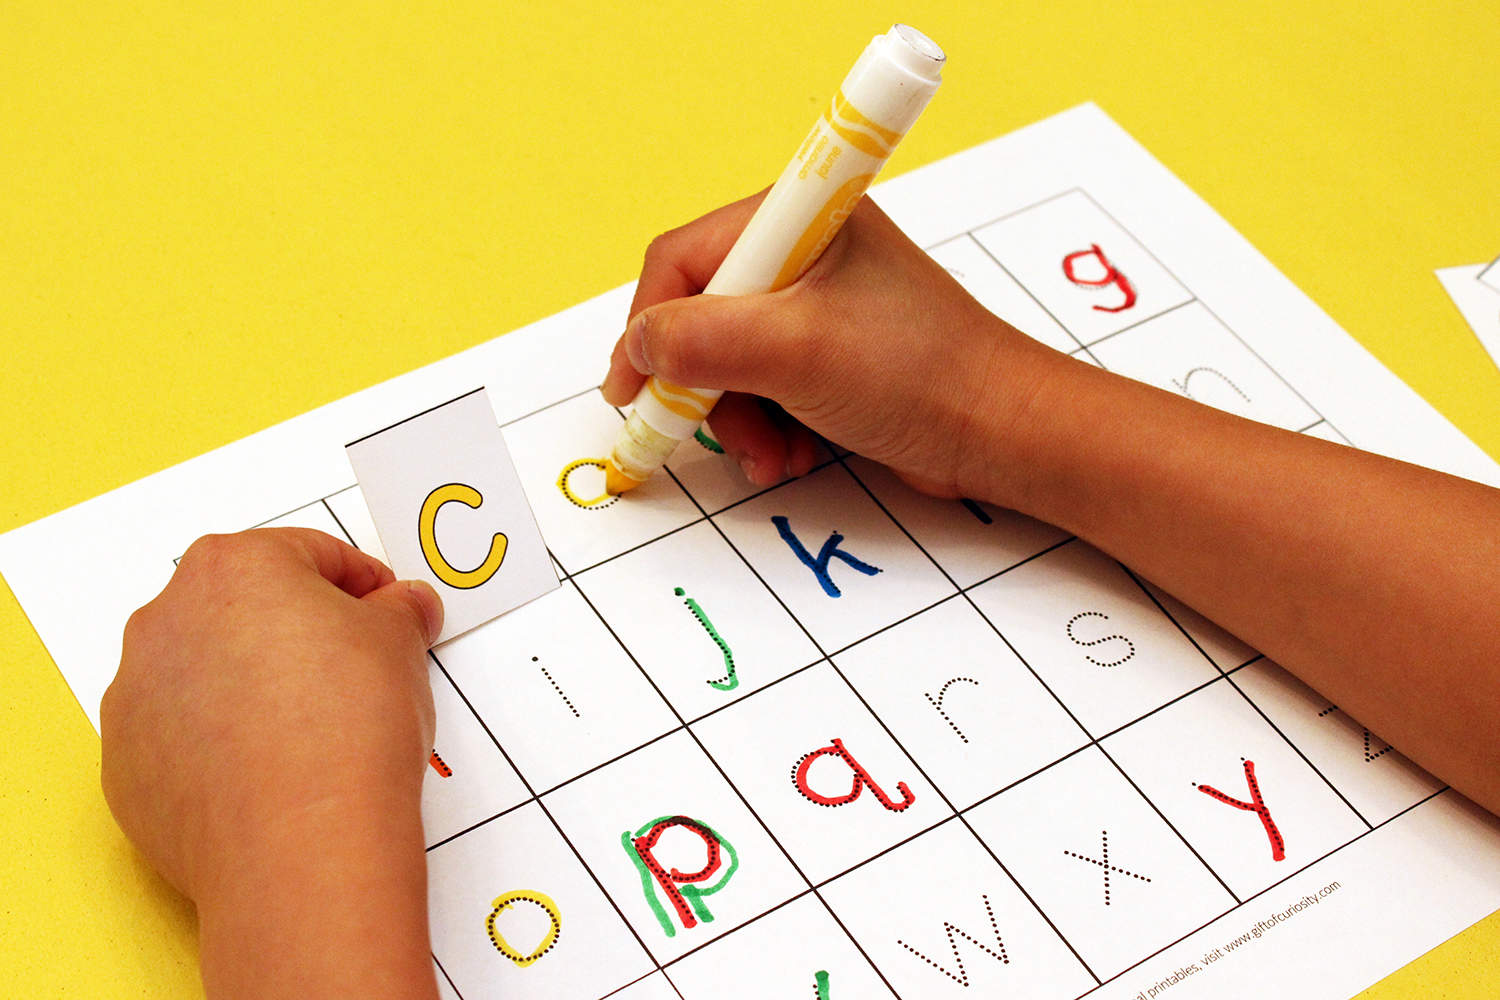
This brand new guide completely provides everything needed to help young children develop strong alphabet skills. The book was written by Katie Stokes from Gift of Curiosity, who has extensive training and experience in teaching young children, as well as being a mom herself. 101 Ways to Teach the Alphabet begins with the information needed as a foundation for parents. The book lays out what it means to truly learn the alphabet, what development with age may look like, and exactly why this strong knowledge base is so important for children. The guide is intended for kids 2 and older. It helps with a variety of skills, including identifying letters with their shapes, names, & sounds, writing letters, and matching capital & lowercase letters.
what’s Included?
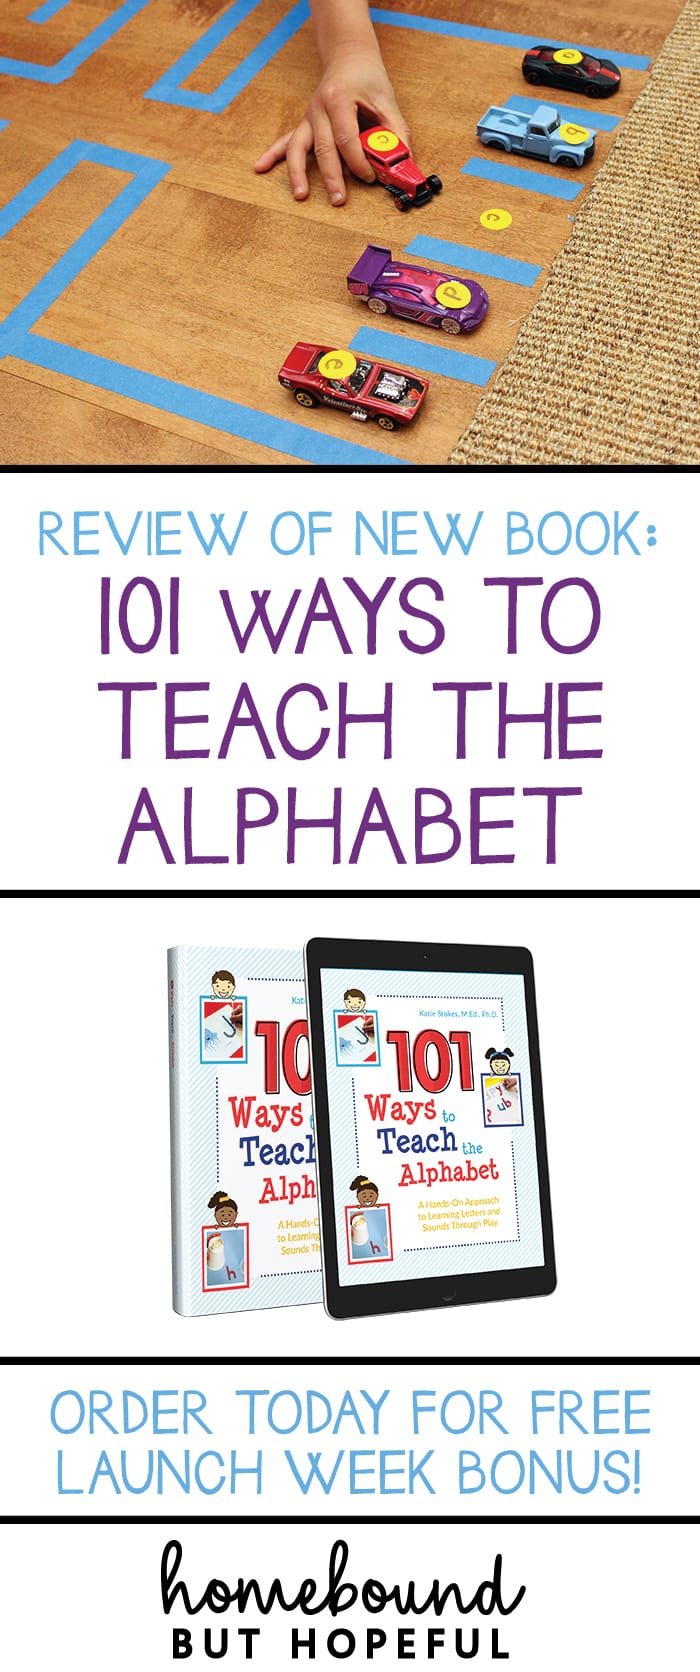
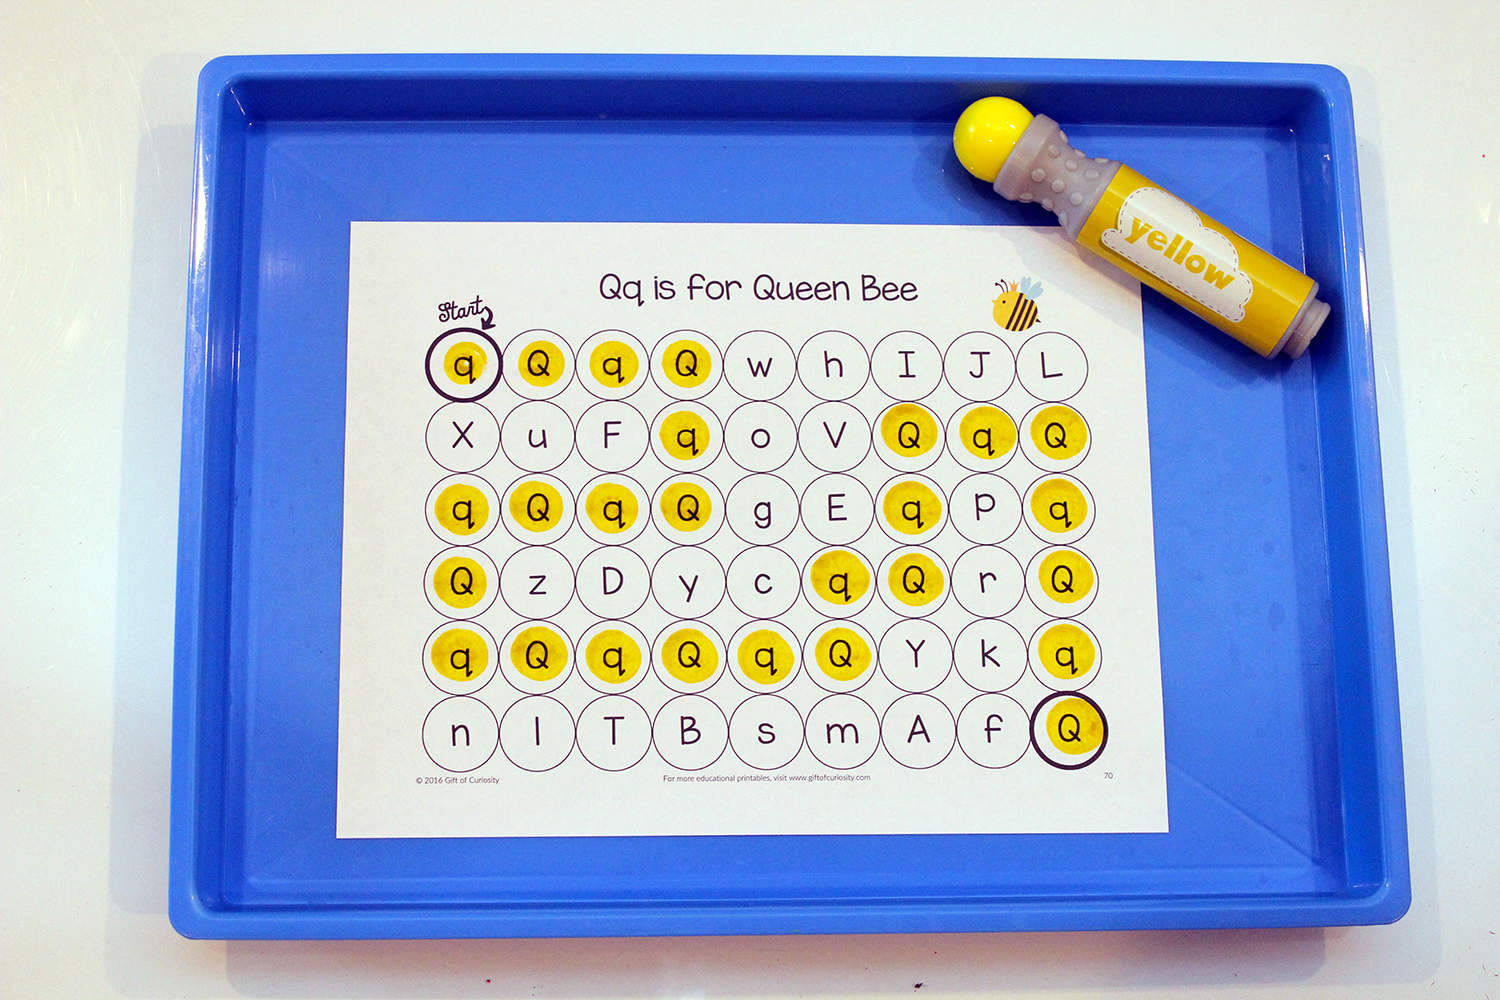
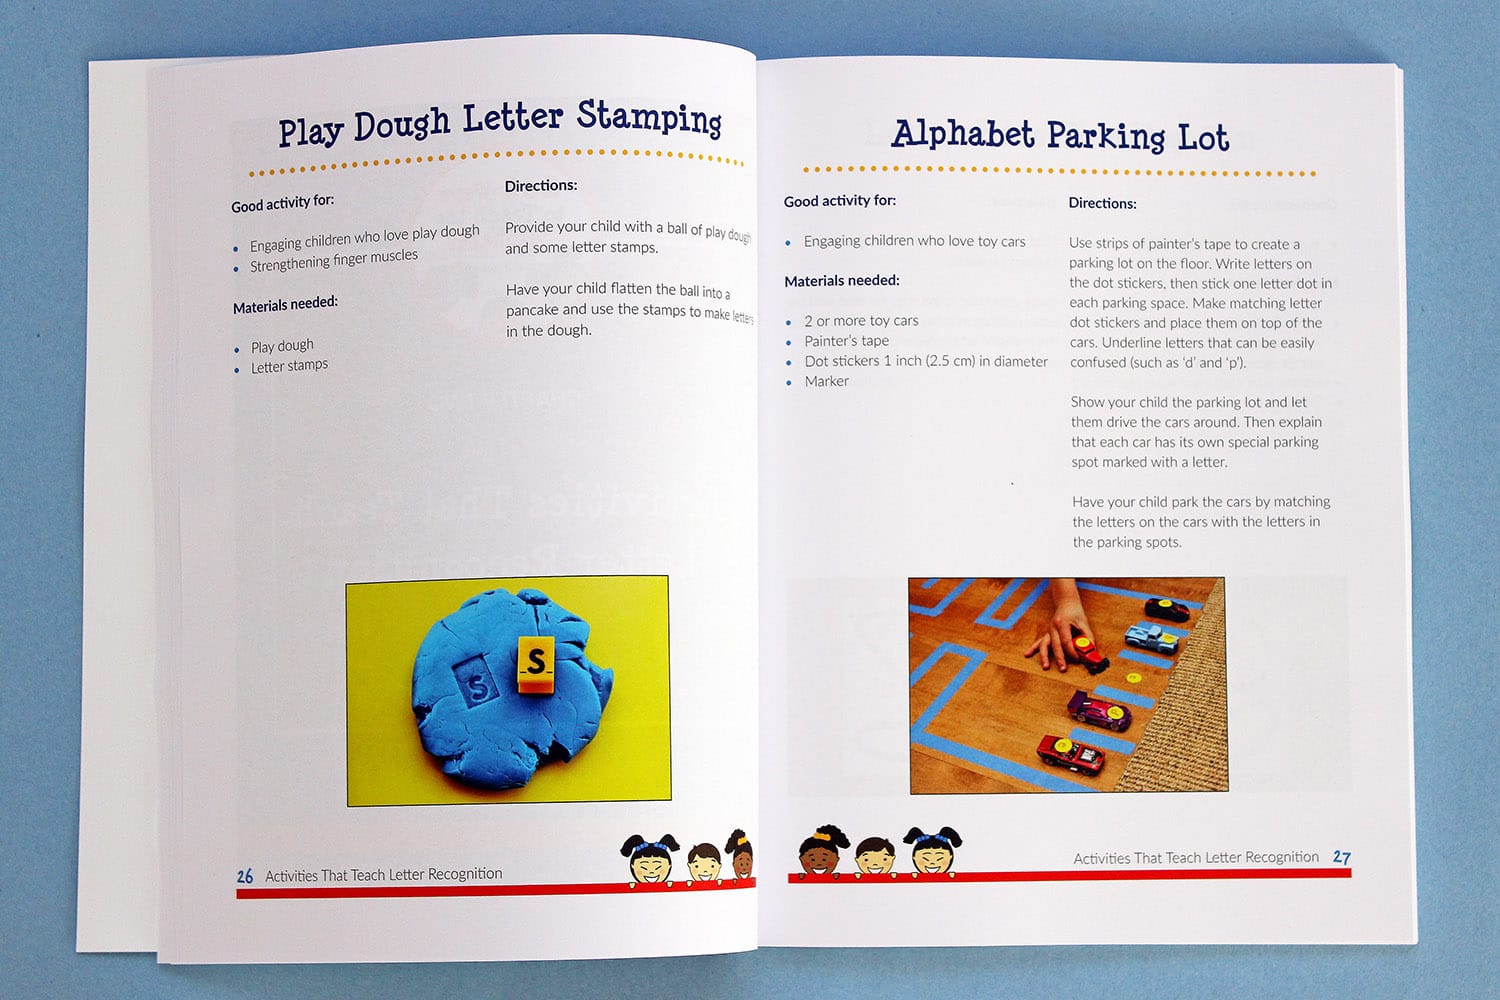
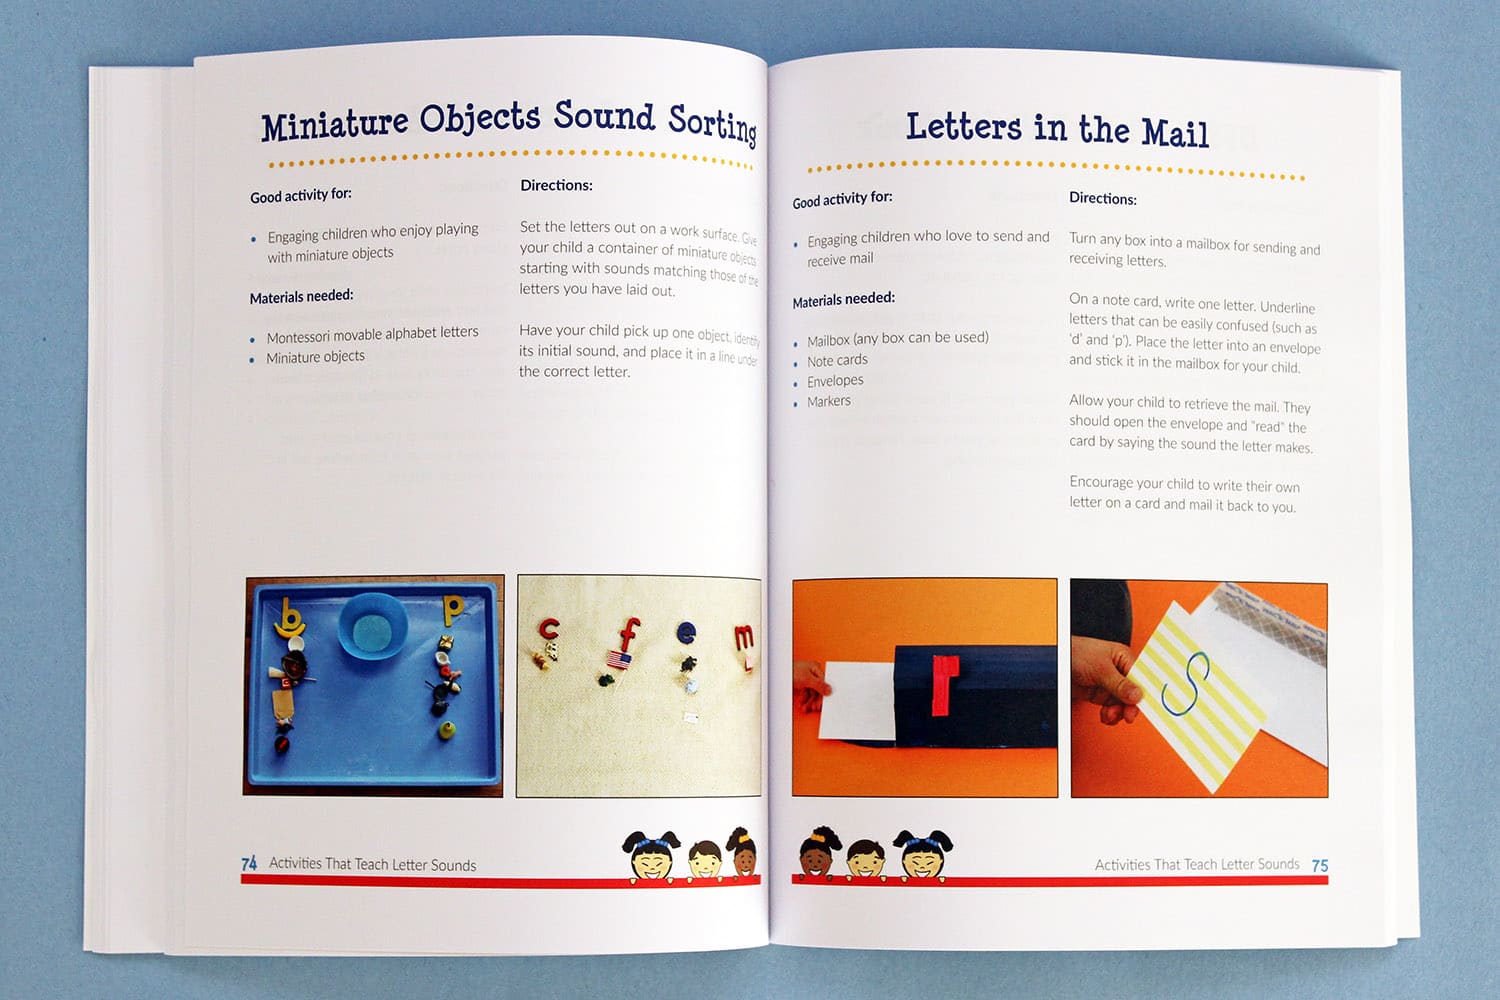
As the title suggests, it contains 101 ideas for activities that will help teach the alphabet. The activities take on a wide variety of formats. You’ll have no trouble finding some that interest your child, work with the supplies you have on hand, or fit the time frame you have available. The guide is perfect for parents, teachers, or any caregiver concerned with helping kids learn as much as possible. For craft-loving kiddos there are options that include do-a-dots, Play-Doh, and markers . Kids who love hands on play and movement might prefer the activities that involve squirt guns, hockey, or hopscotch. The list of ideas is incredible, and truly very diverse.

With 101 ideas to choose from, you’ll have no trouble keeping your children engaged while they are actively learning. Who needs ideas for the fast approaching summer break from school? (We do, for sure!) You could use a different activity to teach the alphabet every day and still have more to choose from! The book includes 800 (yes, 800) printable pages to accompany the alphabet activities, making it a truly complete guide. Be sure to check the rest of this post to hear about the special launch week free bonuses being offered as well!
Although the book officially launched early this morning, I was lucky enough to get an early peek at it. The value of this product is incredible. I will be able to 101 Ways to Teach the Alphabet with #thelittleone straight through until he starts kindergarten. How often can you buy one package of learning materials and use them for 3 or 4 years without you or your kids getting bored?! For families with multiple children, it’s going to be a great investment. You can adapt the activities to include all your children, allowing them to play and learn together. For families that recognize the importance of a strong familiarity with the alphabet in relation to literacy, 101 Ways to Teach the Alphabet is the perfect choice.
Gotta Have it?
To celebrate the launch of 101 Ways to Teach the Alphabet, Katie is offering a discount and bonus goodies to any readers who purchase the electronic version by 10pm PST on April 2. Buyers will save $5, making their price $14.97. They’ll receive 3 bonuses- Letter Knowledge Assessment Pack, Letter Sounds Cards, and a Letter Reversal Tool Kit.
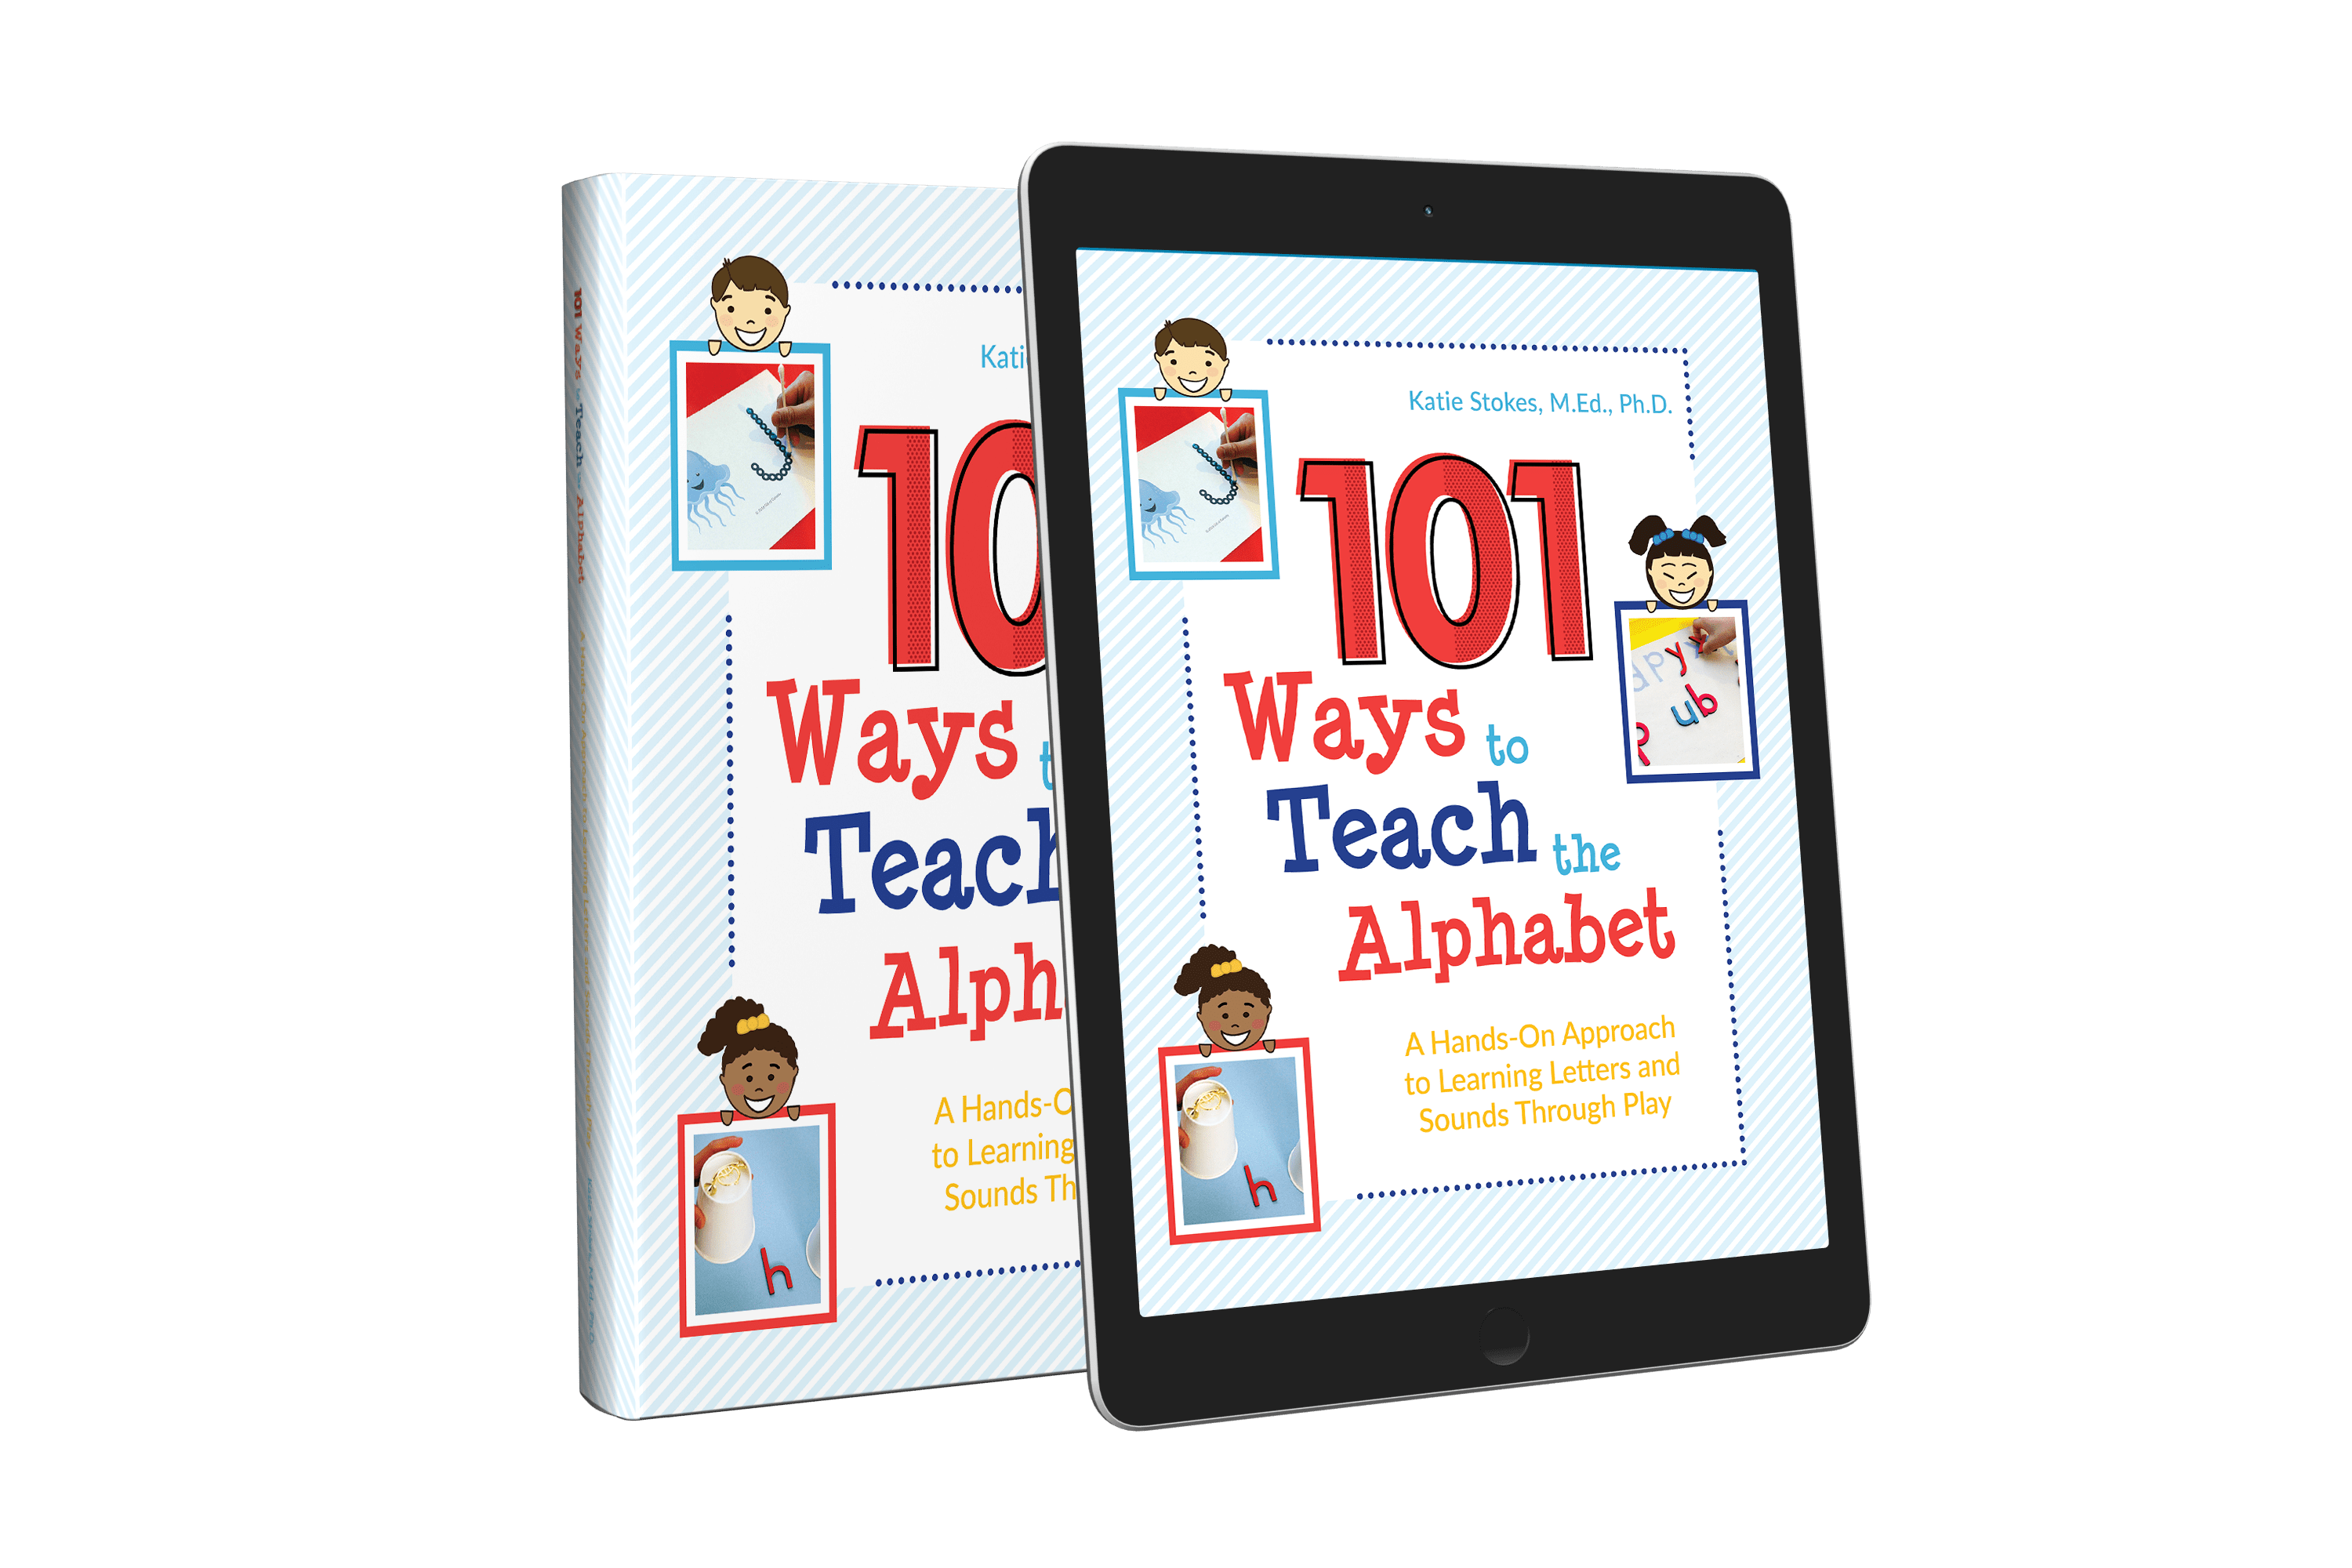
If you’re a bit old school like me, and prefer the physical version of books, that is also available. Although the savings will not apply to this purchase, you can email your purchase receipt to katie@giftofcuriosity.com to claim the 3 bonuses mentioned above. Both options are an excellent deal, so be sure to choose the format you are most likely to use with your family!
Grab your e-book edition from Gift of Curiosity here!
*** (There have been some intermittent technical issues occurring with the direct link to the e-book.
You may have better luck accessing the book through this link, or accessing the store here and scrolling down to ‘Shop All Products’!) ***Visit Amazon.com to pick up your hard copy of the book!
Don’t need to tackle the alphabet but still looking for ways to help your children learn more? Check out Gift of Curiosity’s extensive shop of low-cost printables! There’s bound to be a topic to spark your child’s interest and actively engage them in learning! (Lots of freebies too!)
-
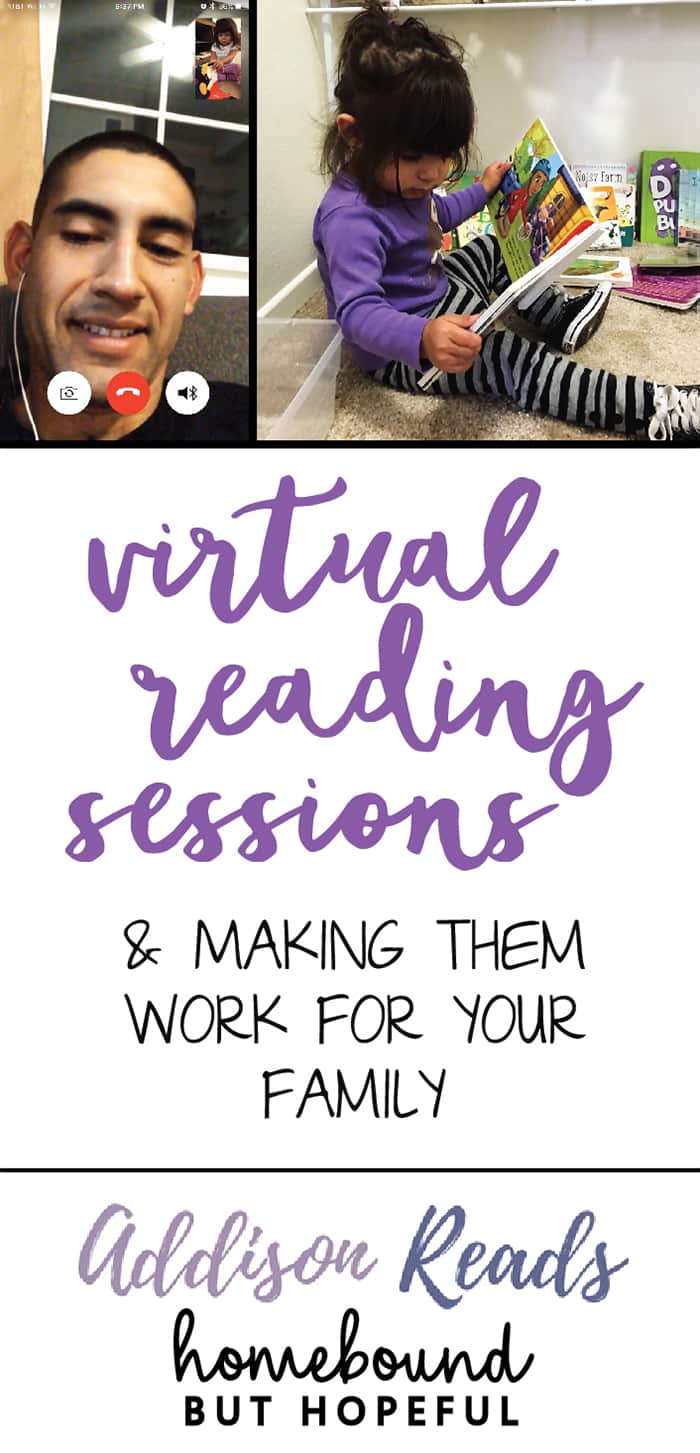
Making Virtual Reading Sessions Work For Your Family
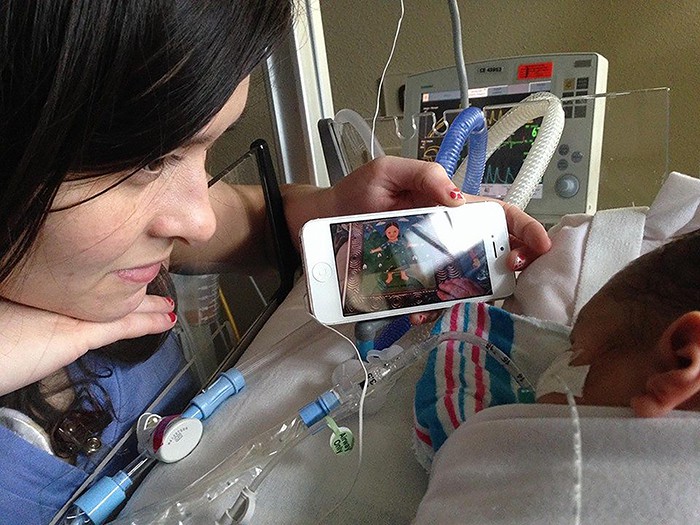
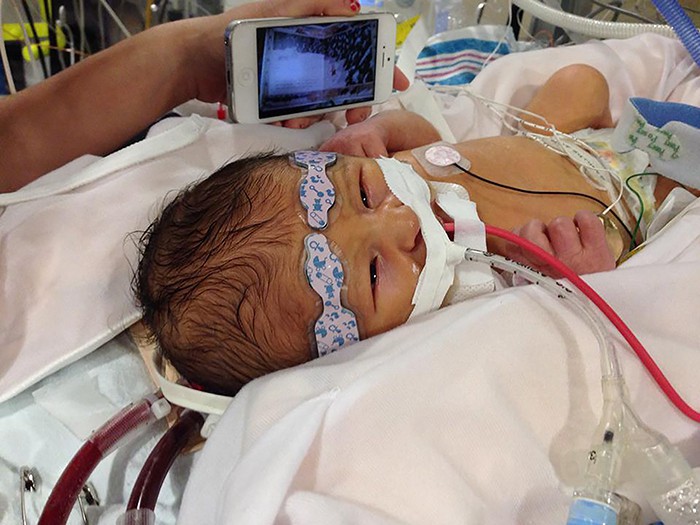
So, let’s be honest. I don’t come across a lot of parents at the playground that geek out about kid lit quite like I do. As a result, one of the best parts of beginning this whole blogging journey has been connecting with some amazing like-minded mamas and papas. Today I’m thrilled to be sharing a guest post from one-such-mom. Samantha Munoz of Addison Reads is sharing her take on virtual reading sessions. These high-tech story times are special in our home as well. They allowed #thebigone, #thehubs, and myself to read to our nephew when he was still a tiny little squish in the NICU. If you’re a family who struggles to make regular read-a-louds work (whether due to complicated schedules or distance), Samantha has the solution for you.
Virtual Reading Sessions
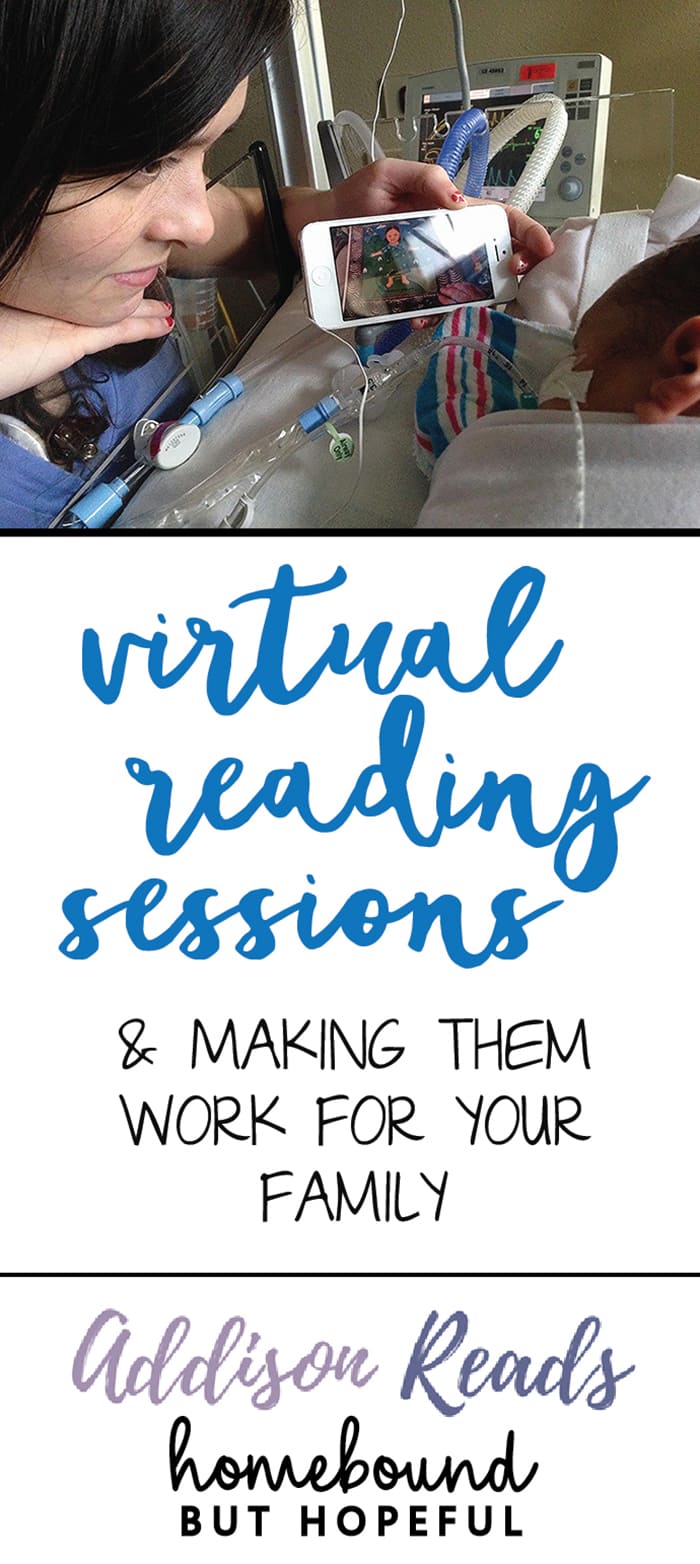
Reading with your children brings about such a closeness and intimacy that many other activities do not even come close to providing. Typically, it’s the physical closeness that reading requires (sitting next to one another, close enough to both see the words and illustrations), but it’s also an emotional closeness. Talking about the stories or laughing about the predicaments of the characters makes way for a close, deep-rooted connection with your child.
But what do you do when the physical closeness is lost, when you cannot be together in person, but still want to reap the benefits of reading with your little one? As a military family, we have dealt with this head on. My husband, daughter and I incorporate reading together into our daily lives and hold that time sacred. But we have had to get creative as we have been separated by distance. We have figured out a way to make it work with “virtual reading sessions”. I want everyone else who finds themselves in a similar situation to take back the closeness of reading together.
What is a “Virtual Reading Session”?
A virtual reading session is just what it sounds like, reading with someone – virtually! Instead of being physically present reading a book together, a video interface is used to enjoy the reading experience. There are a couple of ways you might set one of these up for yourself, Depending on the circumstance, one may be more preferable than the other. The two ways are: live or recorded.
Live
Thanks to the existence of technology, a live reading session can be achieved pretty easily if you have a smart phone or computer. Most video programs are free and include:
- Skype
- FaceTime
- Zoom
- Google Hangouts
- Facebook Video Messenger
and more! We like to use FaceTime for our reading sessions because it is on my cell phone and really easy to use. Although, and this is totally a tangent, it would be so nice if there was a “FaceTime Jr” that disabled the end call button – too often my little Addison has accidentally turned off a call with daddy by clicking that very tempting large red button.
Recorded
If a live session is just out of the question (maybe the reader is in a totally different time zone or in a place where they cannot make live calls), a recorded reading session can work just as well. Again, having a phone or computer at this point can pretty much take care of recording the video for you. Simply record a video of you reading the book and send it along in an email or text message. The benefit of recorded videos is that they can be played again and again, which is great if communication is infrequent. Having a stash of 5 recorded reading sessions to cycle through can really make it feel like that special person isn’t so far away at all.

Why do a Virtual Reading Session?
That last part really gets into the “why” of virtual reading sessions – why would someone do this and why does it matter? There are tons of situations that may be cause for engaging in a virtual reading session, and as a military family we have experienced a ton of them. Here are some possible reasons to do a virtual reading session:
- Deployments
- Business trips
- Vacations
- Hospital stays
- Divorces or Separations
Integrating reading into your child’s daily life is a wonderful way to engage with them and build lasting connections and memories. Just because someone is far away does not mean they should miss out on the opportunity to build that relationship with your little one. Thank the good Lord for technology, because now we do not have to go without.
When Addison’s dad is with us and not out doing training or work related adventures, we read every night as a family. It is very important to us to maintain consistency for her. Having reading as a constant makes things a little easier when everything else seems to be changing in her little world. Enter our virtual reading sessions – we try to do them as often as we can to recreate the experience of reading together. Sometimes we have to do recorded ones simply because it’s the nature of the beast of this military lifestyle. When we get those sacred live reading moments, we soak them up.
Who can do a Virtual Reading Session?
The real answer is, anyone! But I know you did not come to this article to hear that. If you really think outside the box, there are so many people who can hold a virtual reading session:
- Parents
- Grandparents
- Aunts & Uncles
- Siblings
- Teachers
Solo parenting can be super difficult (trust me, I know from experience). Incorporating my husband into our reading time makes me feel like my partner is still there and we are a team. This could even work for separated families – having mom or dad record a video of them reading a book can help bring the family together if only for a moment. Grandparents, aunts, uncles, and siblings who are far away can join in and build the connection with your child by reading to them.

Virtual Reading Session Process
If you’re ready to set up a virtual reading session, here’s a quick process you can follow.
- Send the virtual reader some books or have them choose some to surprise the child
- Set up a special moment, put it on the calendar (if live) or have a time when the child should expect to receive the recorded version
- For the person with the child, engage with them and encourage them to communicate as much as possible
- For the reader, be energetic and cheery. Read the book facing the camera and don’t be afraid to have some fun with it (silly voices, multiple books, etc.)
- Set a time to do some more – have the child involved in choosing the next books and set up an order for them to be delivered!
Have you ever held a virtual reading session? What technology did you utilize? Would you do it again?

 Samantha Munoz is a mother, wife, engineer, bibliophile and avid coffee drinker. She is also the expert kid’s lit curator at Addison Reads and author of The Intentional Bookshelf. Sam writes children’s book reviews to guide parents as they search for the perfect books for their little ones and helps moms and dads build a library with a purpose. Once a seriously overwhelmed and stressed out parent herself, Sam turns to children’s literature for the answers to all of her parenting dilemmas. She currently lives in sunny California but loves when it rains because it gives her an excuse to stay inside and read with her daughter!
Connect with Samantha: Instagram / Facebook / Pinterest
-
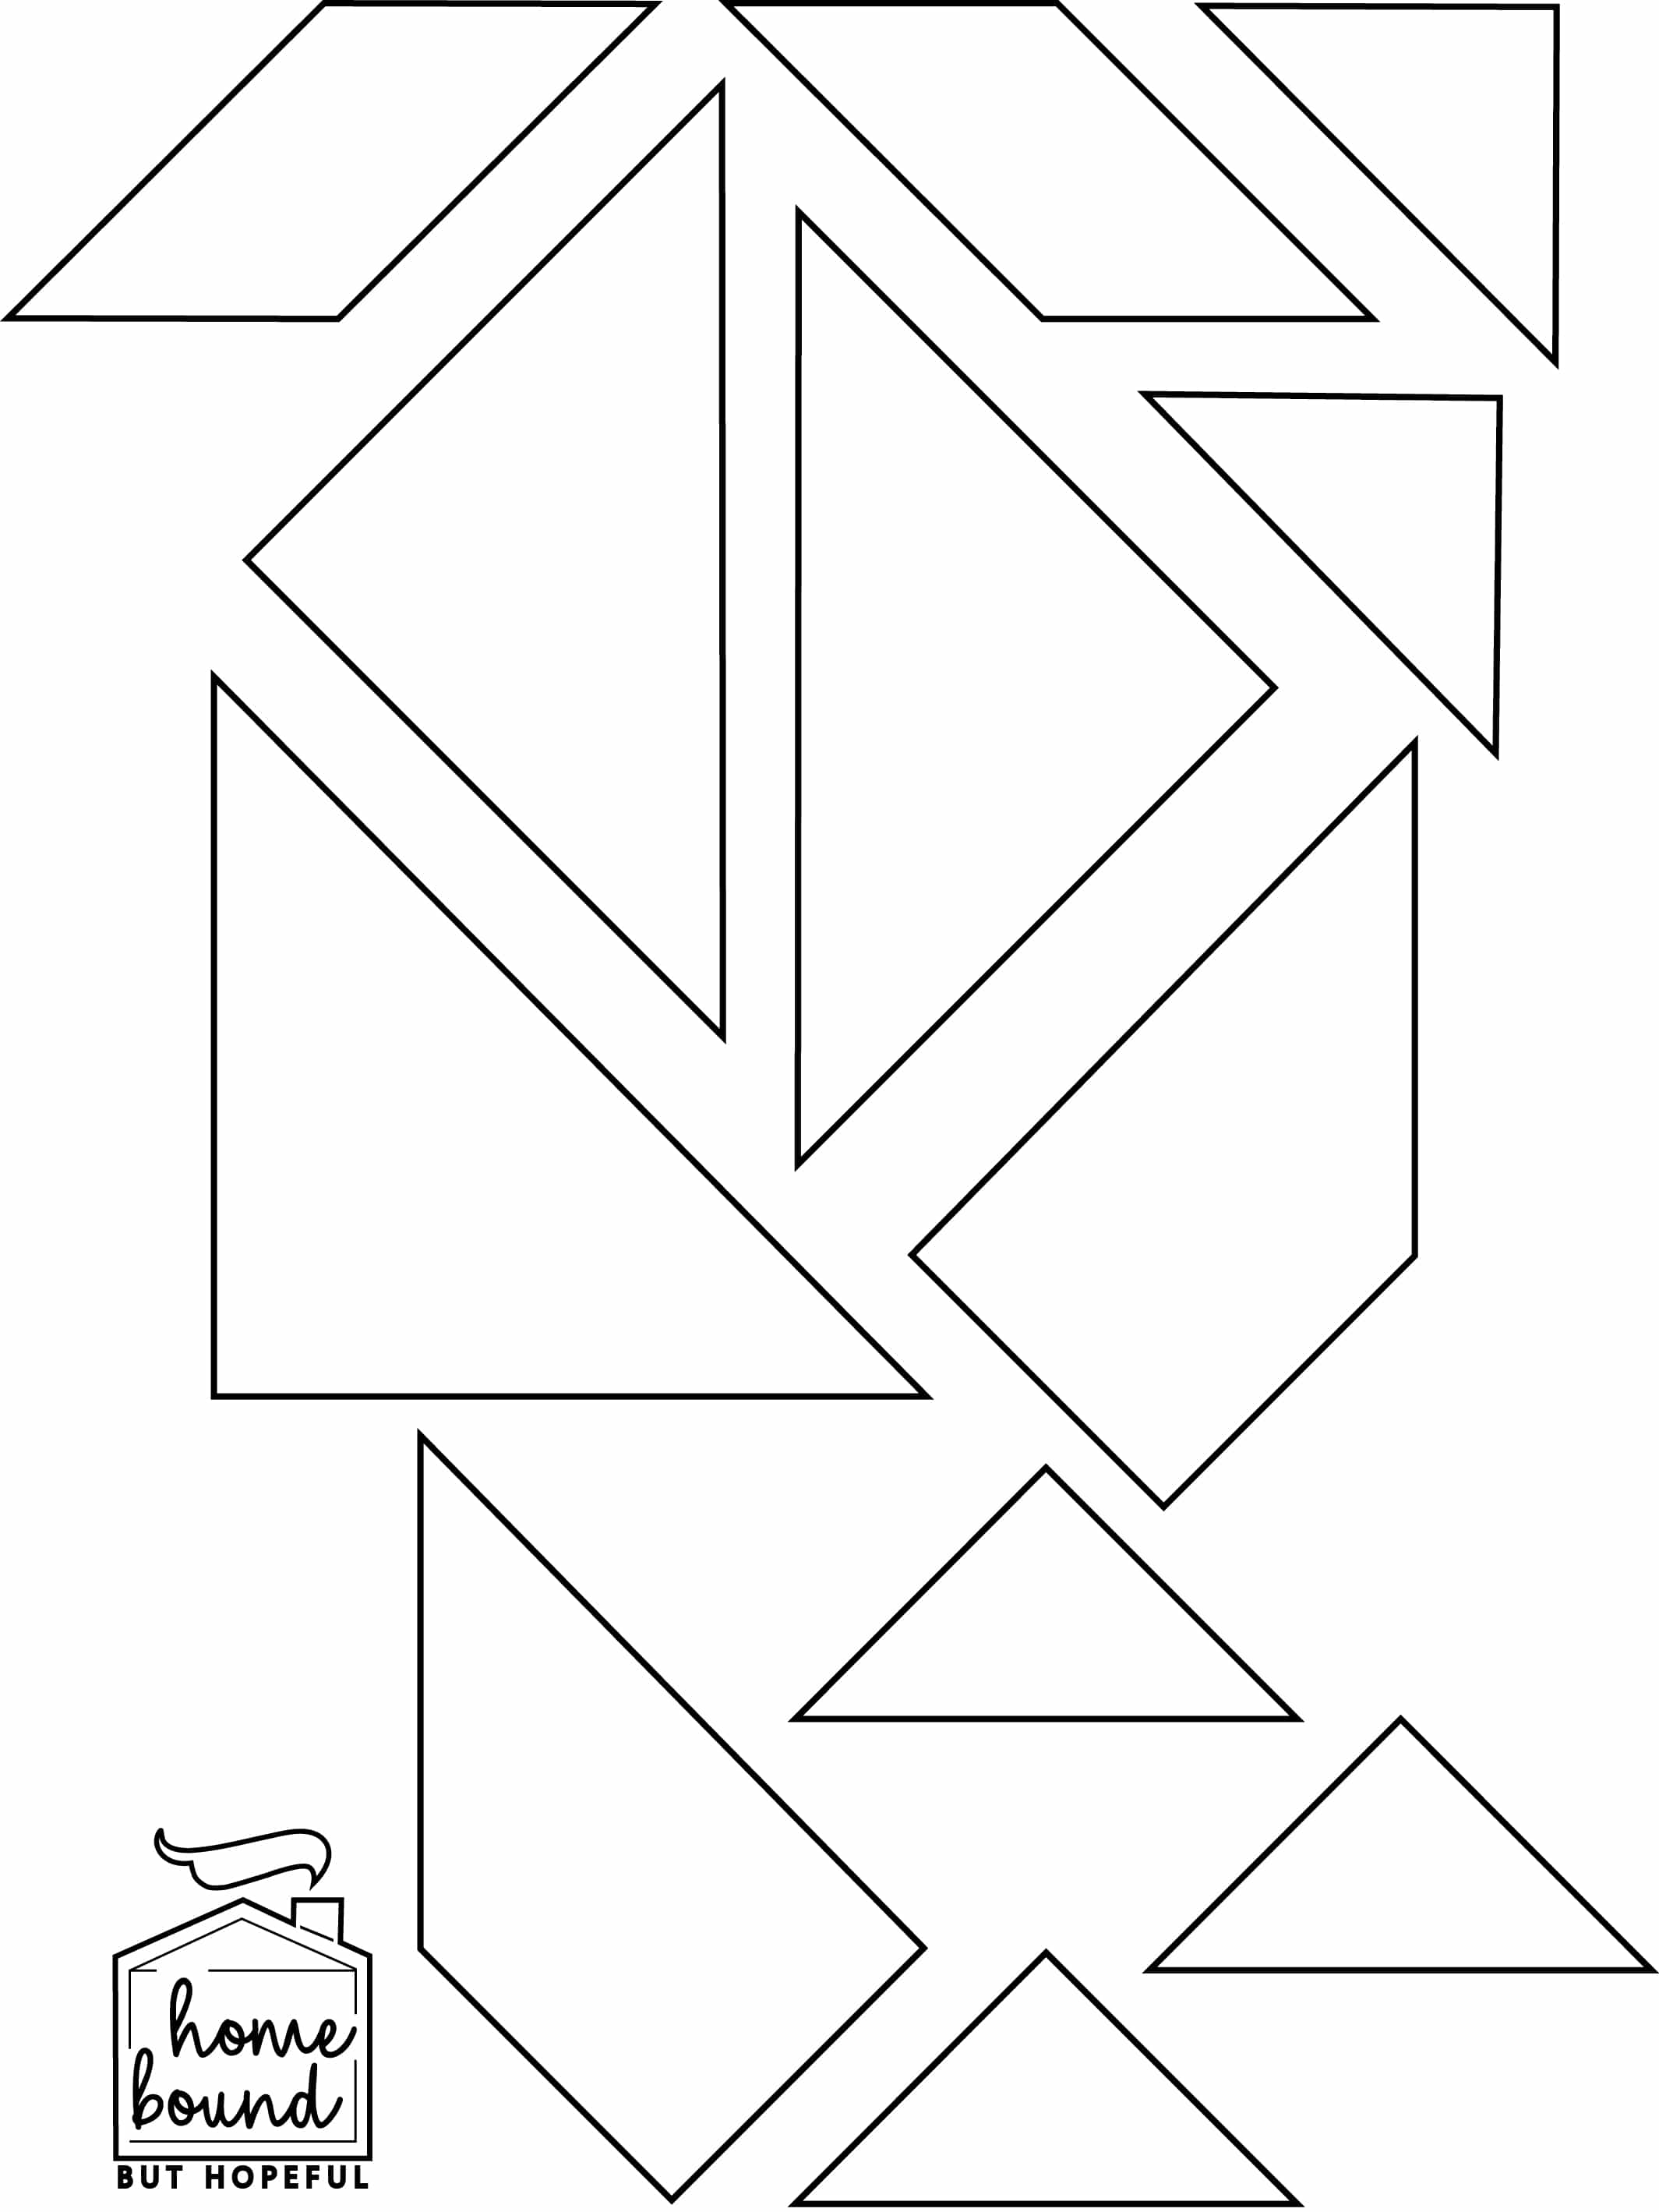
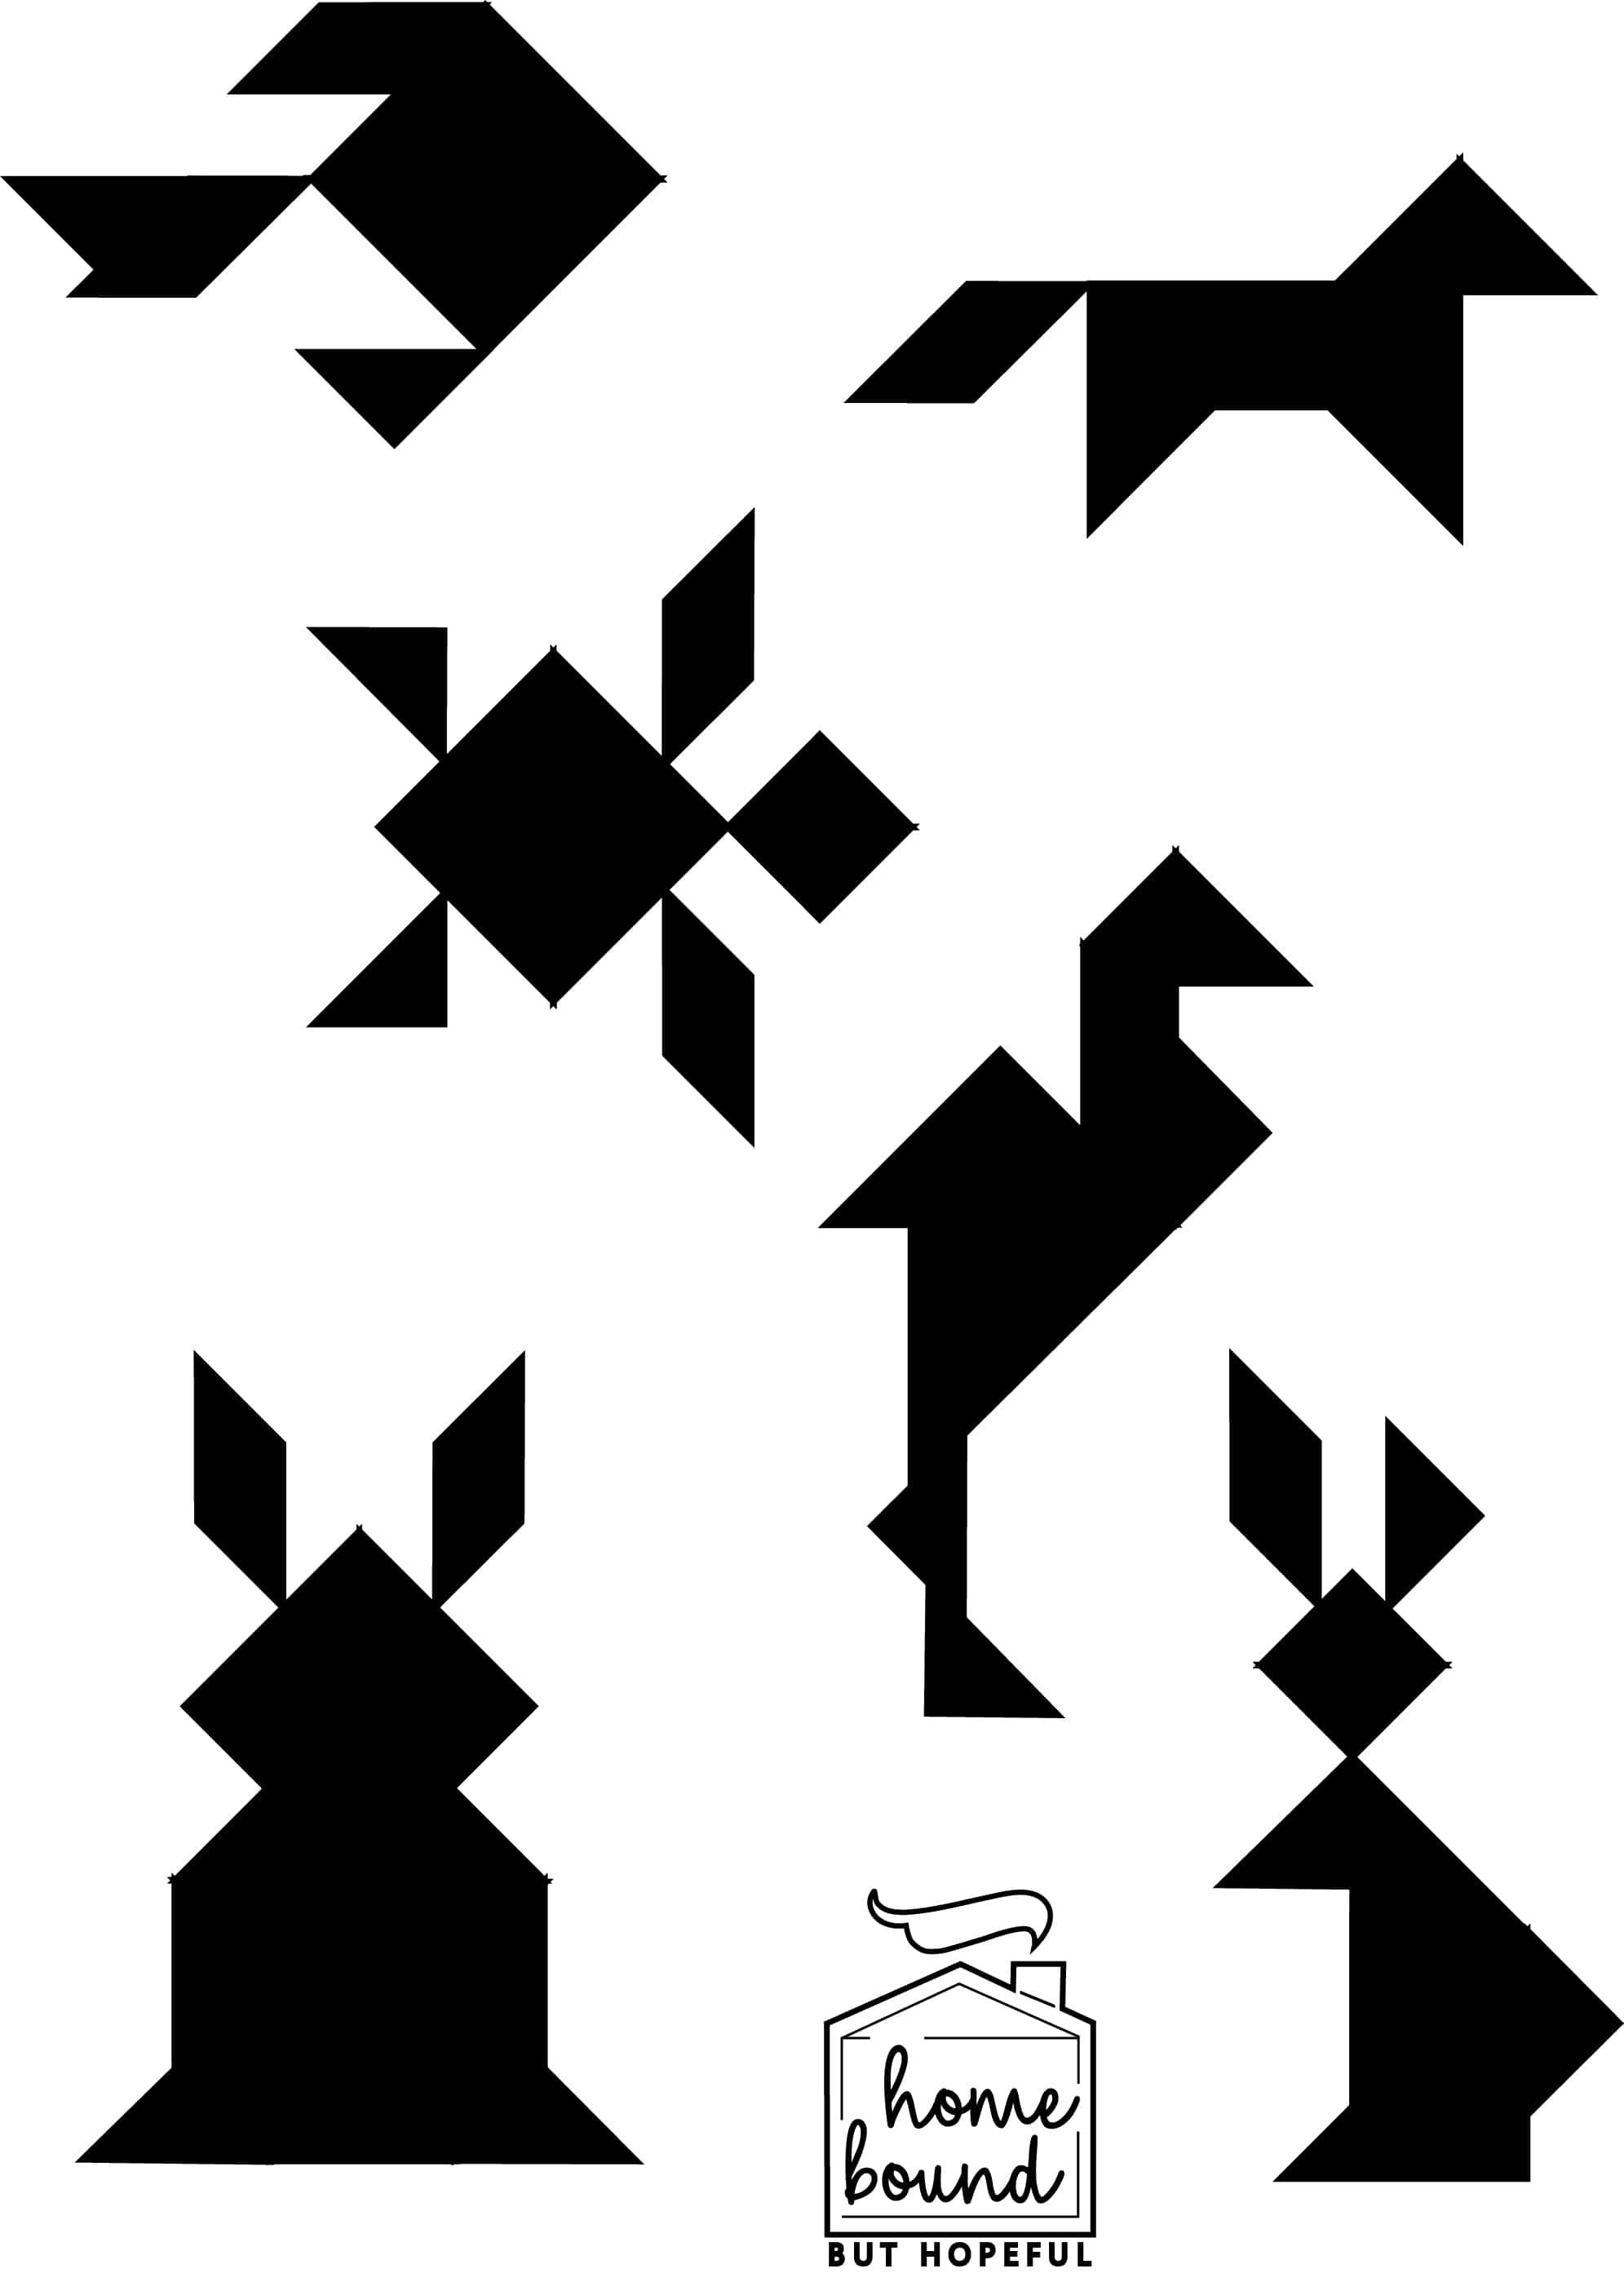
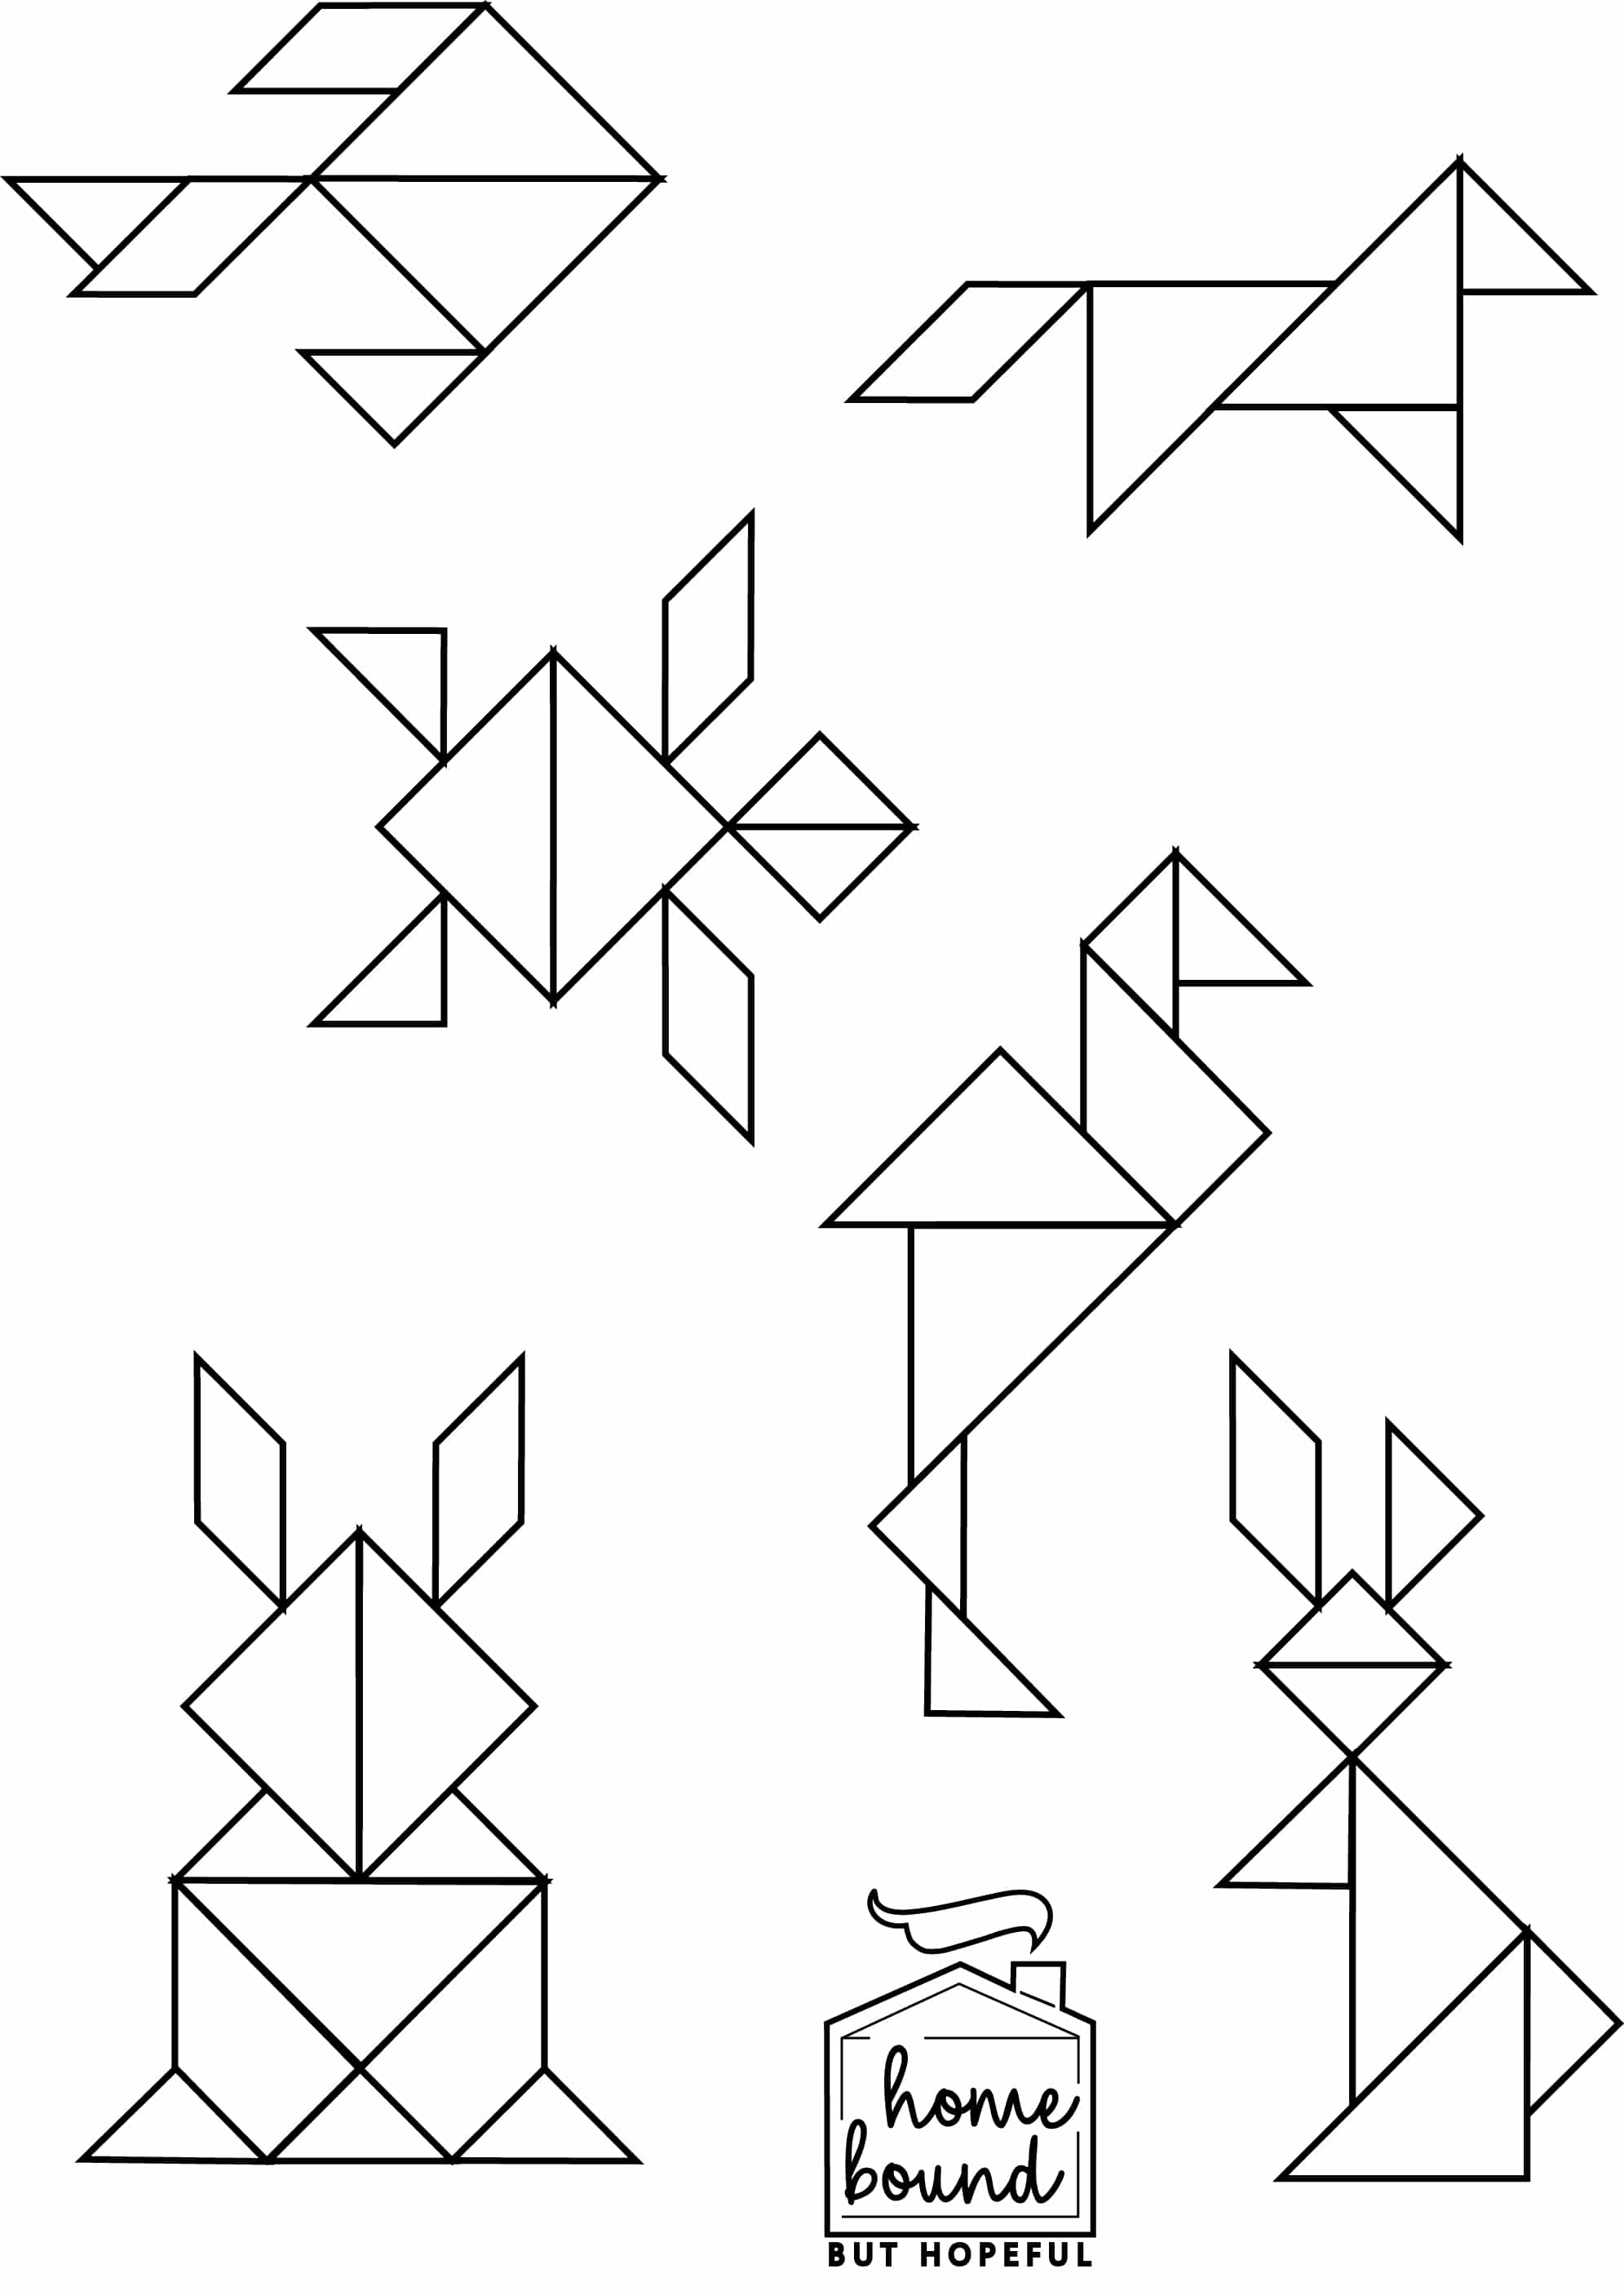
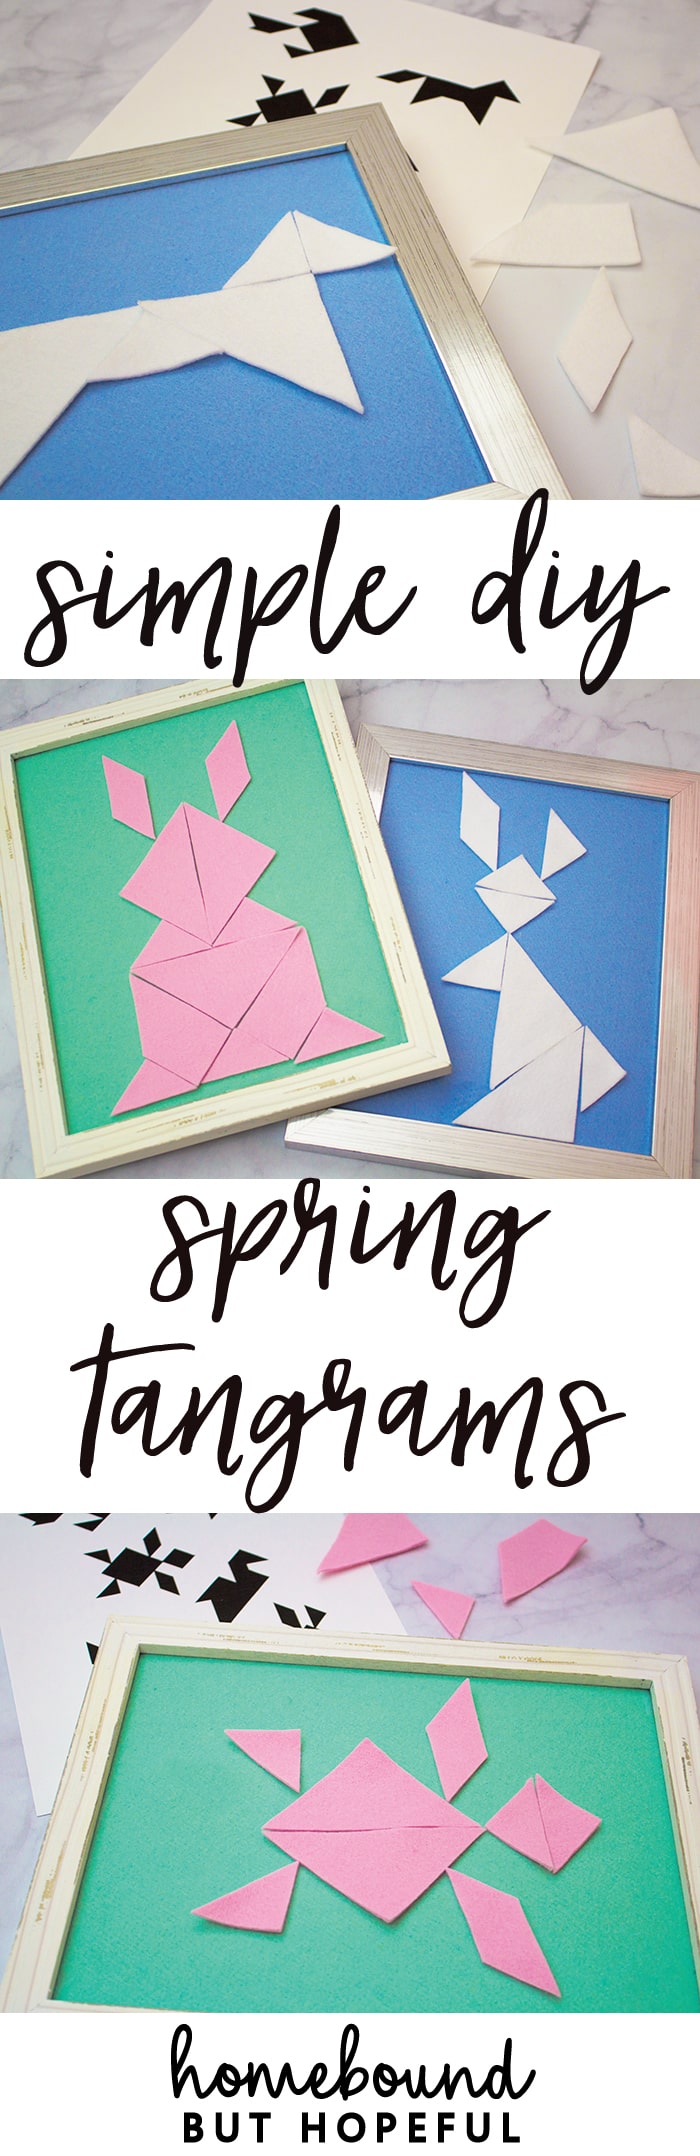
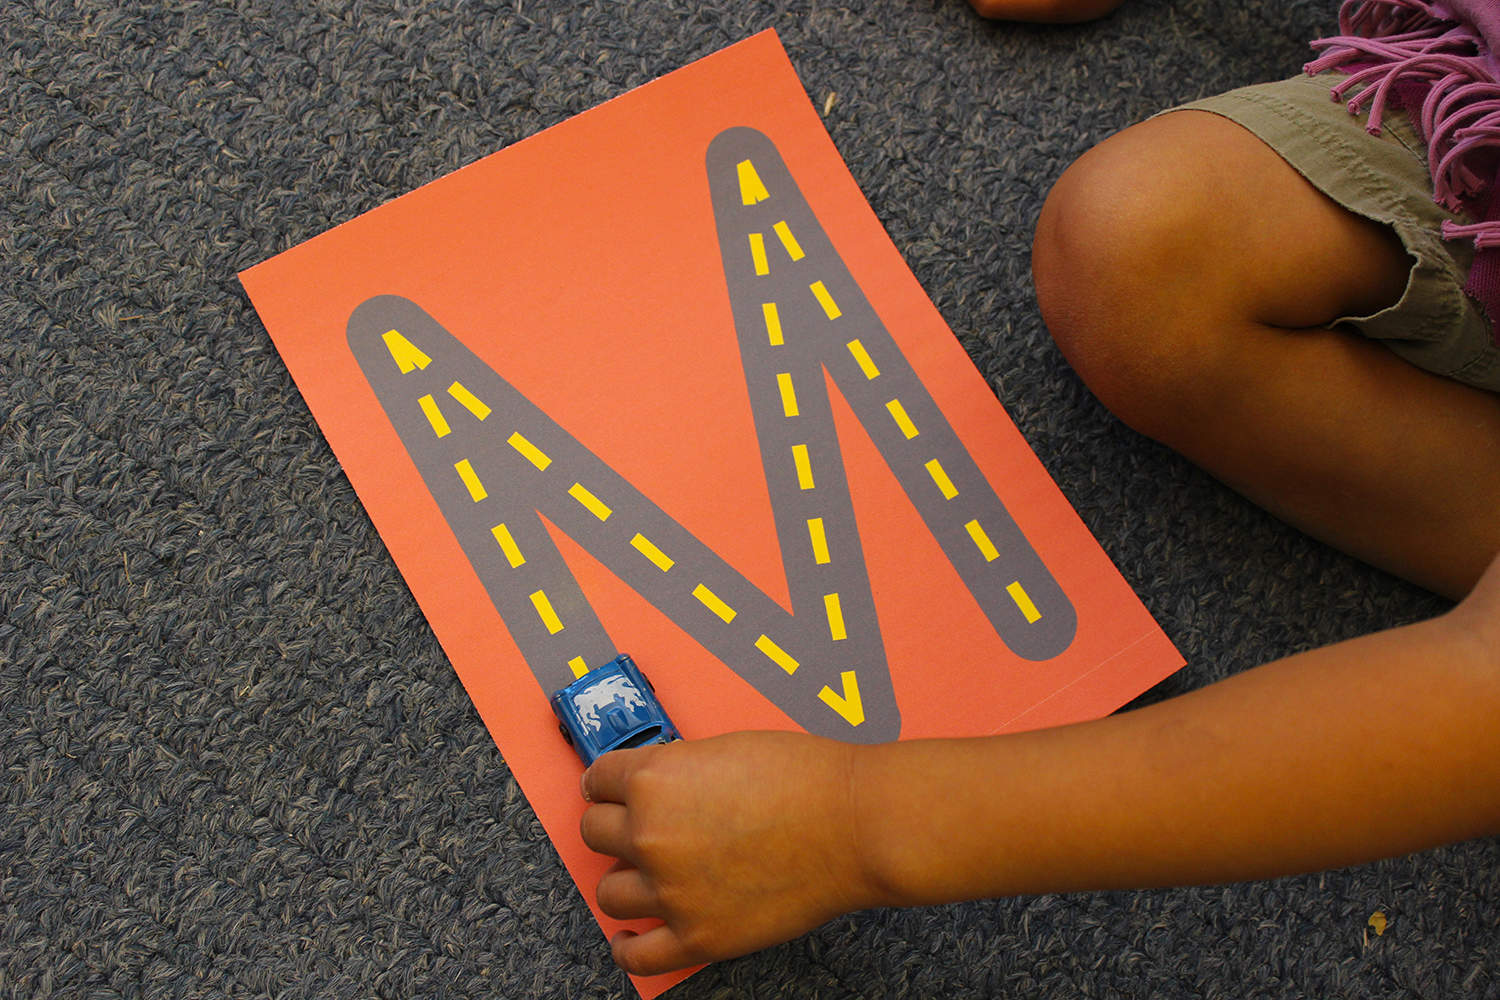
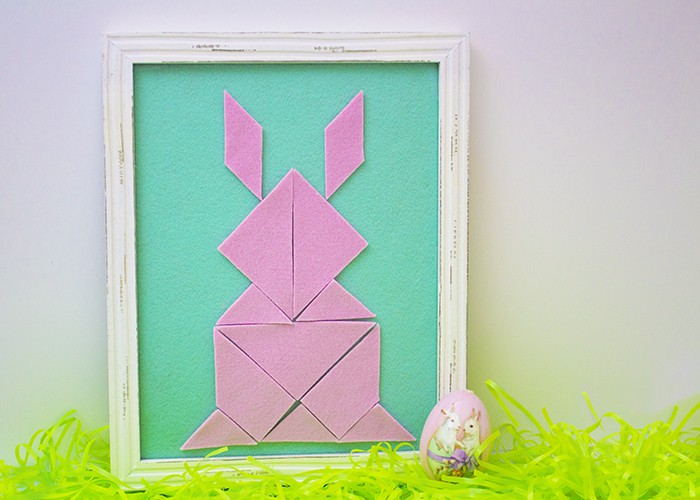
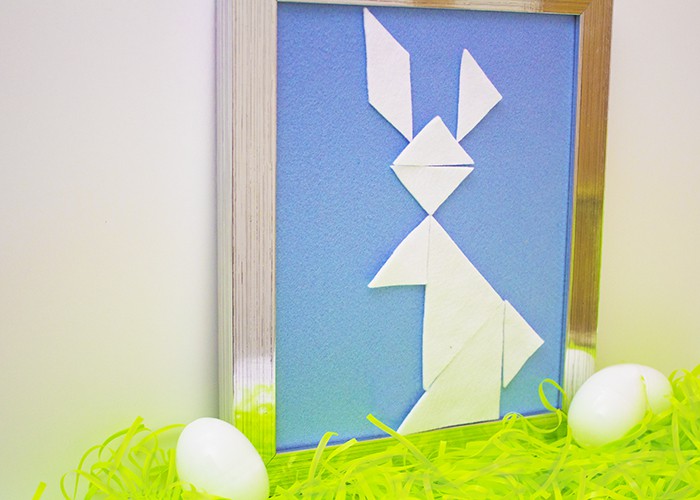
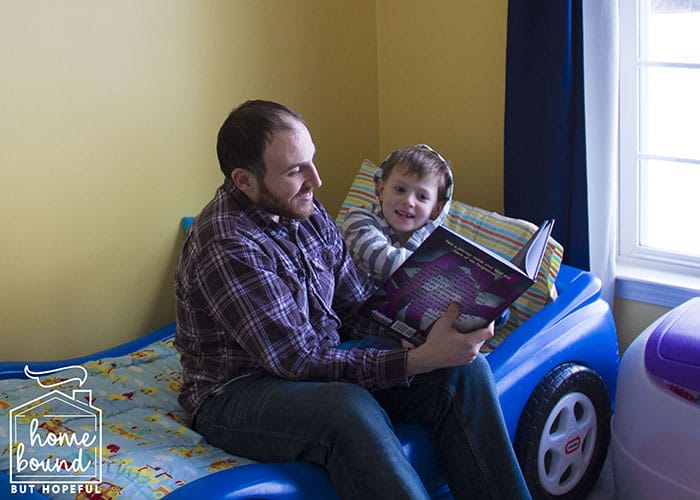
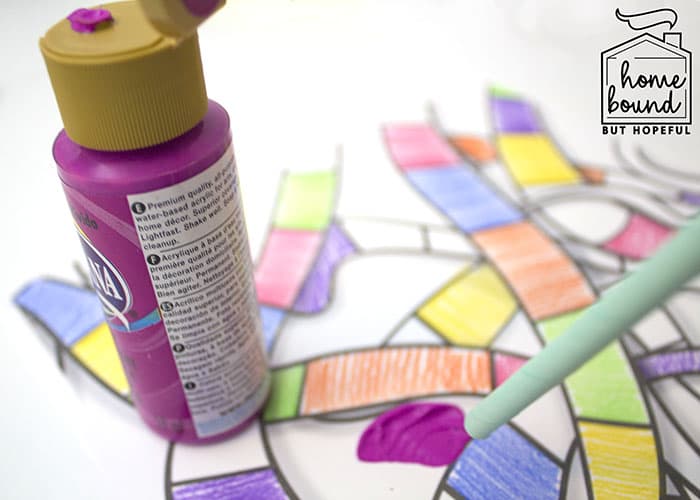
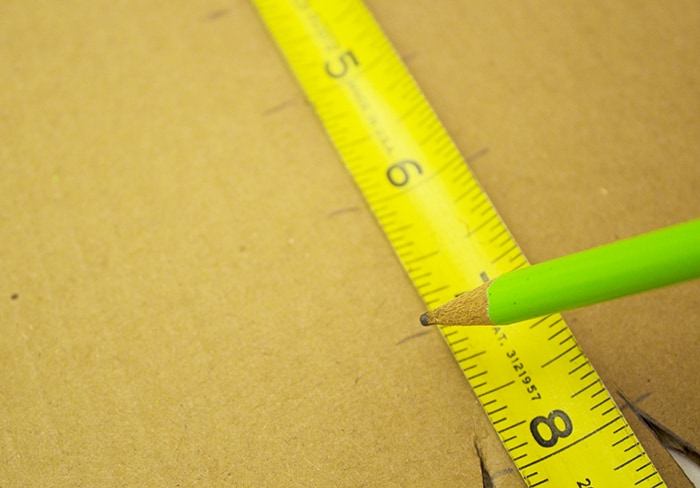
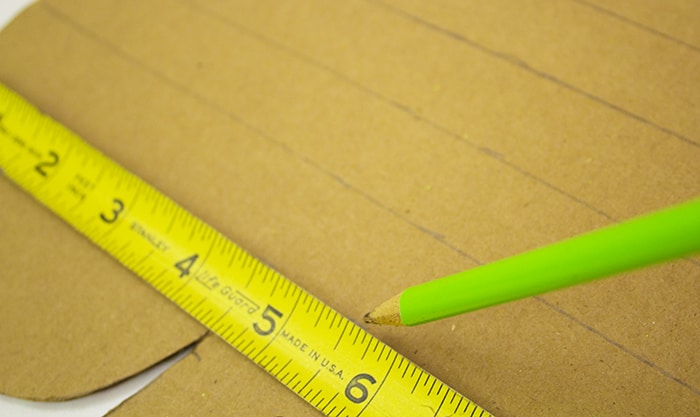
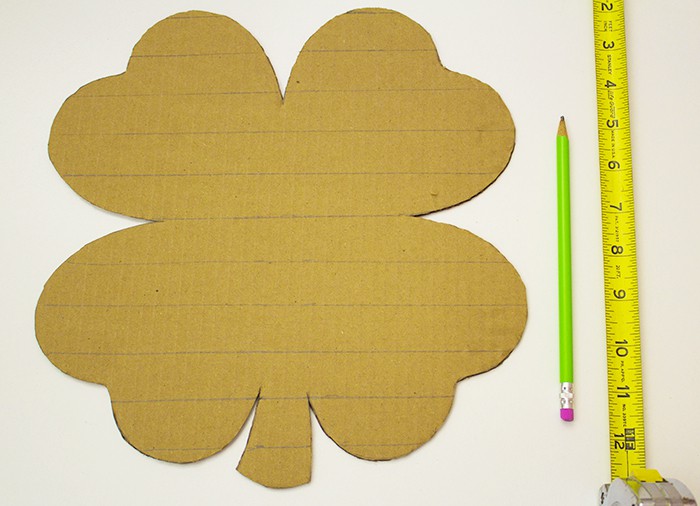
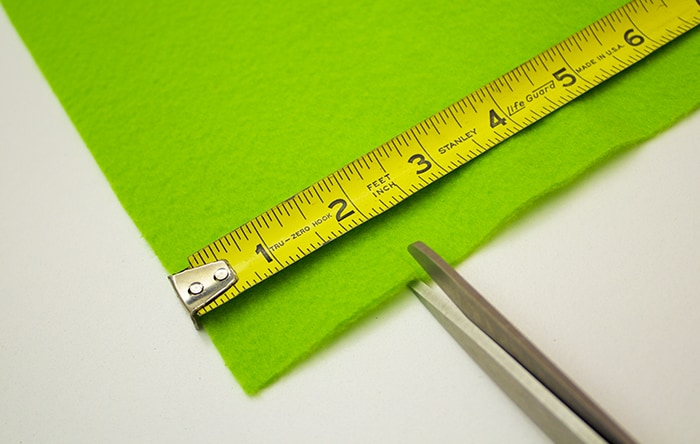
Spring Tangrams: Easy DIY Puzzles In Time For Easter

We are always on the look out for great ways to keep #thebigone busy without relying on screens. Our search led me to create these easy to make spring tangrams. We’ve introduced tangrams to him in the past, but I’m not sure he was truly ready for them until recently. These fun geometric puzzles can be deceptively simple, and are perfect for a large age range. (For reference, #thebigone is 6 1/2 years old.)
I enjoy watching his mind process through the geometric challenges. They are perfect for improving his spatial thinking and reasoning, as he works to see how the pieces fit. Additionally, they are wonderful for developing his perseverance. My oldest can easily become frustrated and flustered when a solution is not quickly found. Working together with these spring tangrams is a great opportunity to encourage him to stick with it. I encourage him to problem solve, often suggesting he might turn something a bit, etc. It is wonderful to see his pride when he completes a challenge.
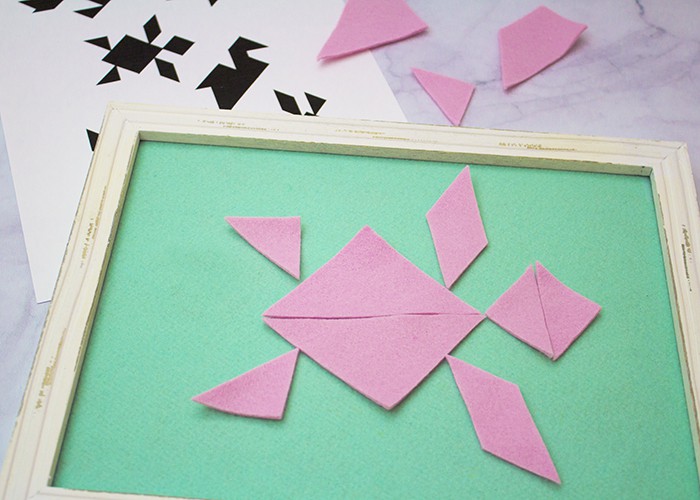
I put together these easy DIY spring tangrams to keep my oldest occupied as Easter approaches. They’re incredibly simple to create, and the supplies are reasonably priced. I put them together in a felt board style, meaning the pieces will not slide inadvertantly. Tangrams like these would make a perfect addition to an Easter basket.
Making Spring Tangrams
you will need:
- 2 pieces of felt. (1 will be a base, the other will be the tangrams, so there should be contrast.)
- Scissors.
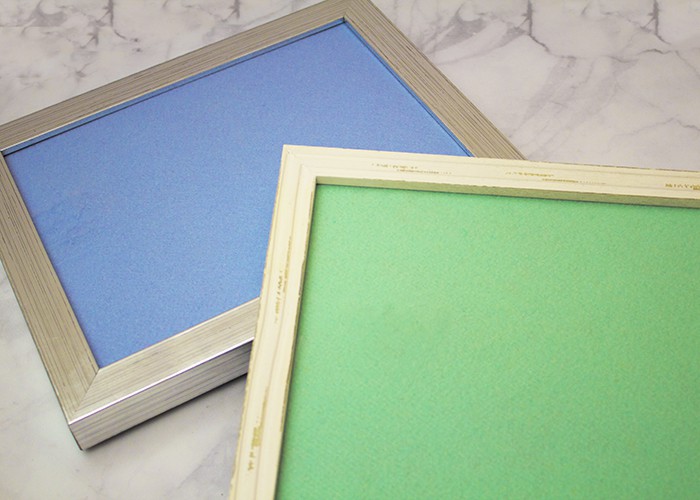
- Frame with 8 inch x 10 inch opening, or larger. (You will not use the glass, so it’s an ideal project to upcycle a frame with broken glass. Consider checking the dollar store or a local thrift shop for something that will work.)
- Spring tangrams printables.
How to make spring tangrams:
- If your frame has glass, remove it. Using the frame backing as a template, cut your base piece of felt down to the correct size. Reassemble the frame with the felt base included. If you have trouble getting your felt to lay smoothly inside the frame, a few touches of hot glue or a bit of scotch tape should solve the problem.
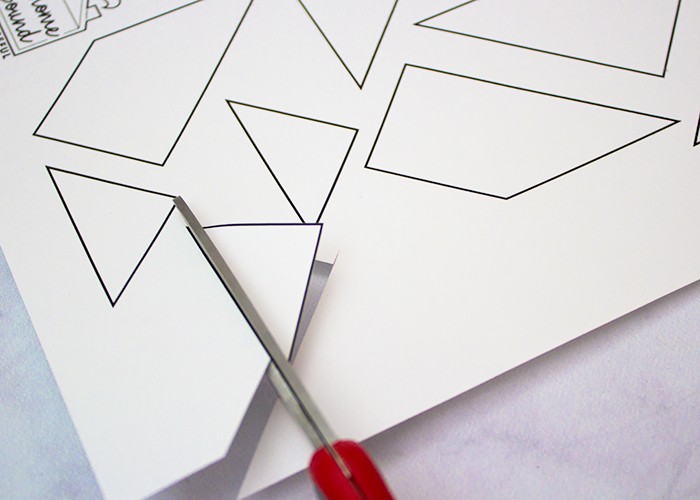
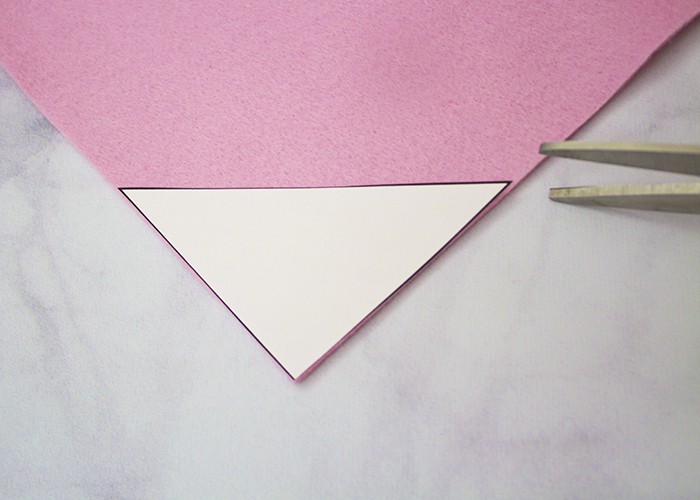
- Cut out the template pieces from the free printable. Use them as patterns to cut each piece out of the contrast felt.
- Print out the free puzzle sheet. Present the frame and puzzle sheet to your child and encourage them to get started putting the animals together.
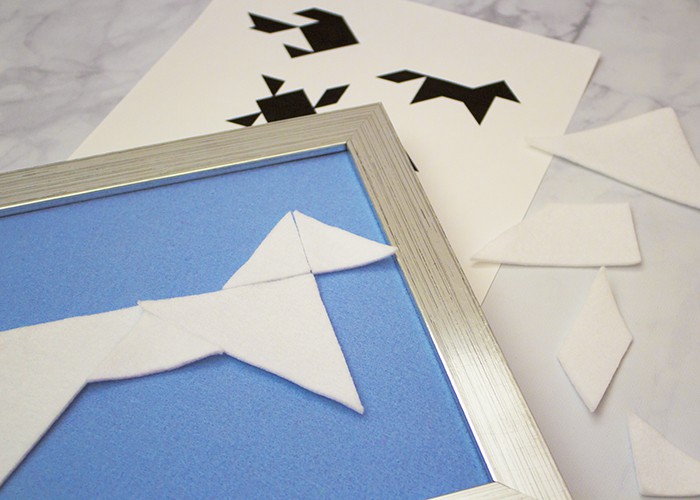
- If you guys need some guidance putting the spring tangrams together, use the printable solutions sheet for a bit of a hint.
In addition to the six puzzles I have provided, there are endless options for creating with tangrams. Look online for countless other ideas. Feel free to give your child free reign to assemble their own shapes and puzzles. With a piece of paper and a pencil, your family can create new challenges to share with each other.
What’s your go-to activity when it’s time for your family to unplug a bit?
-
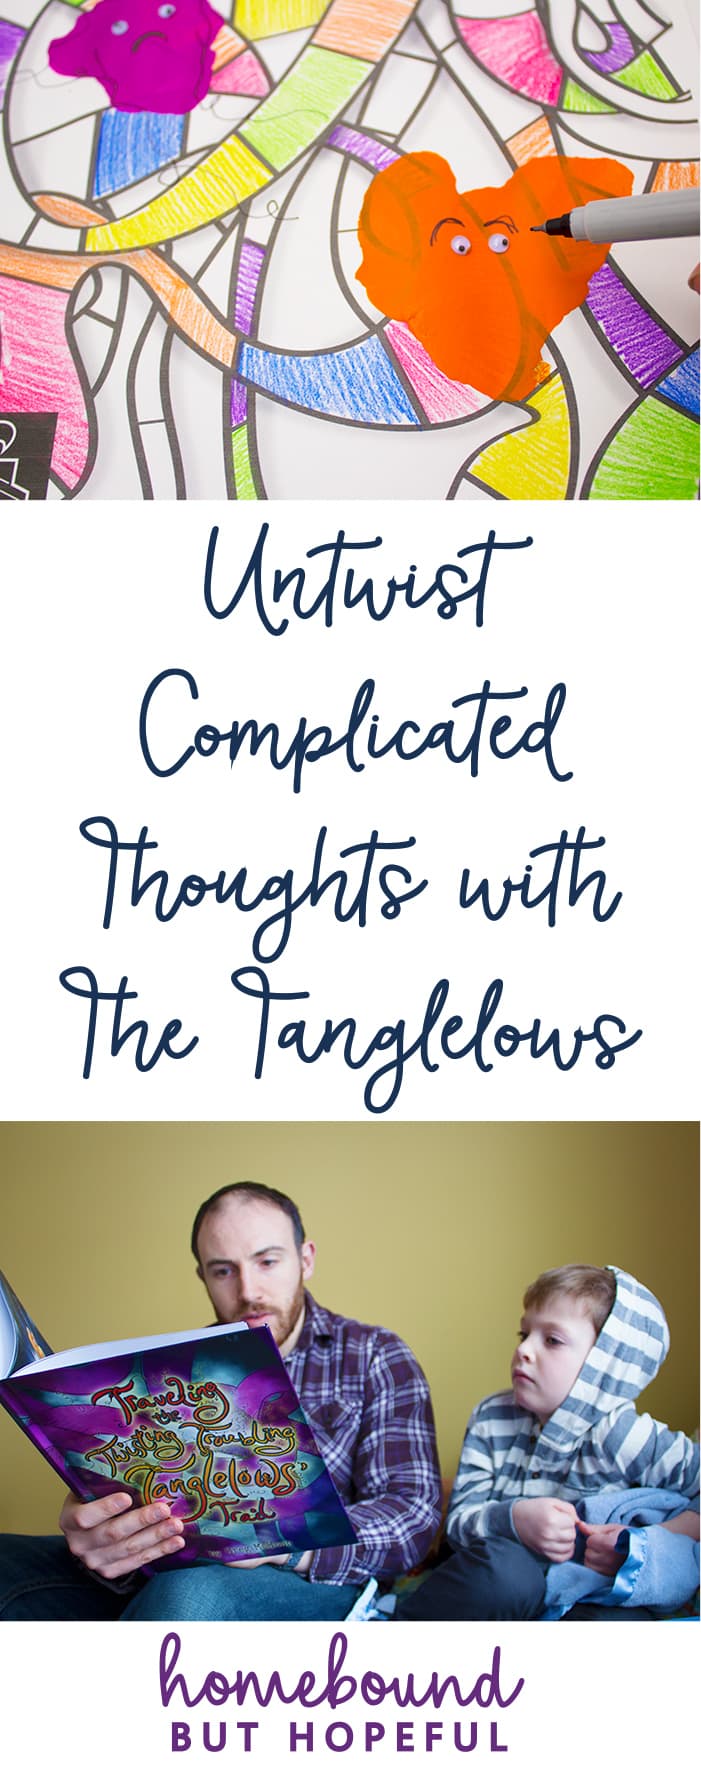
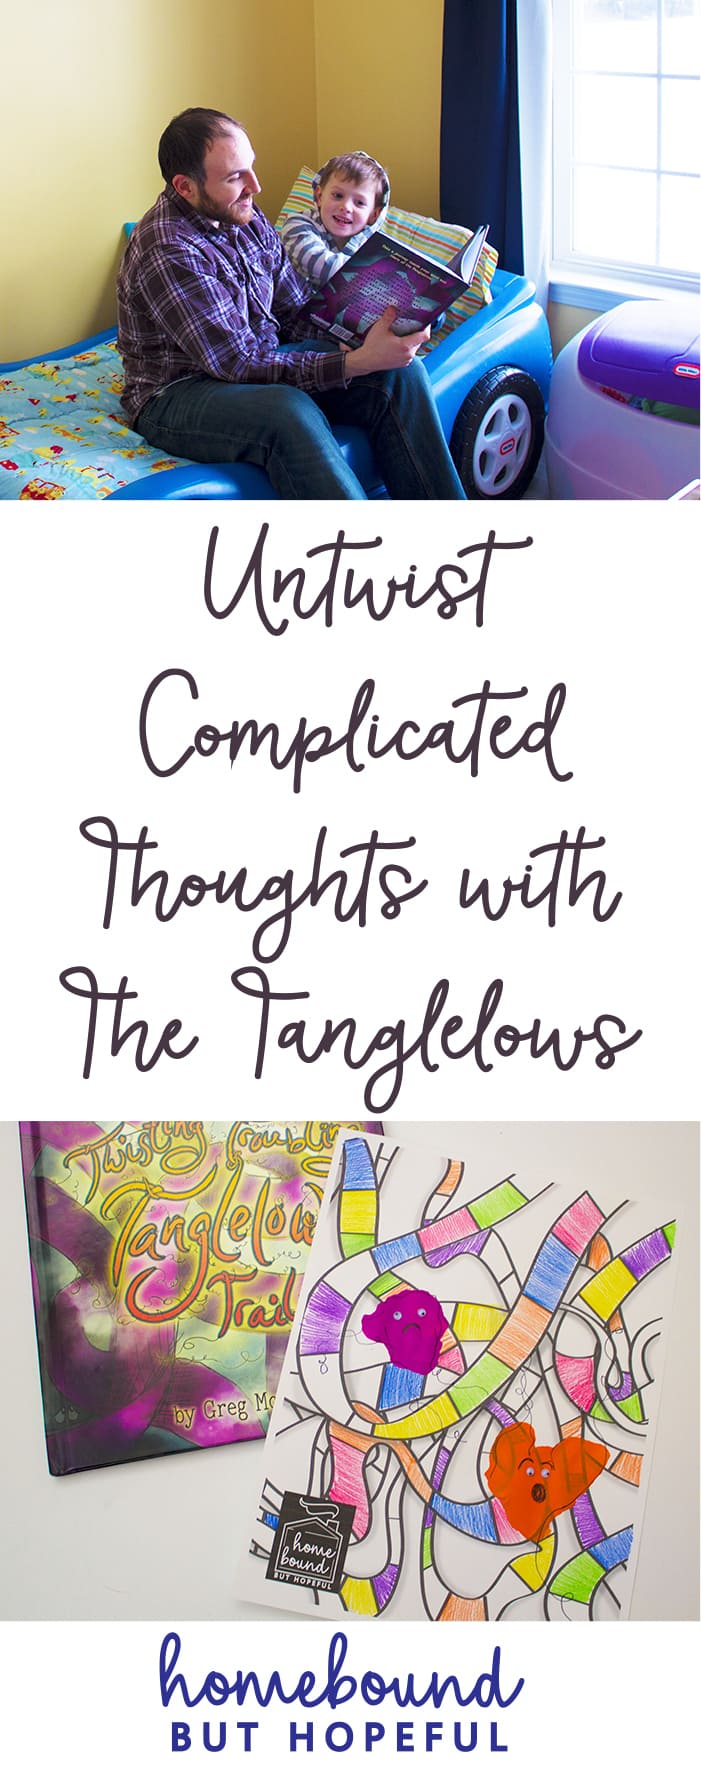
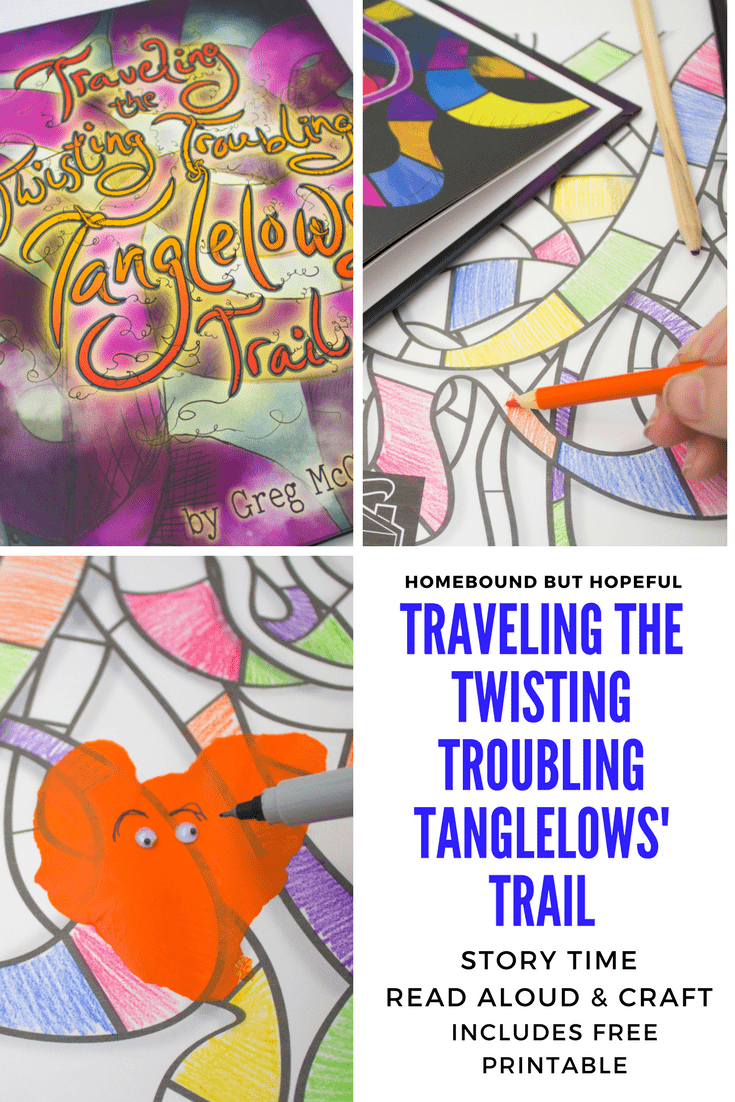
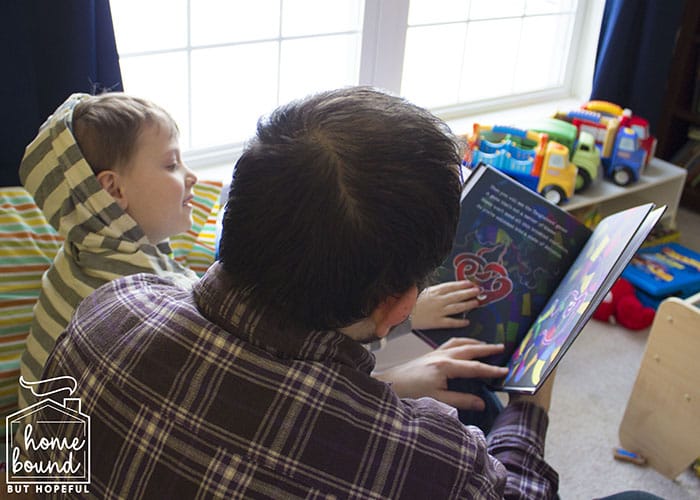
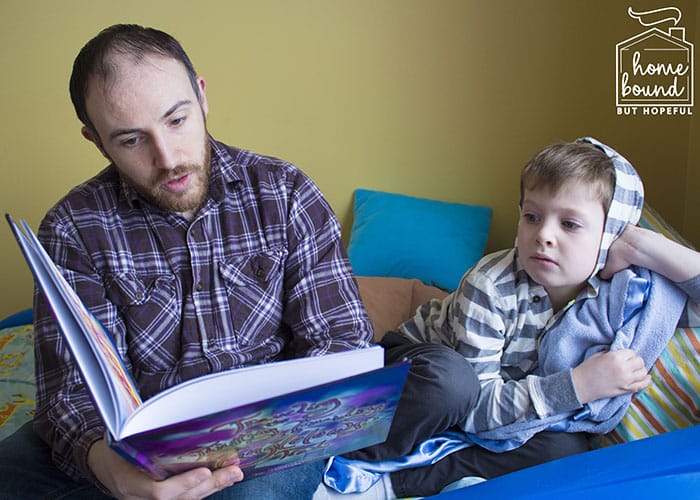
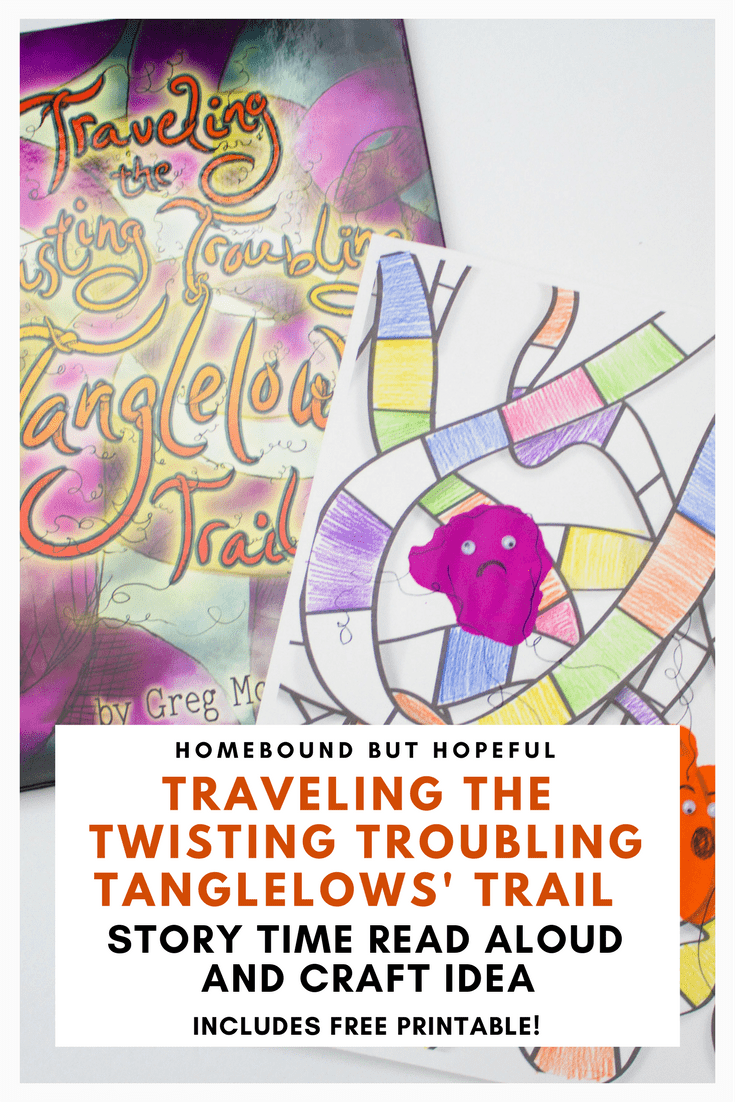
Traveling the Twisting Troubling Tanglelows’ Trail (Review + Craft)
I’ve written once or twice in the past about the importance of helping kids (and adults!) find ways to relax. #thebigone is a child who is always thinking, a trait likely passed down from me. We were able to check out Traveling the Twisting Troubling Tanglelows’ Trail from author Greg McGoon recently. After one reading, we were convinced it was a great book to help my oldest sort out some of his non-stop thinking.
Standard Disclosure: This is a sponsored post. As always, all opinions expressed are my own.If you have followed along with the blog, you may remember me writing that #thebigone has dealt with a lot for a 6 1/2 year old. He has split time between my home and his father’s since he was a baby. My oldest endured the death of his baby brother three years ago, as well as a subsequent miscarriage. He welcomed a new baby brother a month before starting kindergarten. In the last year, he lost 5 great grandparents across his three families.
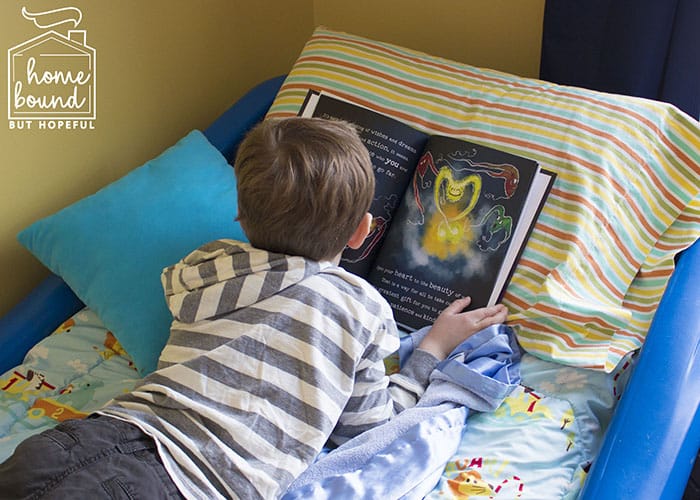
We are blessed that he generally adjusted well in the face of these changes. However, it’s clear from his questions and remarks at times that his mind is still working to process everything. Tools that help us facilitate this process are invaluable. Traveling the Twisting Troubling Tanglelows’ Trail is the perfect addition to our ‘tool kit’.
Traveling the twisting troubling tanglelows’ trail
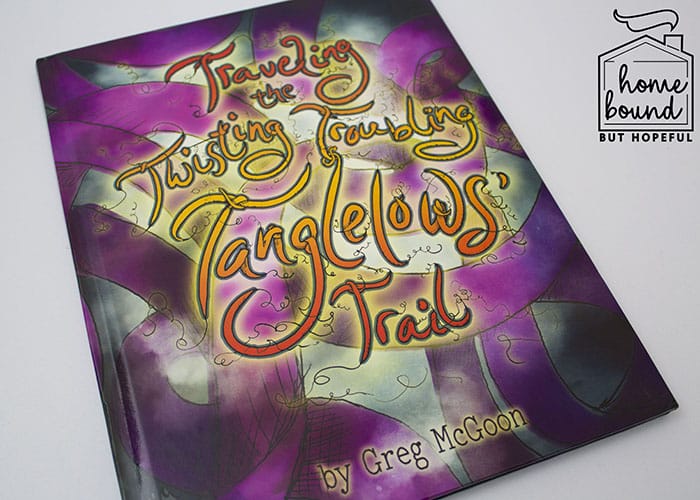
McGoon takes a light and whimsical approach to a serious topic, ensuring the book will appeal to children. The text is a series of tricky tongue twisters, adding novelty to the often heavy work of processing anxiety. Young readers will love the lyrical quality of the rhymes. The book is perfect for read-a-louds as adults are likely to get tripped up in the twisters a time or two- giggles guaranteed! The tale provides basic guidelines for kids to re-frame their thinking. Traveling the Twisting Troubling Tanglelows’ Trail is able to relay these ideas in a playful, engaging way that never feels ‘teachy’. It’s an excellent jumping off point for a discussion with your child about what thoughts they are struggling with.
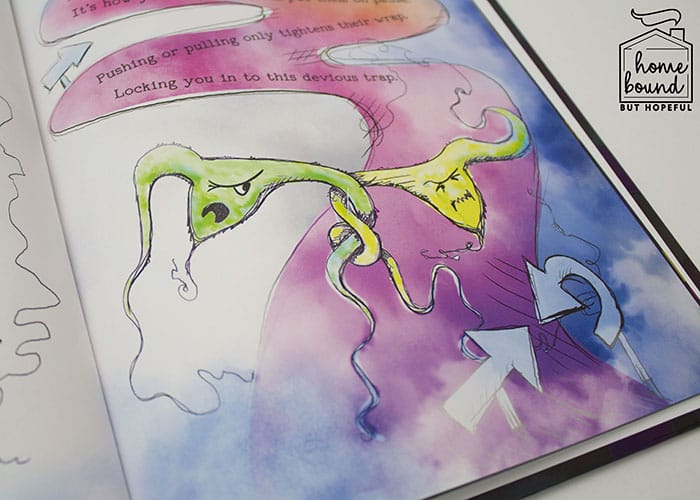
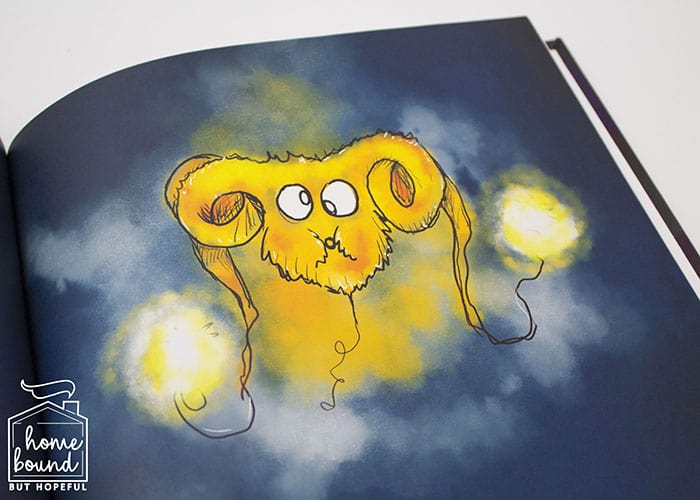
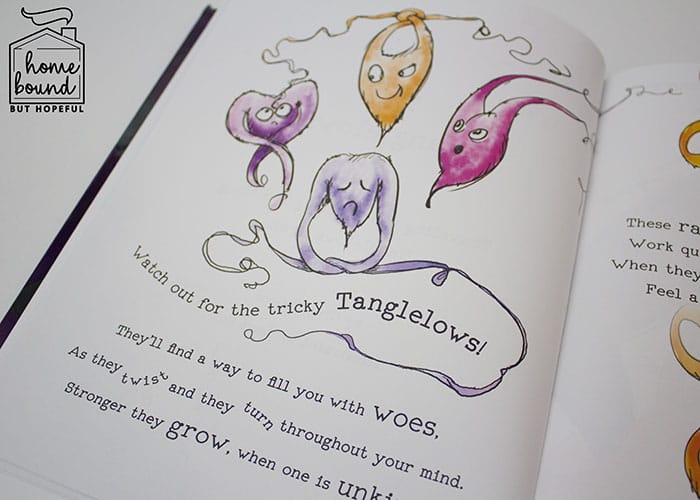
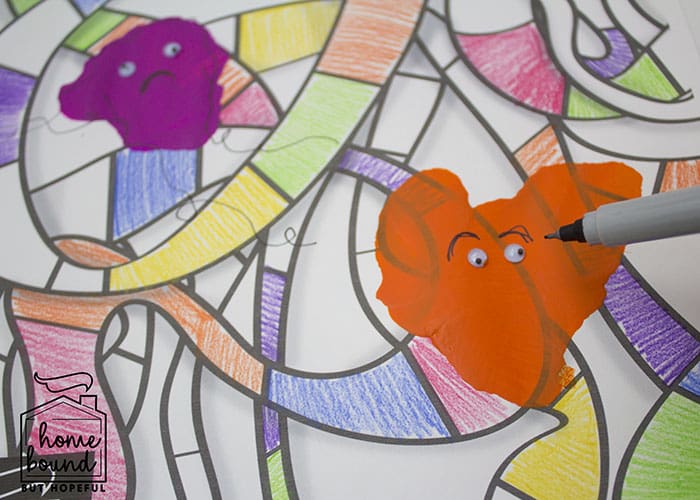
The Tanglelows are the invasive little thoughts that fill both the book and your mind. Illustrator Jessa Orr has rendered them in a quirky, almost cute style. This is ideal as the last thing an already anxious child needs is a threatening or frightening image of something within them. The bright, vibrant illustrations do an amazing job of visually representing just how snarled and entwined our thoughts can be.
Inspired by the colorful art in the book, I created a fun project to accompany the book. This craft is fairly simple, and easy for young readers to work on almost independently. The beauty in this is that you can sit side by side with your child while you both create your own Tanglelows. I find that sometimes it is easier for children (anyone, really) to open up when they are engaged in a project. The bit of distraction a simple project can provide often makes a world of difference.
Make your own tanglelows
You will need:
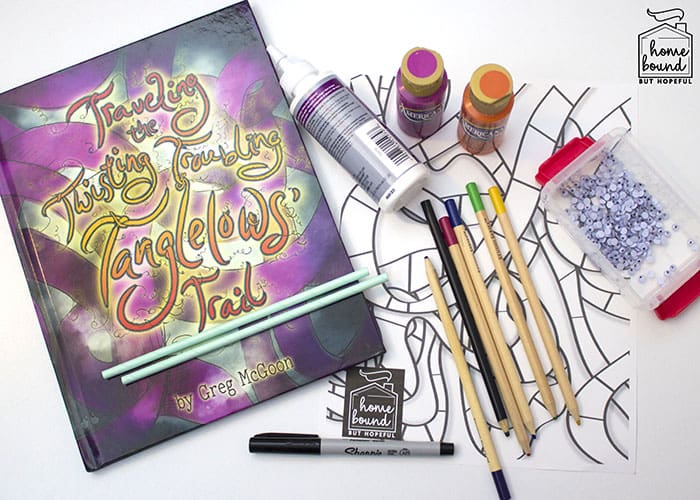
- Free printable Tanglelows’ trail page. (Scroll to the end of the post to grab yours!)
- Colored pencils, crayons, or markers.
- Acrylic craft paint.
- Straw.
- Wiggle eyes.
- Craft glue.
- Black marker.
How To create your tanglelows:
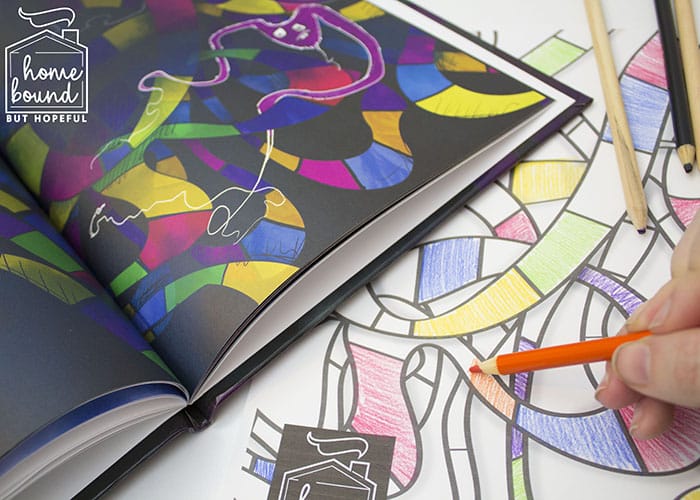
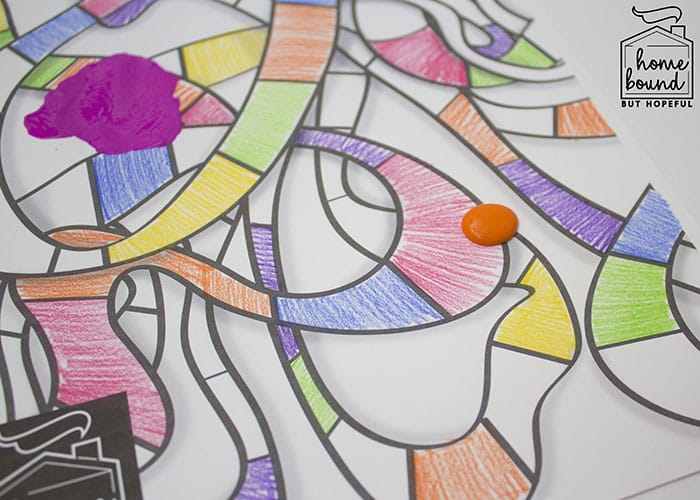
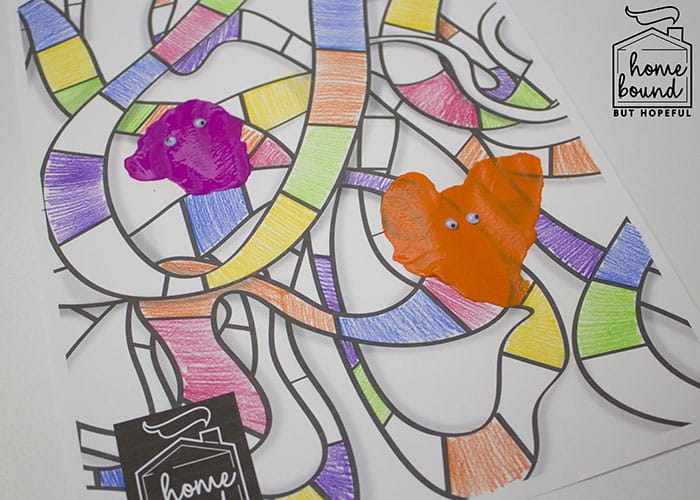
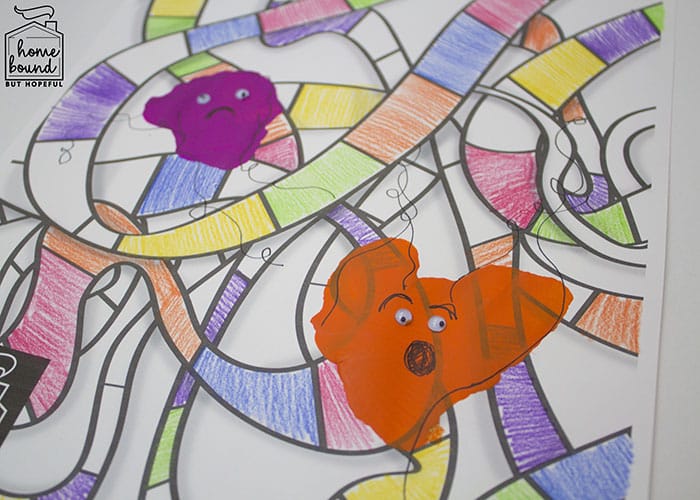
- Start by adding some color to the printable trail page. We used colored pencils, but you can use whatever supplies you have on hand. We used colors inspired by the illustrations in the book, but this is totally flexible. Consider having your child use the colors that best represent their current thoughts and emotions. This is a great chance to start getting a peek at what is on their mind.
- Add a bit of acrylic craft paint to the trail page. If your paint is very thick, you will want to water it down a bit.
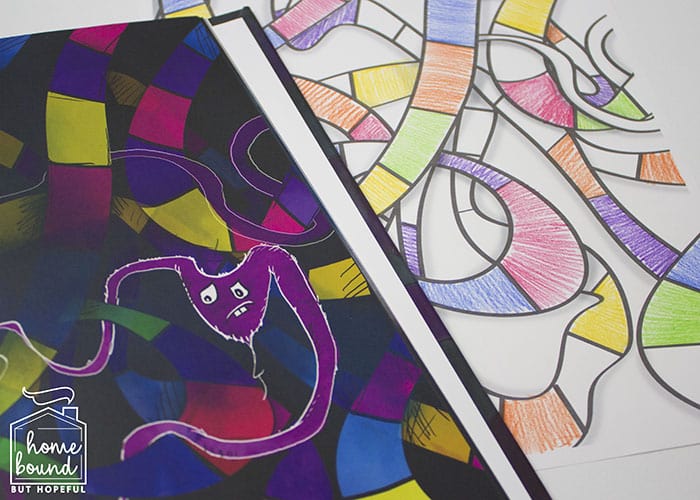
- Next, use a straw to blow the craft paint into a Tanglelows sort of shape. Some Tanglelows may be big, and trap a lot of the trails. Others may be smaller, and not as invasive. There’s no right or wrong here. Add as many Tanglelows as you like.
- Add wiggle eyes to your Tanglelows. If your paint is thick enough, you can likely add the eyes to wet paint. If the paint is dry, or very thin, use some craft glue to stick them on.
- After the paint and glue are completely dry, use the black marker to add some of the Tanglelows’ details. You’ll notice curly little tails that intertwine the characters in the book- the marker is perfect for adding these, as well as additional facial features.
- Admire you finished artwork with your child! Be sure to follow up with them going forward about the thoughts and concerns they shared with your during the reading and craft sessions.

Gotta Have it?
Traveling the Twisting Troubling Tanglelows’ Trail is available through both Barnes & Noble and Amazon.com.
Please note- Amazon’s stock information has not been updating correctly, shipping should not be as long as the estimate states.> > > GRAB YOUR TANGLELOWS’ TRAIL PAGE RIGHT HERE! < < <
Do you have tools or tricks you use to help your children work through their thoughts? Share your tips in the comments below!
-
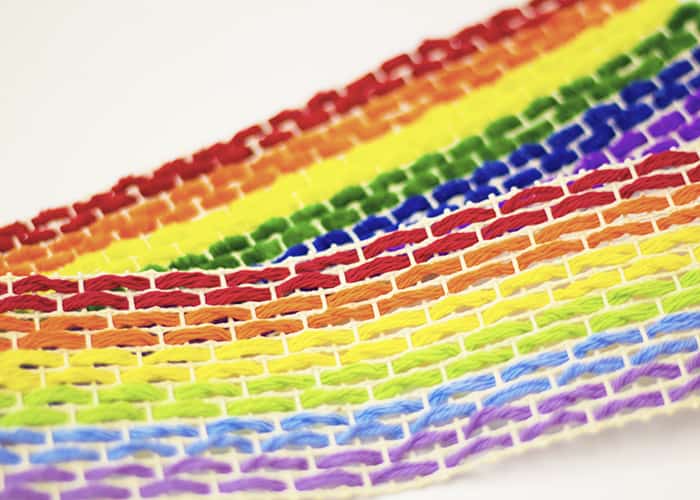
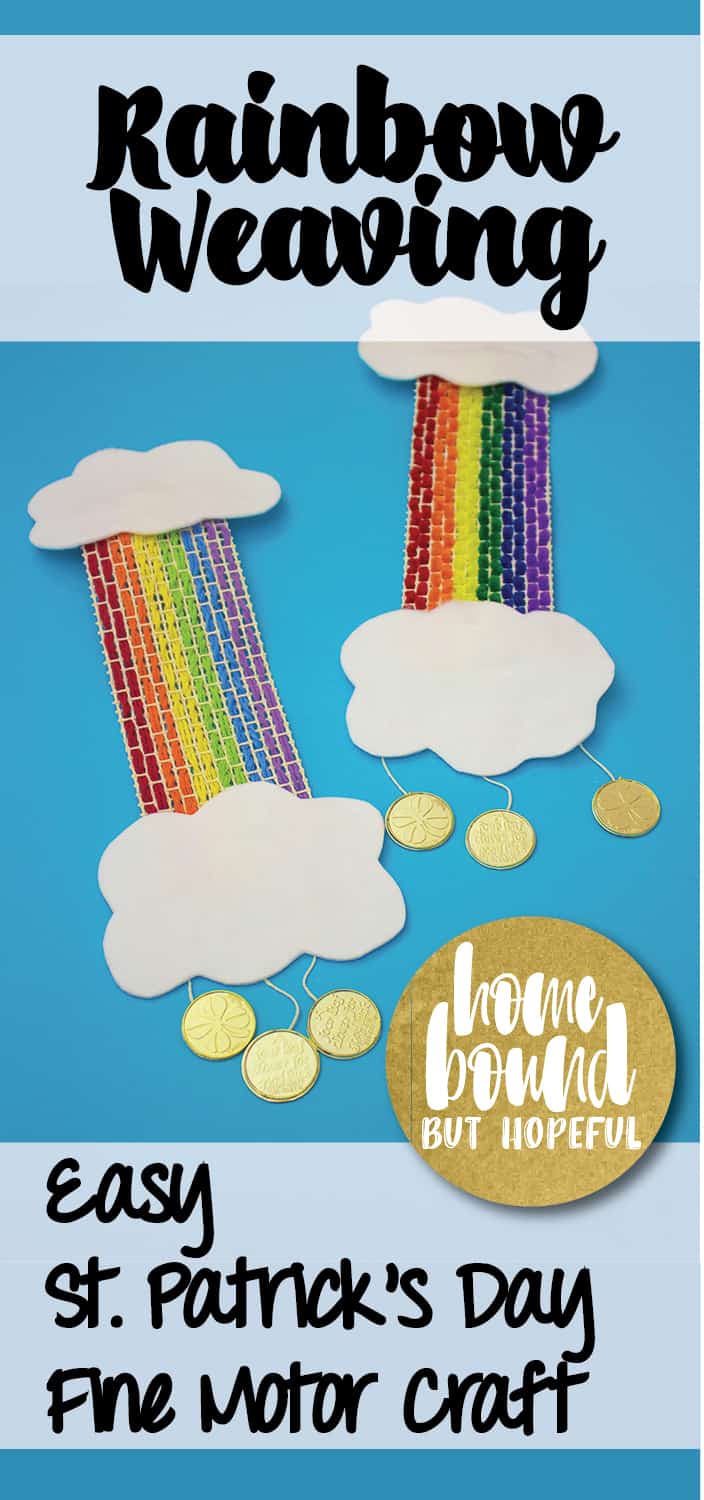
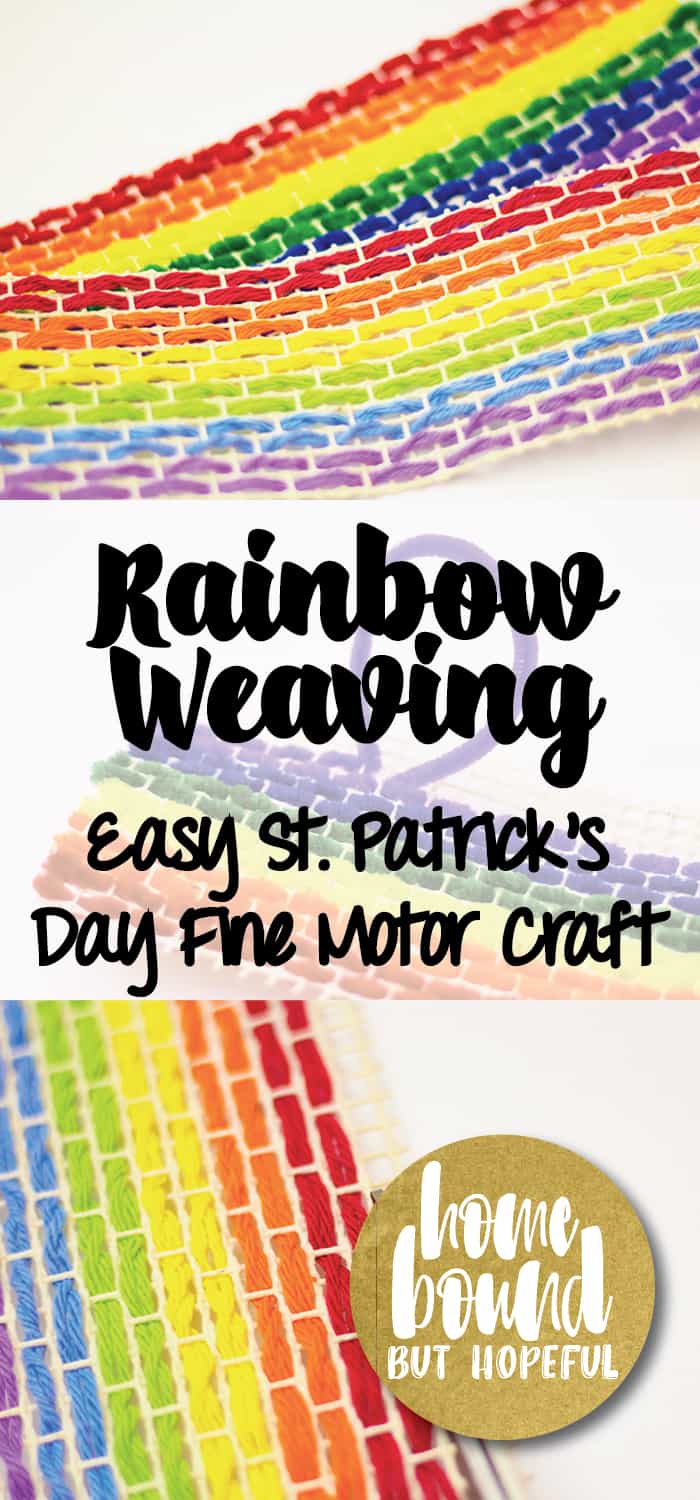
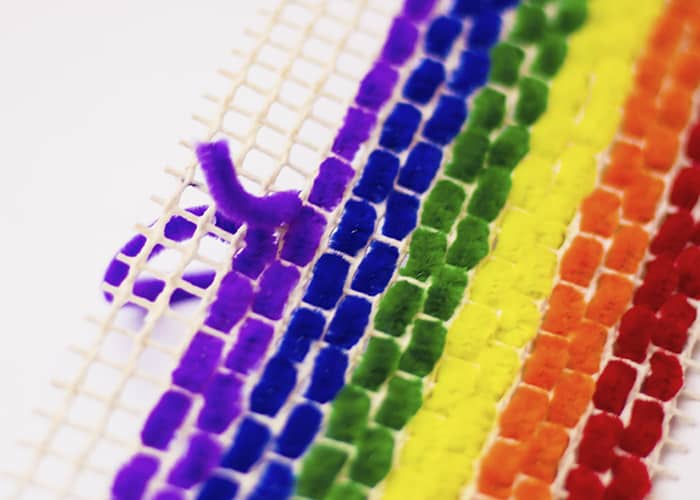
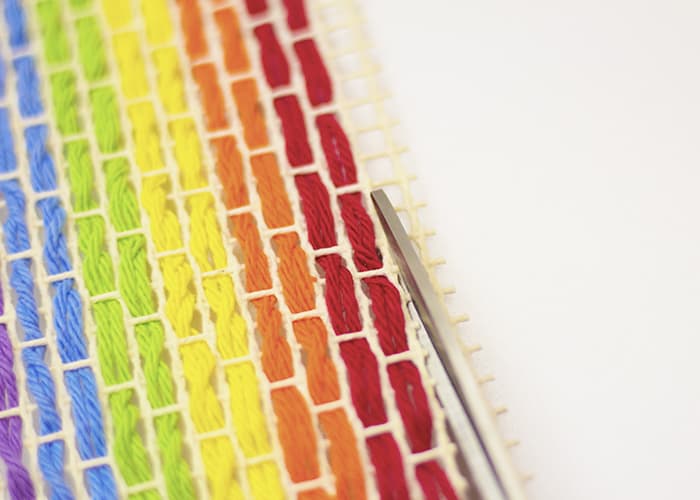
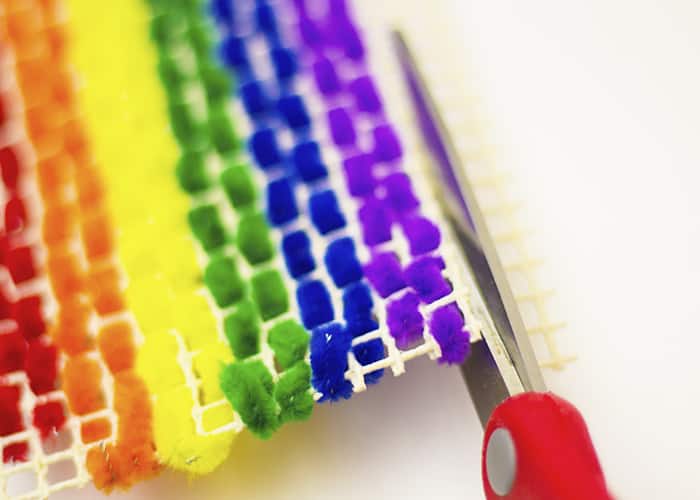
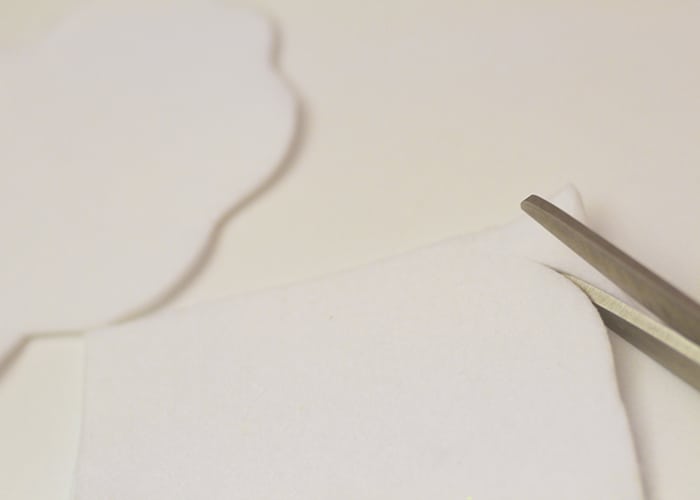
Rainbow Weaving- Easy St. Patrick’s Day Craft For Kids
There’s been a lot of talk about leprechauns and shamrocks around our home lately. Whenever we think of St. Patrick’s Day, in addition to those two classic symbols, rainbows and gold coins also spring to mind. I created a rainbow weaving craft that is perfect for helping your children decorate for the March holiday. In addition to being cute and easy to assemble, it also provides great fine motor practice for older children.
I have to apologize for all the radio silence lately folks! We live in upstate New York, and if you haven’t heard, we were hit with massive windstorms last week. We spent several days without power, and then some additional time without wi-fi (oh, the humanity!). Thankfully, now we’re finally headed back towards normal life, and bracing for an incoming snow storm. Never a dull moment! #thebigone and I hope the leprechauns can make it through the snow to visit us later this week. I think our easy rainbow weaving project will be the perfect festive detail to lure them through even the coldest, windiest upstate NY March day!
Rainbow Weaving
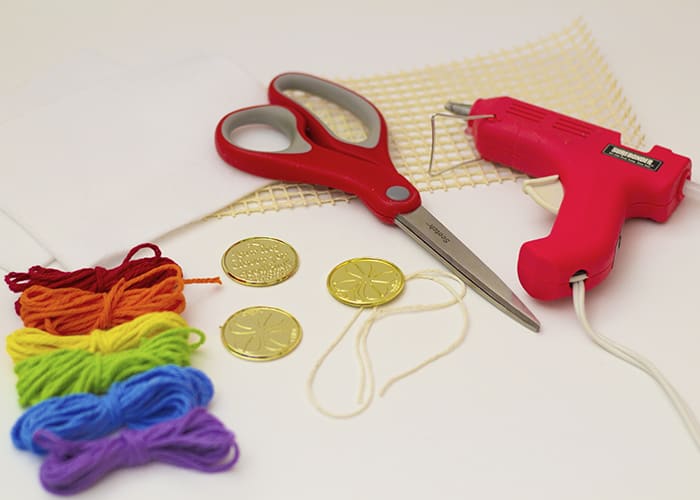
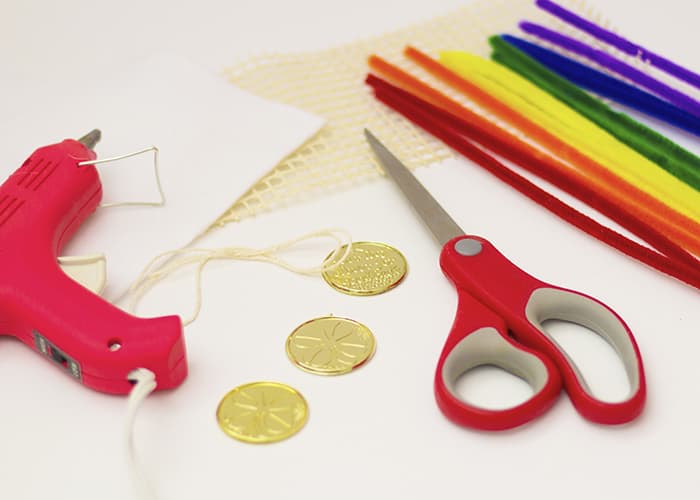
Supplies:
- Base material.
- We used latch hook canvas, but burlap or plastic canvas could also work well. Generally, you will want something with a larger weave for younger children. Older kids will be better able to handle smaller weaves.
- Colors.
- We did one version using yarn, and another using thin chenille stems. We chose shades of red, orange, yellow, green, and blue to represent a rainbow. Thin ribbons, raffia, or colored baker’s twine would also be good options.
- Yarn needles or masking tape.
- We used some wide-eyed, thick, blunt plastic needles to thread our yarn. Alternatively, you could wrap the end of the yarn with masking tape to stiffen the edge- similar to the plastic coating at the end of a shoelace.
- Scissors.
- White felt.
- Paper or craft foam would also work well.
- Craft glue or hot glue.
- Novelty gold coins.
- Circles cut from gold or yellow paper or felt would also work well.
- String.
How To
- Cut a portion of base material in a rectangular shape. Size is flexible- your child might want to add more than 1 row of each color, for instance, so see what their vision is prior to cutting. If you are using chenille stems, the length should be approximately the same length as the stems. You can always trim the base carefully after weaving, but too much fabric will be difficult for the child to manipulate.
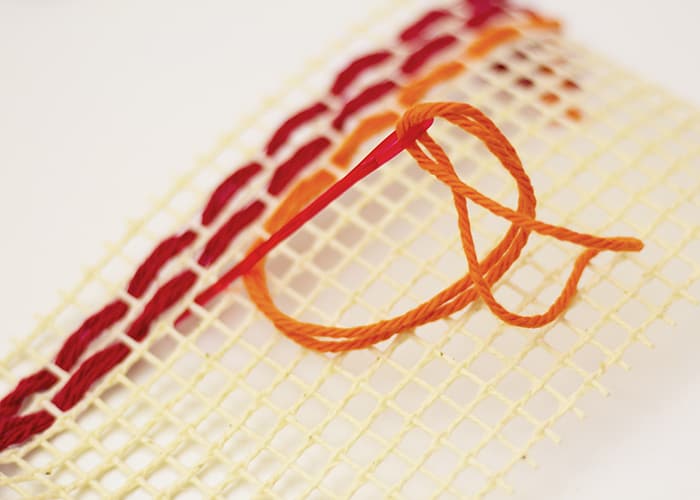
- If you are using yarn, cut lengths of each color. Thread your first color (red) onto the plastic needle. Children can start weaving in a classic over-under manner. Add a knot at the end of the yarn if the child is concerned about pulling it all the way out as they weave.
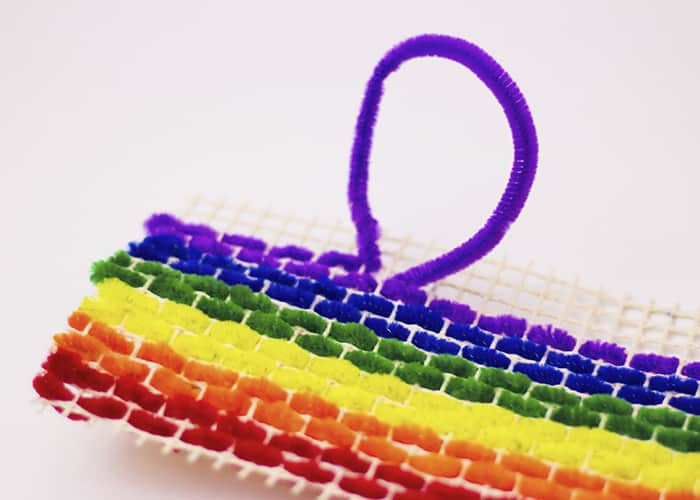
- The chenille stems are used in essentially the same manner. The only difference is you do not cut them, and do not need a needle.
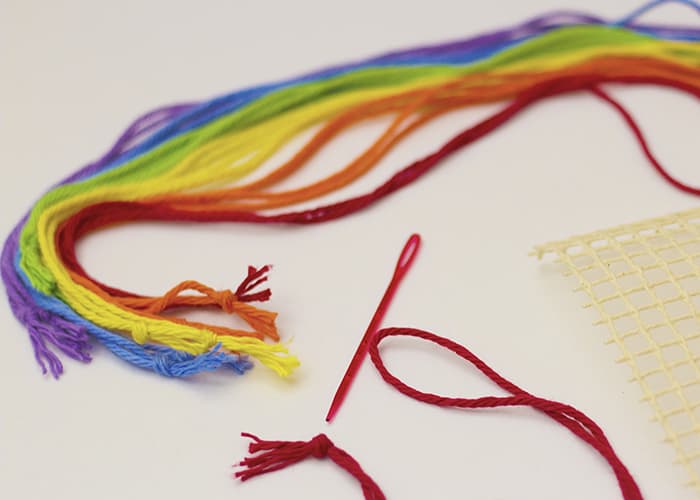
- The chenille stems are used in essentially the same manner. The only difference is you do not cut them, and do not need a needle.
- Repeat step 2 for each color of your rainbow. Kids can experiment with alternative weaving patterns if they wish- over 2, under 1 for example. This gives them the opportunity to add some personal flair to their projects. Continue until your rainbow is complete.
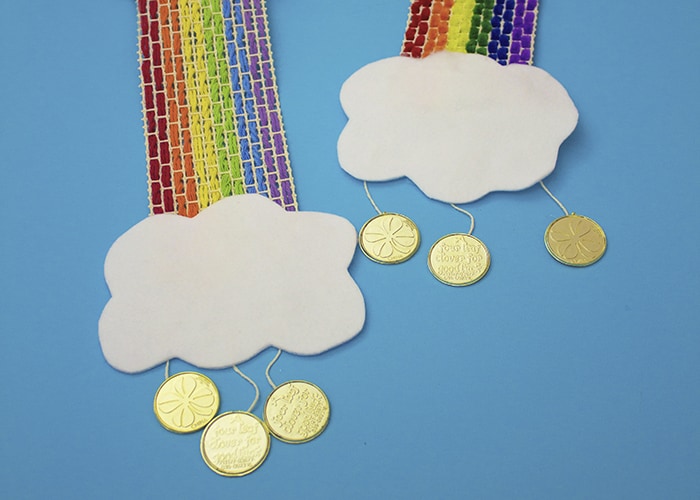
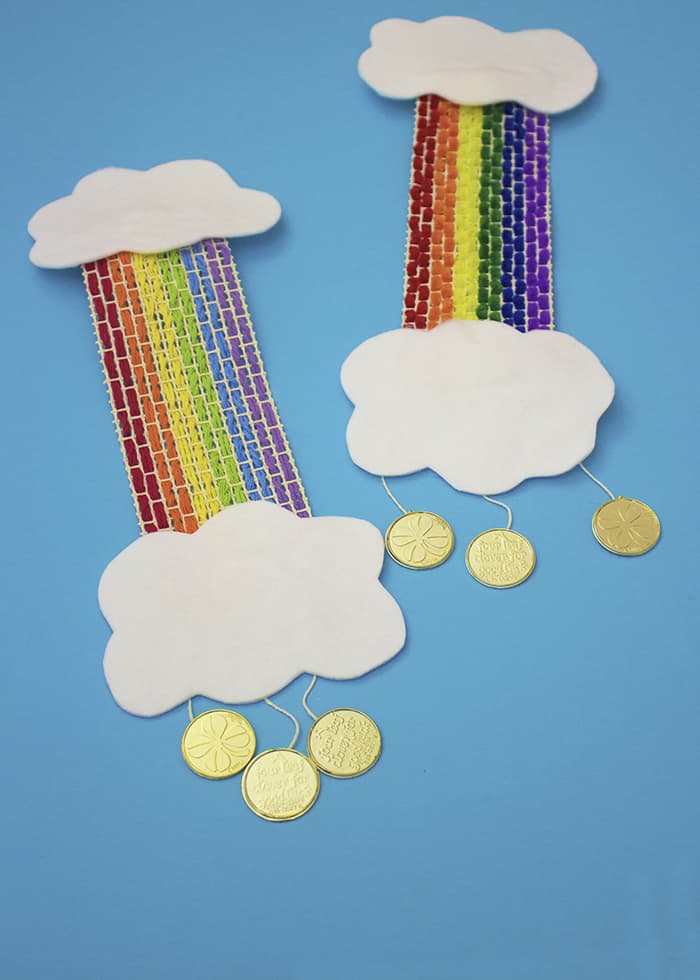
- Trim excess base material if needed. (Adults may want to take care of this step- no one wants to see their rainbow fall apart after 1 small snip in the wrong spot!)
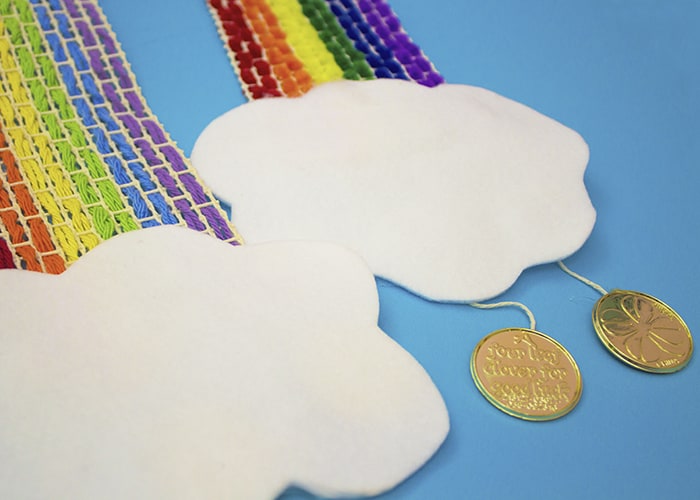
- Cut 2 clouds from your white material. (Felt, foam, etc.) Use the craft glue to attach them to each end of the rainbow. Ideally, try to catch the end of each length of yarn in the glue during this step, to help keep everything together.
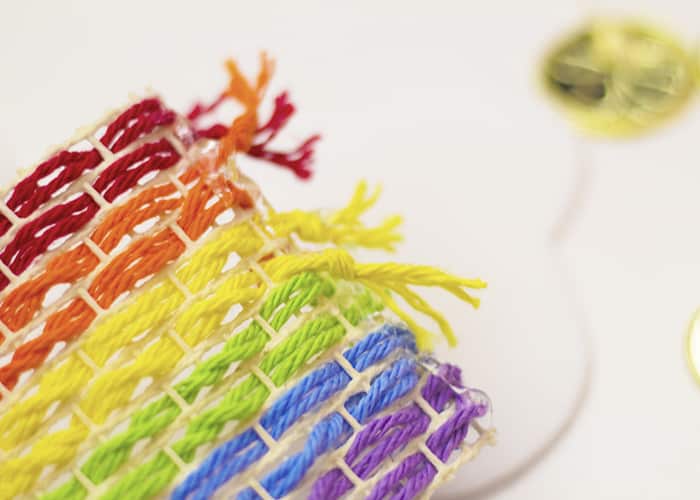
- Cut some lengths of string to hang from one cloud. Use glue to attach coins to the string. Glue the strings to the bottom back of one cloud. When the project is hung vertically, the gold coins will be falling from the rainbow.

- Finally, help your child hang their rainbow weaving creation as they anticipate the arrival of St. Patrick’s Day.
Do your kids look forward to St. Patrick’s Day? What is their favorite thing about the holiday? Let me know in the comments below!
- Base material.
-
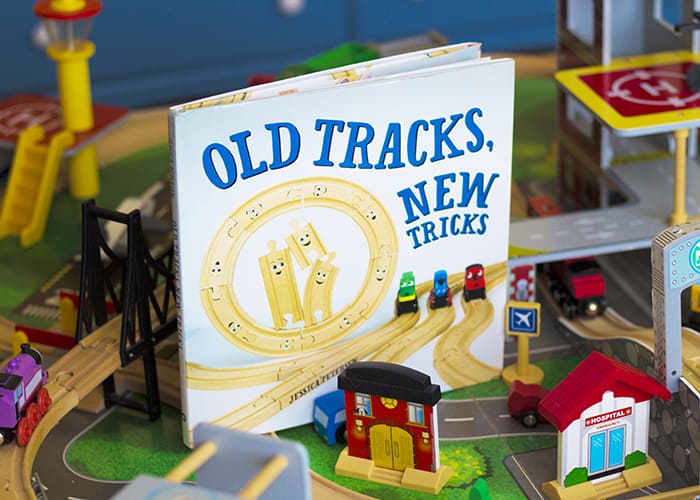
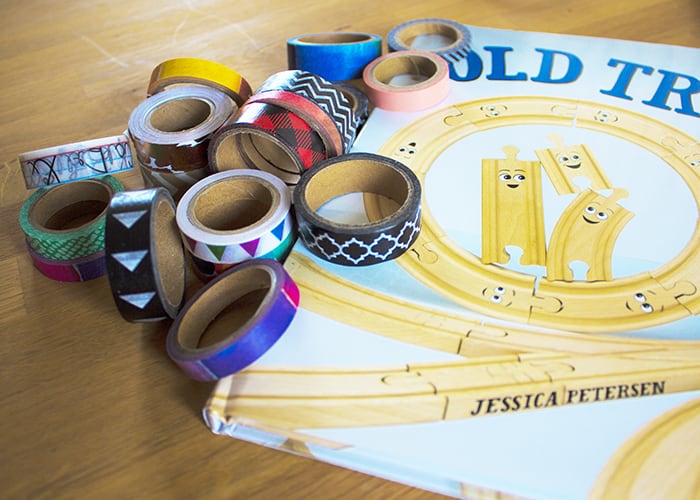
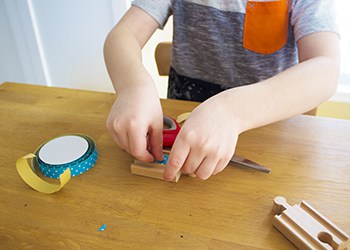
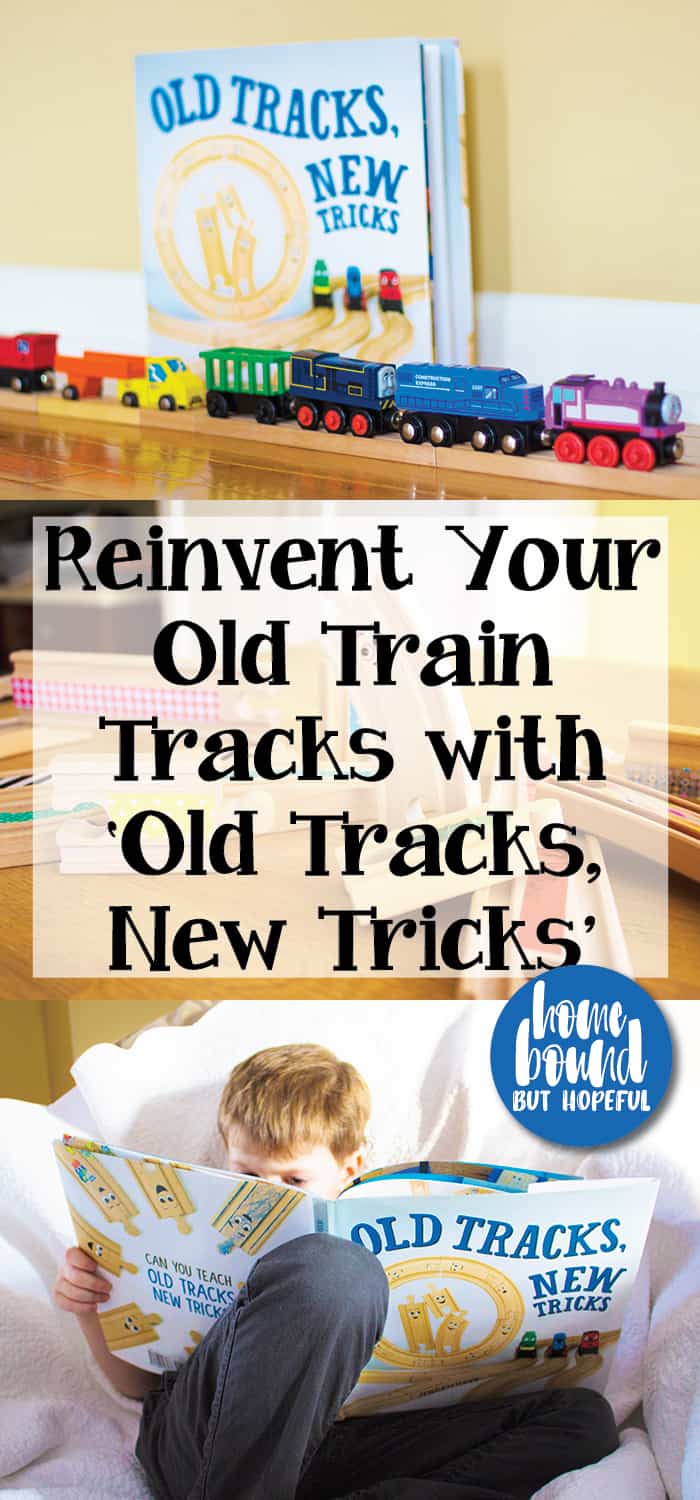
Can You Teach ‘Old Tracks, New Tricks’? (Review + Craft)
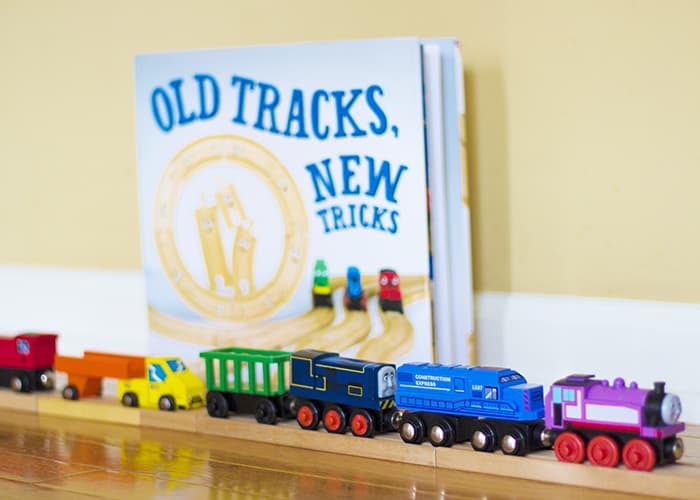
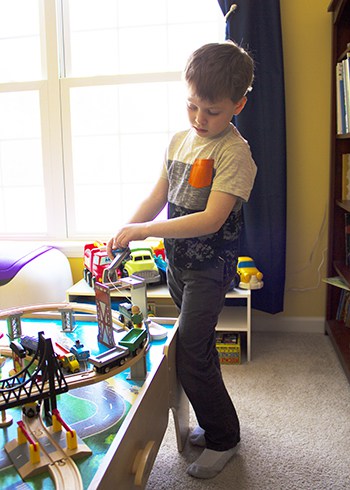
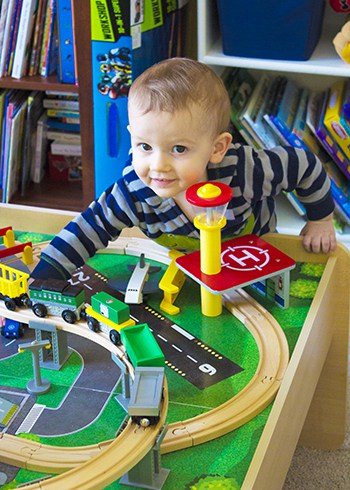
Lately, #thelittleone has been learning all sorts of new words. It’s fun to watch him label everything around him- kitties, balls, and recently, ‘choo-choos’. He and #thebigone were both understandably pretty excited when Old Tracks, New Tricks arrived in the mail for review. The mix of trains and crafts was especially appealing to my 6 year old who could not wait to jump in.
Old Tracks, New Tricks is the creation of Jessica Petersen, who blogs at Play Trains! Jessica has crafted a fun and engaging tale for young readers. Published by The Innovation Press, the book is bright and cheerful. (You may remember The Innovation Press from my recent review of their newest series, Zoey and Sassafras!) The story centers around some run-of-the-mill toy train tracks that are eager to find some fun. As Trixie, Tracky, and Tinker explore different ideas for novel tricks, the trains realize they want in on the action too. Ultimately, both tracks and trains are having fun together as they engage in new antics together.
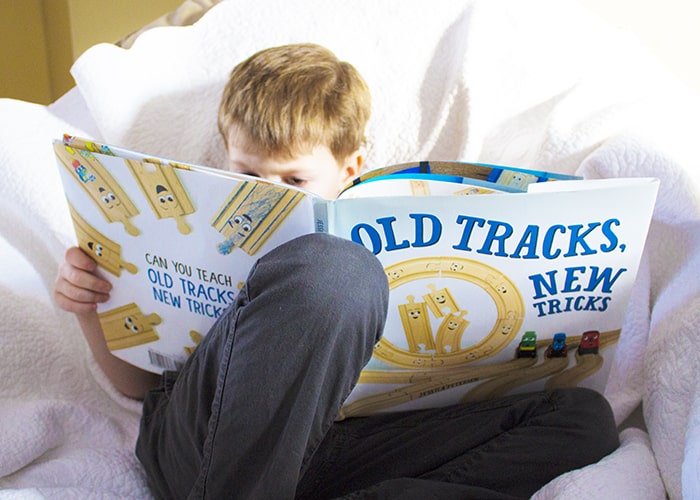
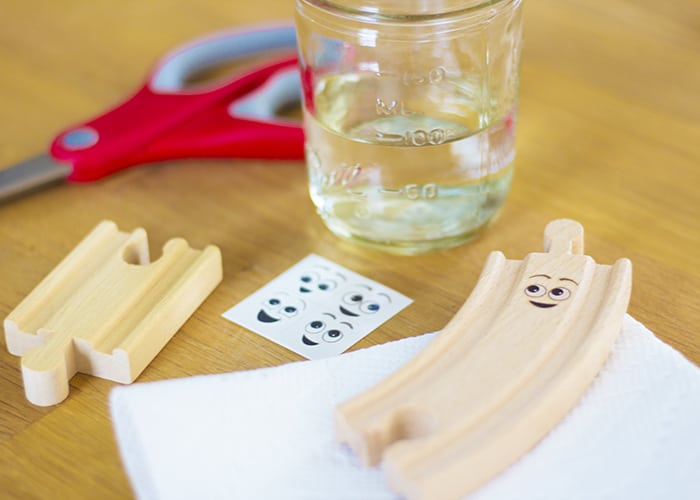
My son was enamored with the photographs through out the book. The pictures are bright and vibrant, featuring toys with expressive little faces added on. There’s a sense of familiarity in the images- so many families have a stack of train tracks at home, a bin full of duplos, etc. The illustrative style makes it easy for children to make the leap from observing in the book to imagining what their next steps will be. They see the toys they have on hand represented in the book, and their minds start racing with possible tricks. Some of the photographs are so detailed, it’s easy to spend extra time poring over them and discovering little touches you may miss during a quick read-through.
The text itself has a lyrical, sing-song quality that will appeal to children. The rhyming structure will help both pre-readers and emerging readers gain confidence by helping them predict the last words in each line. Jessica includes tons of great ideas to customize and update the trains and tracks you likely already have at home. How much fun would a glow in the dark train set be?! Tracks decorated with foil, and train sets that are set up outside are other fun ideas she has included. The photographs will likely be enough inspiration for your children, but if not, Jessica has included a brief how-to for each idea as well.

Interested in a sneak peek at the first ten pages? You’re in luck!
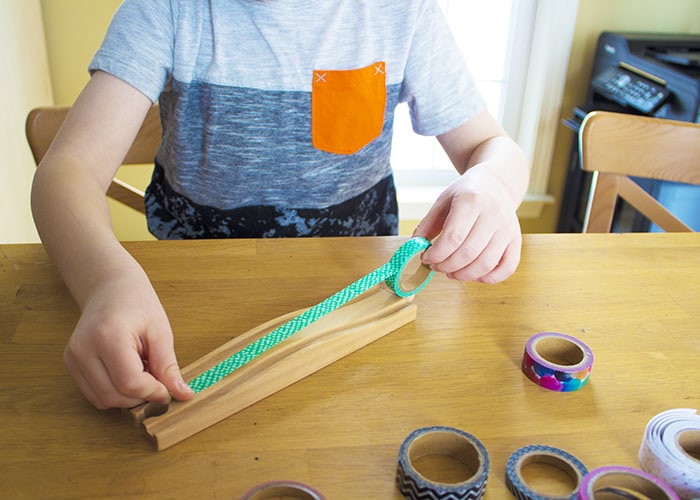
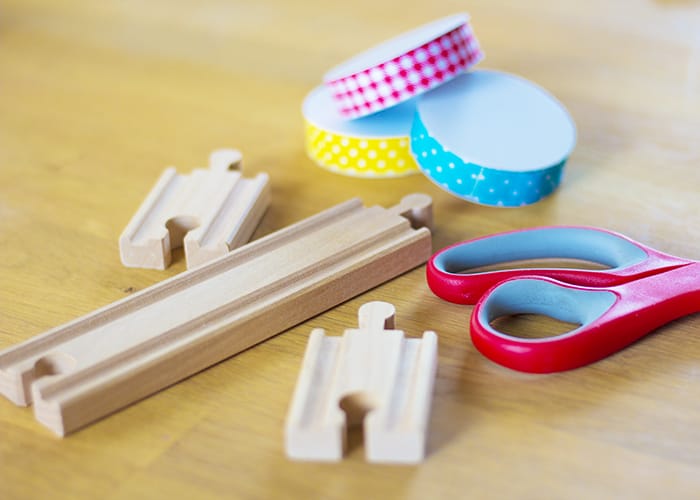
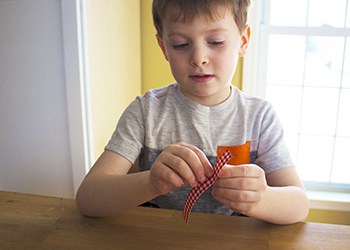
Teaching OUR old Tracks, New Tricks!
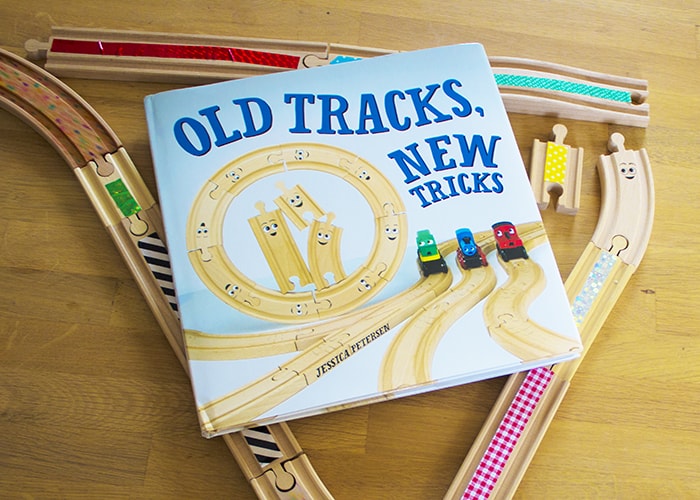
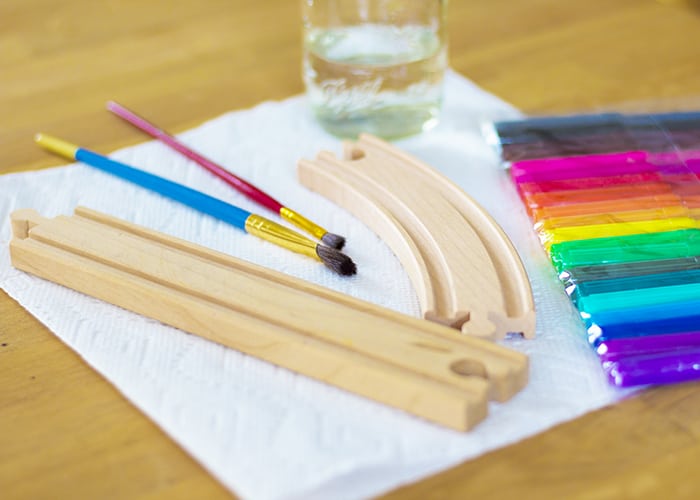
Old Tracks, New Tricks was the perfect book for our family, as it’s such a fun example of children’s literature inspiring craftiness and tinkering. (Even if your child isn’t a huge fan of artsy activities, there are ideas for building and balancing as well, so don’t let them be turned off by the craft talk!) Of course, we wanted to come up with a few fun and simple ways to update some of our train tracks with supplies we already had on hand. Check them out below!
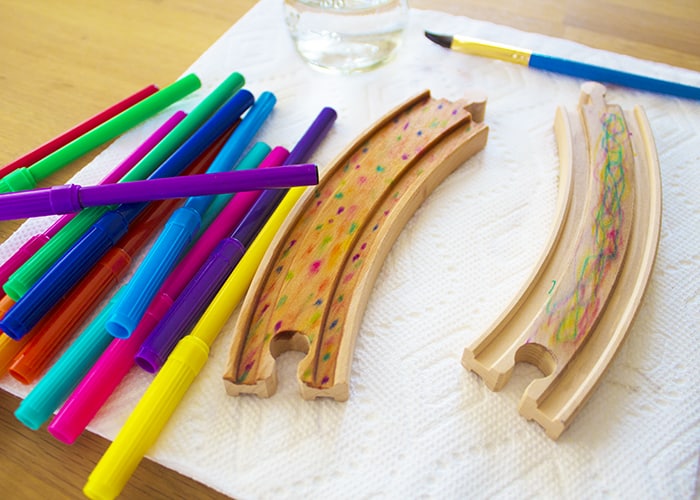
Shine Bright
We used some shiny, foil tape in a few colors to add some holographic stripes down our train tracks.
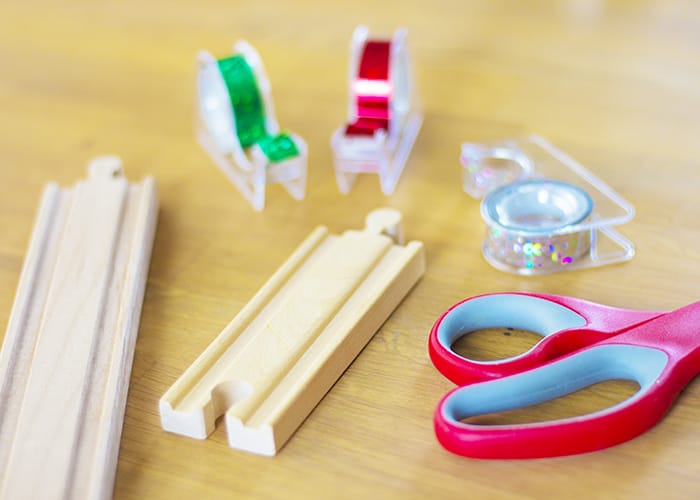
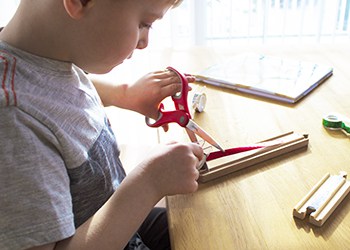
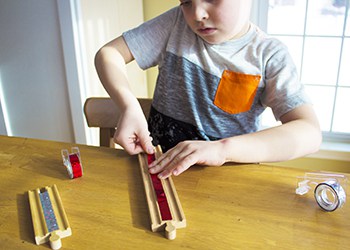
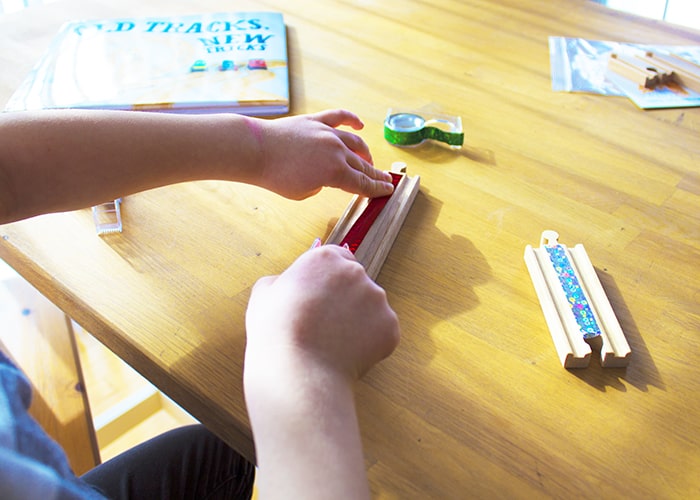
Wishy Washi
We picked a few of our favorite rolls of washi tape to add some fun, bright detail to some train tracks. (Bonus! Washi tape removes easily, so this modification isn’t permanent. Perfect for indecisive kiddos!)
Fabric-ated
Some adhesive fabric tape in different patterns added some vibrant interest to our train tracks. (Trims like ric rac or ribbon with a bit of craft glue would be another great option.)
water works
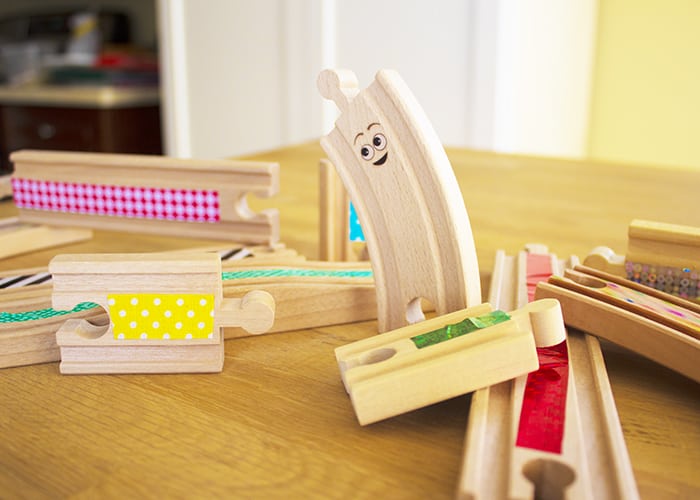
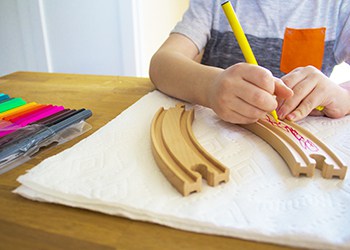
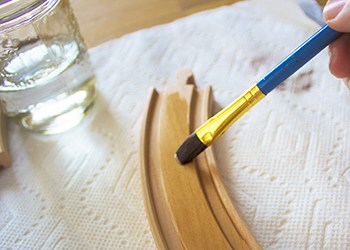
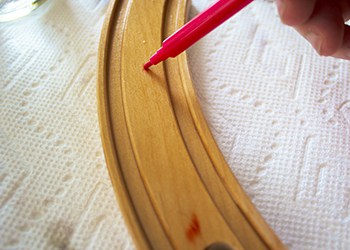
A little bit of water, some paintbrushes, and some washable markers made a simple, low stress project for us. We took two approaches, and both worked well. My son drew directly on a track with his markers. When he was happy with his design, he used a paintbrush to add water. The washable ink bled a bit, creating a washed out version of his drawing. We also tried wetting the track with water first, and then holding the markers to the track. This method produced watery splotches of color in an almost tie-dyed effect. After painting, we let the tracks dry thoroughly before playing with them.

I’ve got my eye on you
There are a few other simple options to recreate the look of the characters found in the book. Eye stickers are a great option, and very simple to use. Google eyes are another good choice, and with a bit of craft glue are also easy to attach. Our review copy of Old Tracks, New Tricks came with some adorable fake tattoo eyes, which may be a bit difficult to find. Some other fun eye add-ons that are perfect for tech-obsessed kiddos are emoji stickers and emoji tattoos.
We had so much fun reading and creating with Old Tracks New Tricks. I hope you’ll think about checking it out for all the little engineers and conductors in your life!
What sort of new tricks would your kids love to see their old tracks perform? Let me know in the comments below!
-
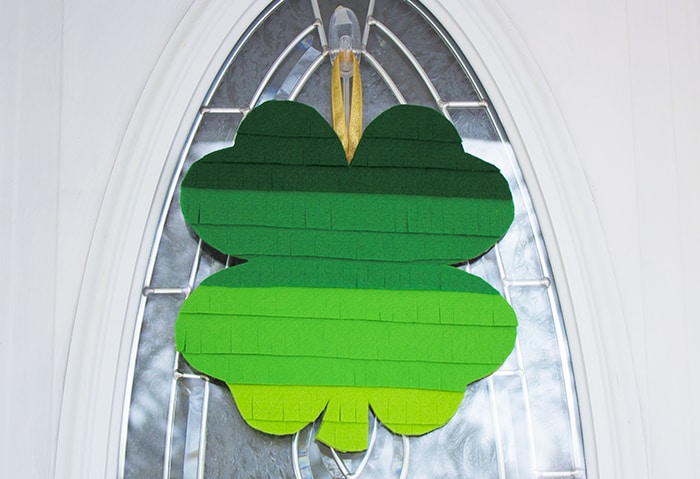
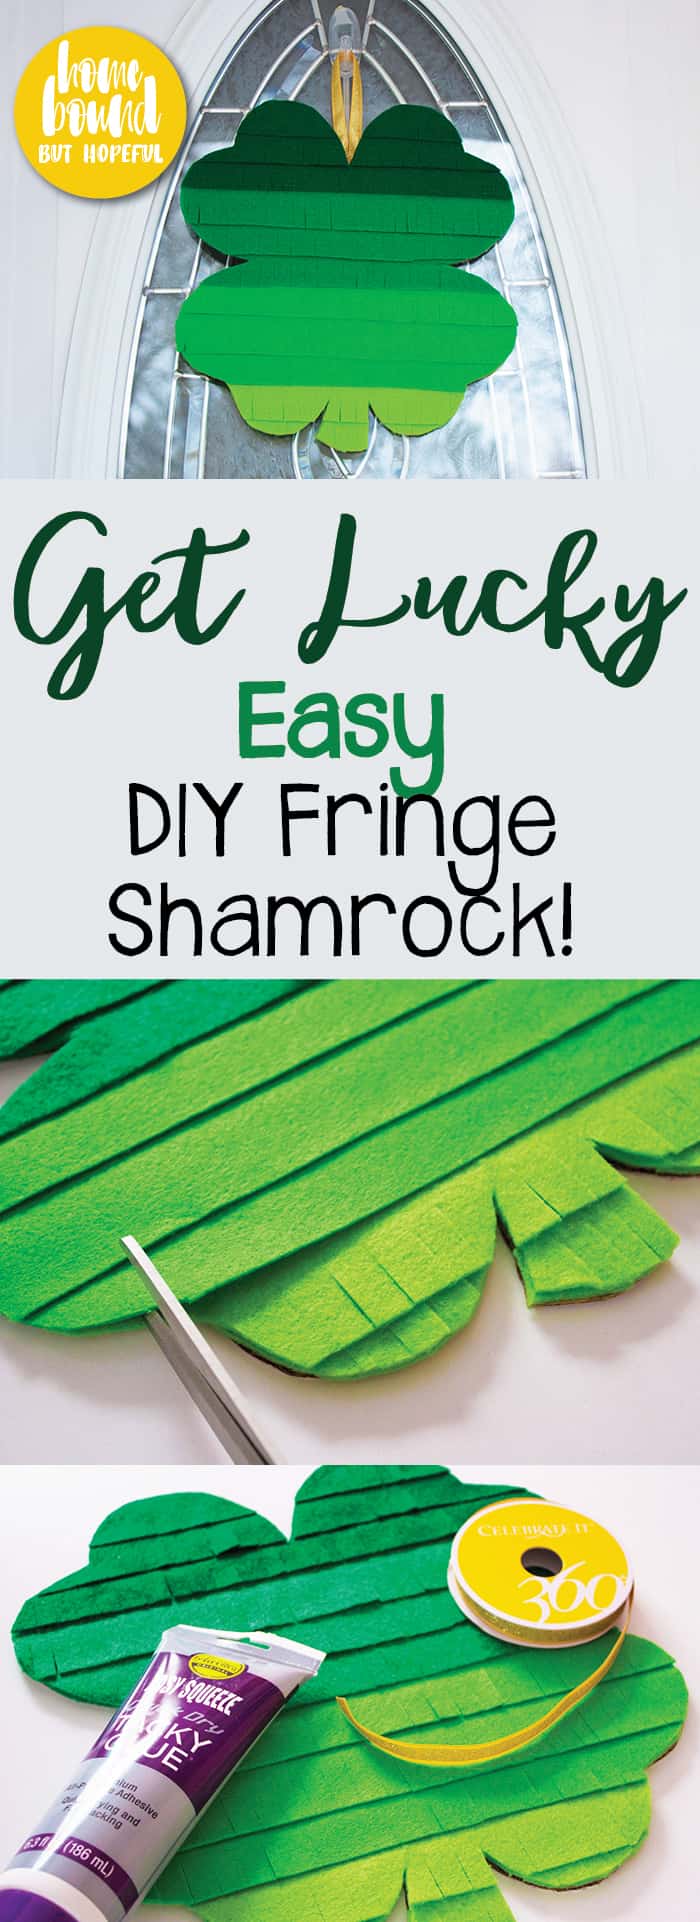
Get Lucky this St. Patrick’s Day- Easy DIY Shamrock With Fringe
I like to find little ways to make even minor holidays extra special for my kiddos. One small way I try to make the house a bit festive is to change the decorations hanging on the front door every month or so. Despite a few years of looking, I’ve never found a St. Patrick’s Day hanging I truly loved, so this year I finally took matters into my own hands. Today I’m sharing my new easy DIY shamrock decoration with you. The project is simple and inexpensive, and comes together quickly. The fringe is a cute and fun detail that adds a little bit of movement to the hanging. Read on to see how fast and manageable this project really is!
Easy DIY Shamrock Supplies
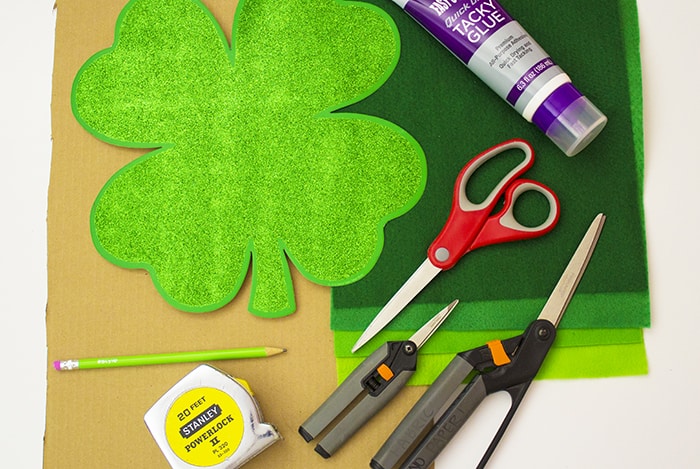
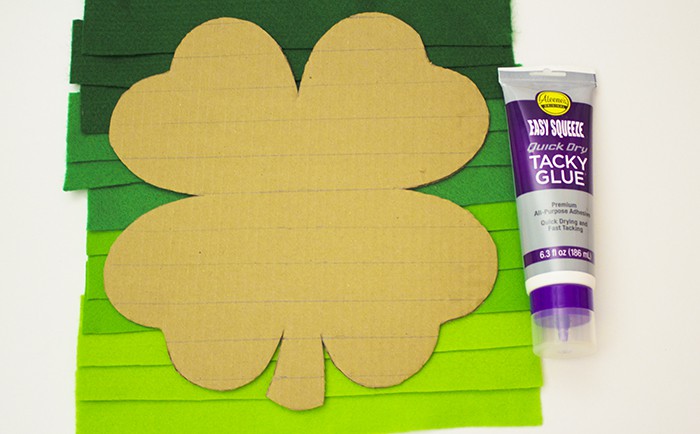
- Base material. I used a piece of old cardboard from a box of printer paper. Go green & recycle something for this. (Get it?! Green?! St. Patrick’s Day! Ha, I’m a nerd!)
- Craft glue. (Or hot glue. I avoid hot glue because I really value my fingertips. However more coordinated crafters will most likely have quicker results with hot glue).
- Green felt sheets, in as many or as few shades as you would like.
- Ruler, or tape measure if your ruler has suddenly gone MIA like mine. (#hotmessmom, right here).
- Pencil or pen.
- Ribbon, yarn, or twine for hanger.
- Scissors. (I used craft scissors and fabric scissors).
- Optional- pre-made shamrock cut out as a template.
Here’s How!
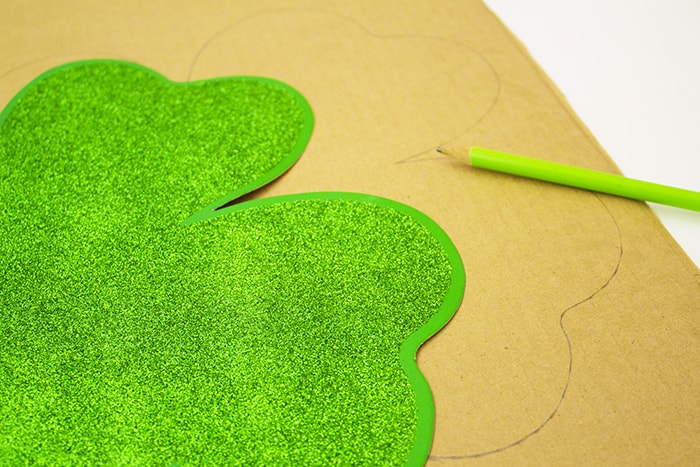
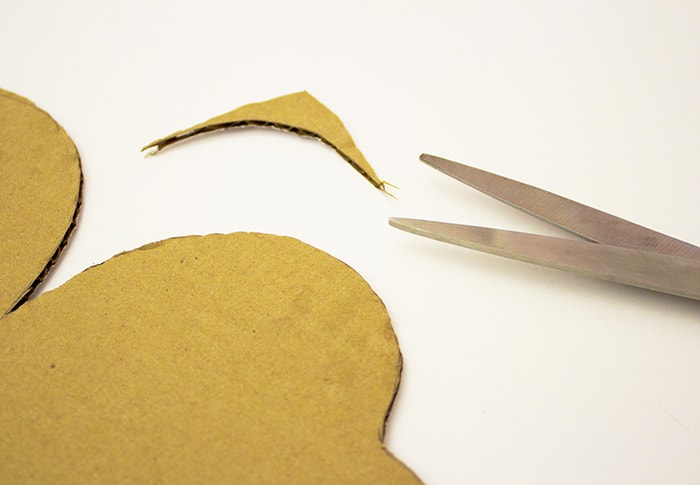
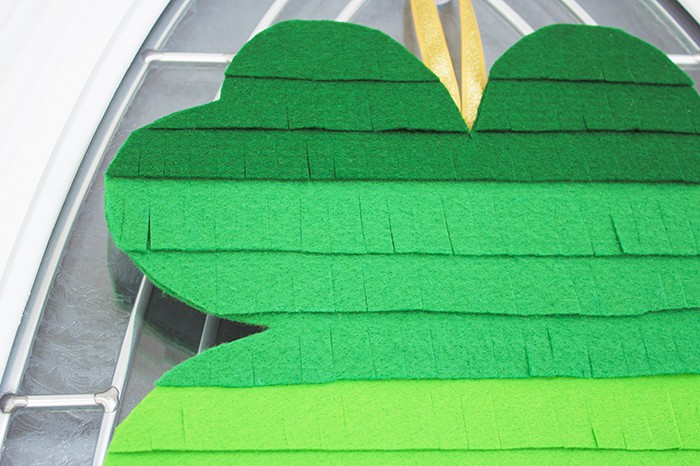
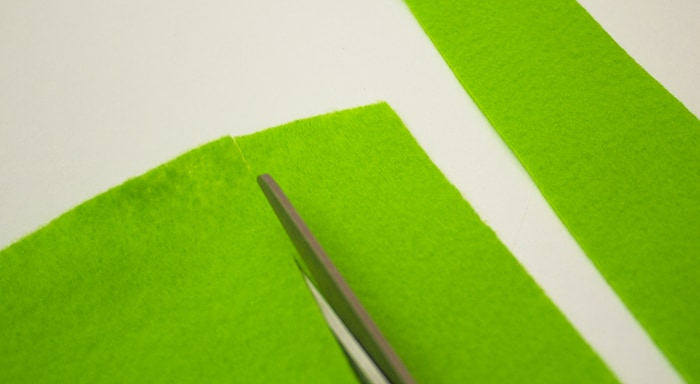
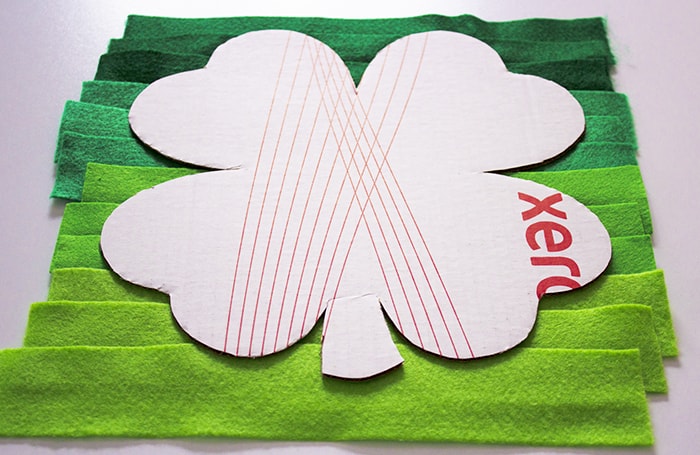
1. Use your pencil or pen to sketch out your shamrock shape on your cardboard base. I used a cheap pre-cut shamrock we had an hand from the dollar store as a template to trace. (The size and shape were perfect, but it wasn’t sturdy enought to use as the base for this craft.) Cut the shamrock base out with your scissors. (Hint: you do not want your shamrock to be wider than your felt, so keep that in mind during this step!)
2. Next, I used my tape measure to mark off roughly 1 inch segments down the shamrock. I wanted this project to be low stress and easy, so I didn’t worry about perfectly straight lines that were exactly 1 inch apart. There’s a little wiggle room here, so don’t let the details make you nuts. I drew guidelines horizontally across the shamrock around 1 inch apart.

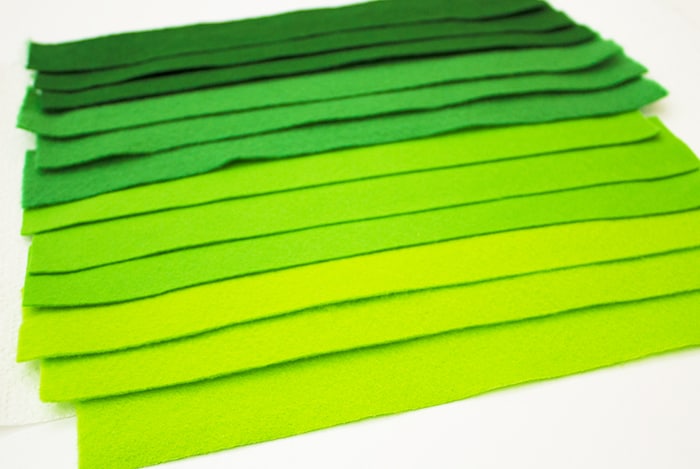
3. I used my tape measure to make small snips on the felt, with the aim of cutting relatively straight strips around 2 inches wide. Again, I kept this project laid back. If you want to be precise, a cutting mat, rotary cutter, and grid ruler will make perfect 2 inch strips for you quickly. Take the approach that feels right for you. You will want one 2 inch strip of felt for each guideline on your shamrock. Consider the pattern or layout you would like to use while you’re cutting. I chose an ombre feel, cutting around 3 strips of each of my 4 tones of green felt.
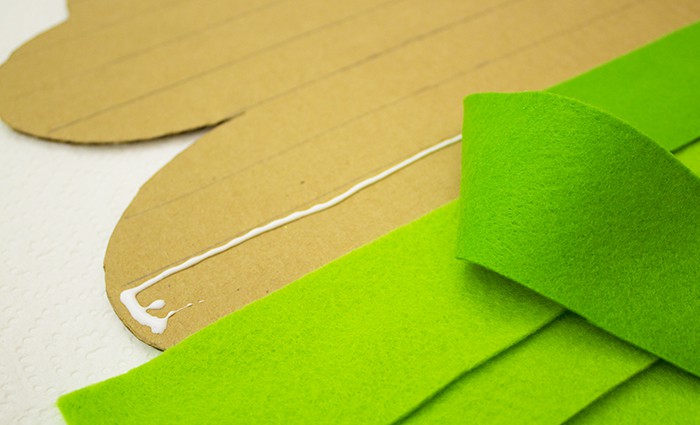
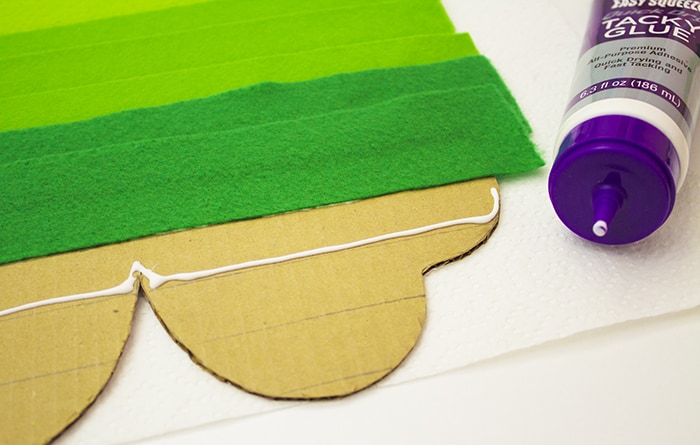
4. Next, use the glue to attach your felt strips to the base one at a time. Start from the bottom of the base and work up. Run the glue along the guideline, as well as down the sides a bit. Attach each felt strip, and allow the glue to dry completely.
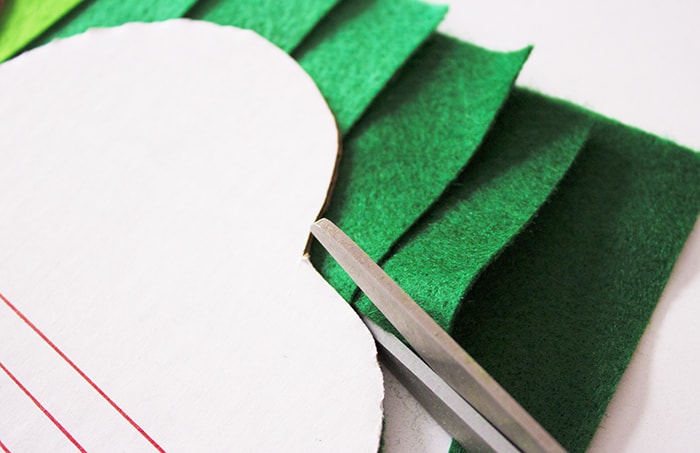
5. After the glue is finally dry, you can begin to trim the excess off the sides with your scissors. I found it worked best to cut off the majority of the excess first. Then I went back to trim more carefully and closely with finer scissors.
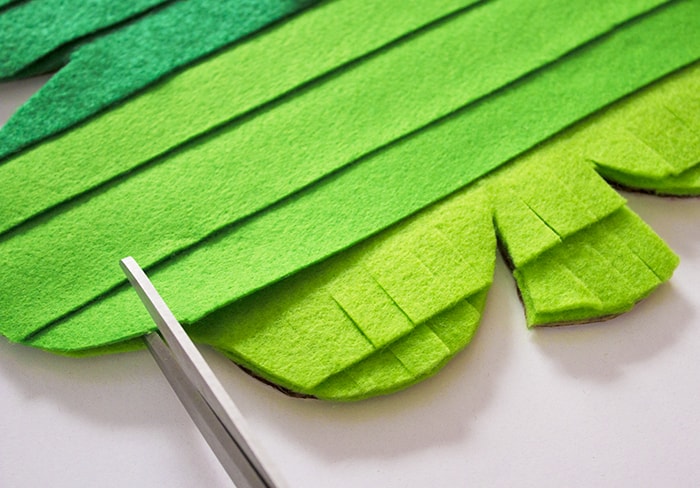
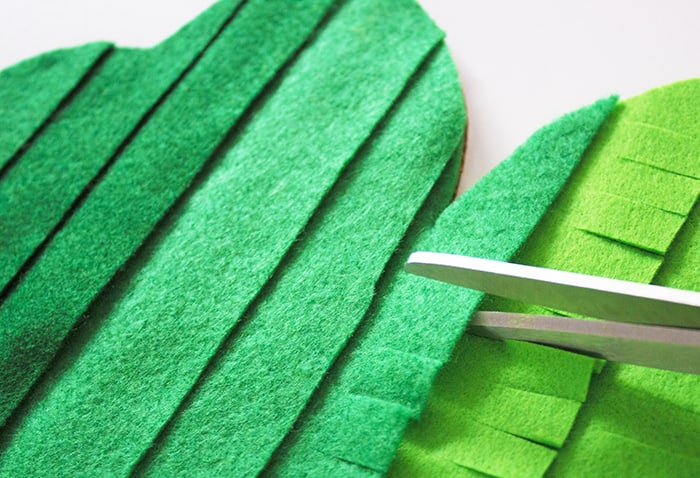
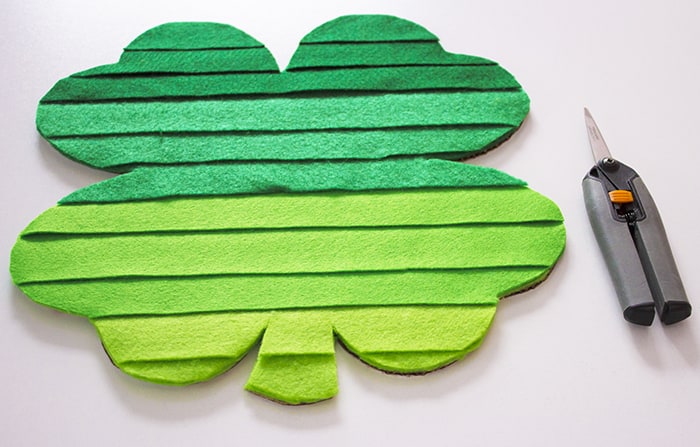
6. Up next is the most fun step, which will add a little novelty and dimension to the easy DIY shamrock craft. Use your scissors to cut fringe into each layer of felt. Be careful at any curved shamrock edges- you don’t want to cut the ends of the felt strips off! This is the time to check for any edges that may be a little loose. Loose edges are likely to be at some of the shamrock’s curves. If you find one, just add a little more glue to the edge to better secure the felt.

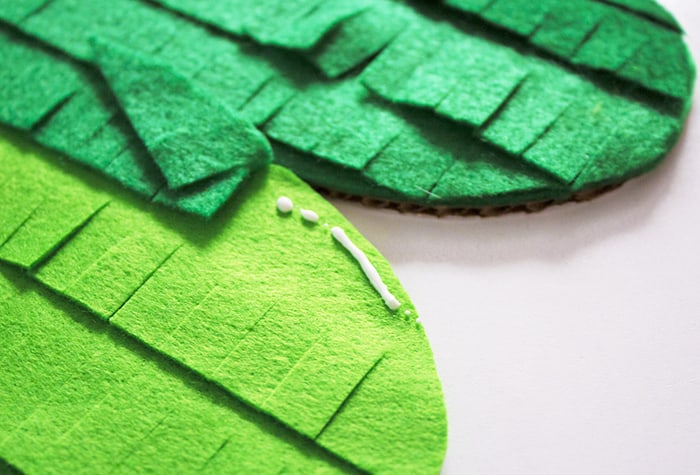
7. Finally, attach a hanger of some kind to the back of your shamrock. I chose a metallic gold ribbon, since it seemed appropriate for the holiday. Rainbow printed ribbon would also be super cute and fun! String, twine, or yarn would all be other good options. When the glue for your hanging loop is totally dry, you are ready to hang your lucky 4 leaf clover.
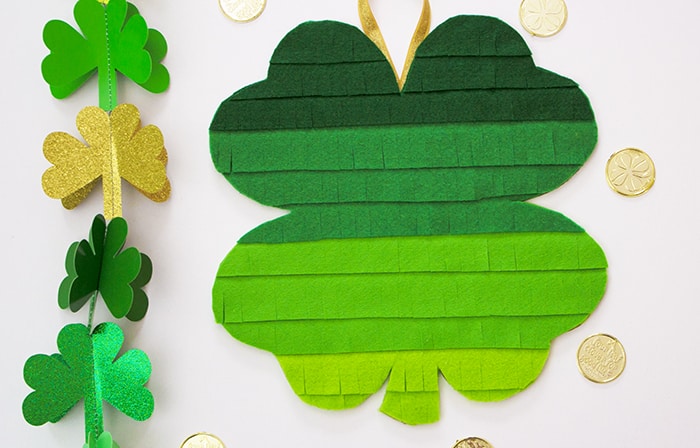
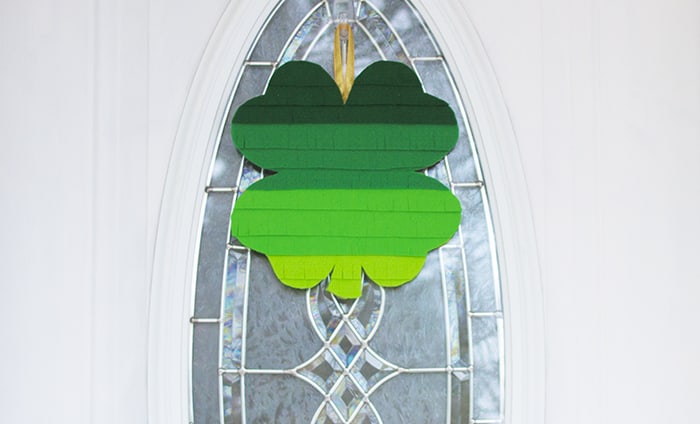

I hope you enjoyed this easy DIY shamrock project! With any luck, it will bring St. Patrick’s Day spirit and maybe even some leprechauns to your home as well!
Be on the look out for more leprechaun antics and St. Patrick’s Day fun!
Does your family do anything special for St. Patrick’s Day? I’d love to hear about it in the comments!

-
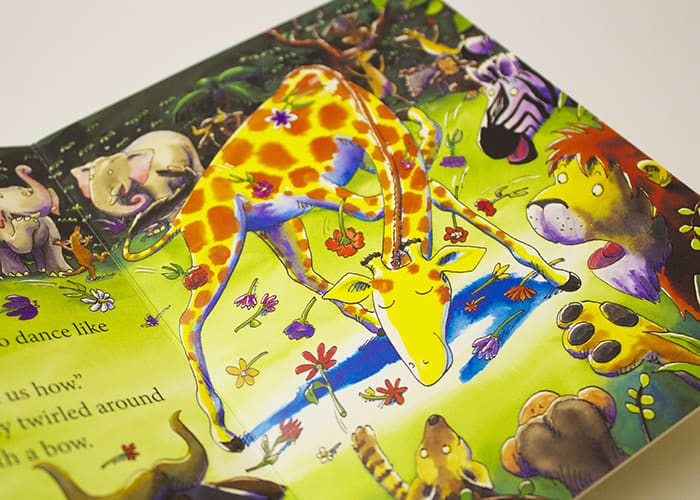
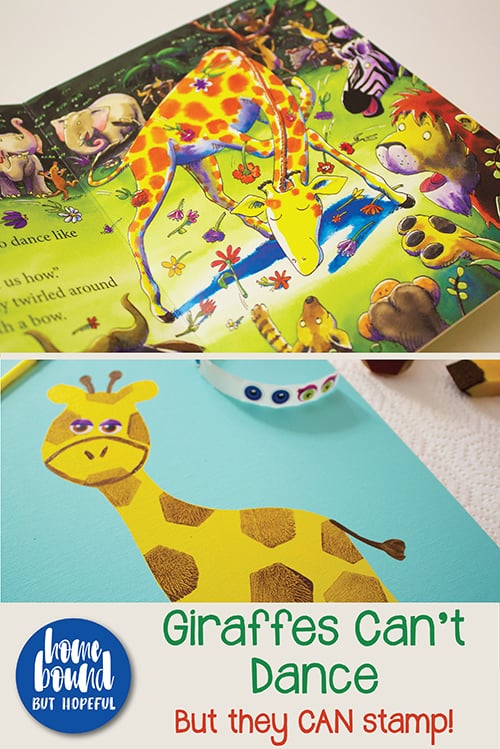
Giraffes Can’t Dance – But They CAN Stamp!
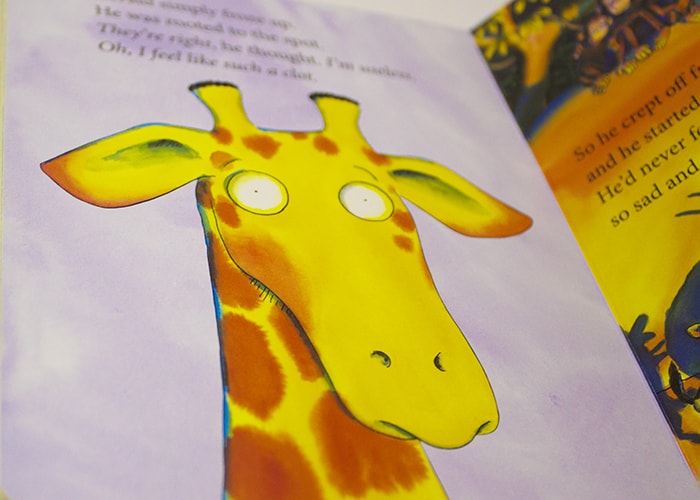
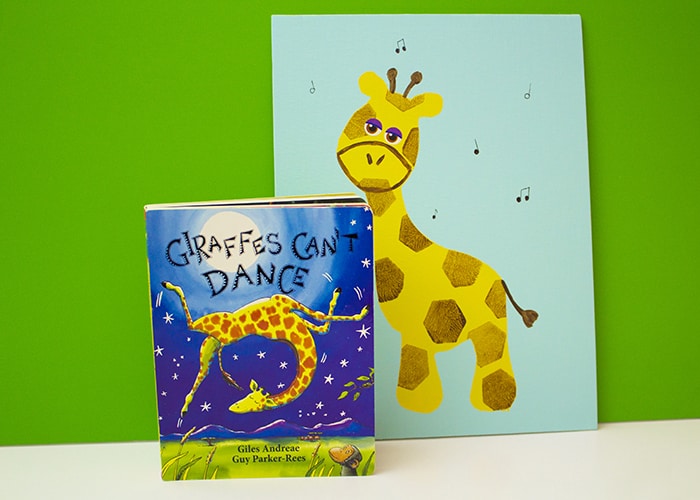
It’s time for another monthly themed picture book link up with some other creative bloggers. This month we are focusing on a perennial favorite- Giraffes Can’t Dance. I have to be honest- despite it’s popularity, I had not read this book until a few years ago. When I finally did, I loved Giles Andreae and Guy Parker-Rees‘ tale of Gerald, an unsure, self-conscious giraffe who pays too much attention to the taunts of the other animals.
While the other creatures of the jungle dance confidently, Gerald internalizes their remarks. He must be too clumsy, too useless, and clearly- he can’t dance. A friendly little cricket comes along, and helps Gerald realize that he can dance- he just needs to find his music. With that boost, Gerald is able to dance freely and share his new-found moves with the rest of the awed animals. It turns out that Gerald – and giraffes – can dance! The illustrations are bright and lively, sure to draw in young readers. The text is full of novel words, making read-a-louds engaging and enriching.
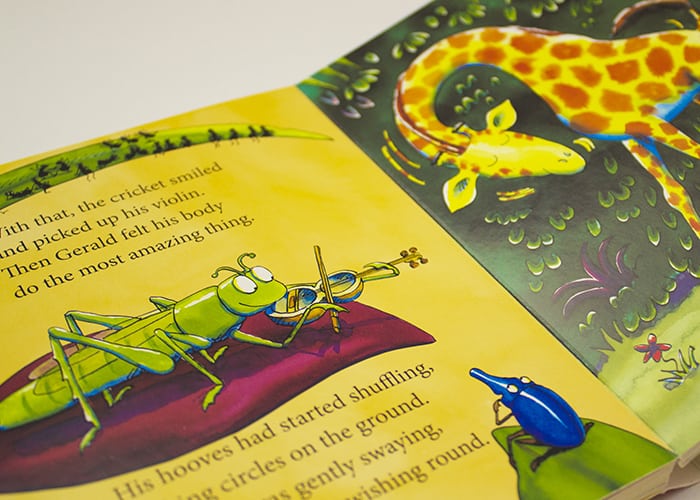
My entire life, I’ve been Gerald. As a child, going up to bat during a softball game was a panicky experience- all eyes were on me! Public speaking assignments in high school were nerve wracking, and I would shake throughout them. I am the wife sitting down at weddings because I don’t feel comfortable dancing in front of others. I don’t even like to call to order a pizza! Not surprisingly, there’s also an awful lot of Gerald in my mom as well – like mother, like daughter I suppose. I love Giraffes Can’t Dance as an opportunity to share an example of finding inner confidence to my boys. I don’t want them to grow up with my same level of nerves. Ultimately, I want them to feel comfortable dancing freely. I know they can find a role model for this in Gerald.
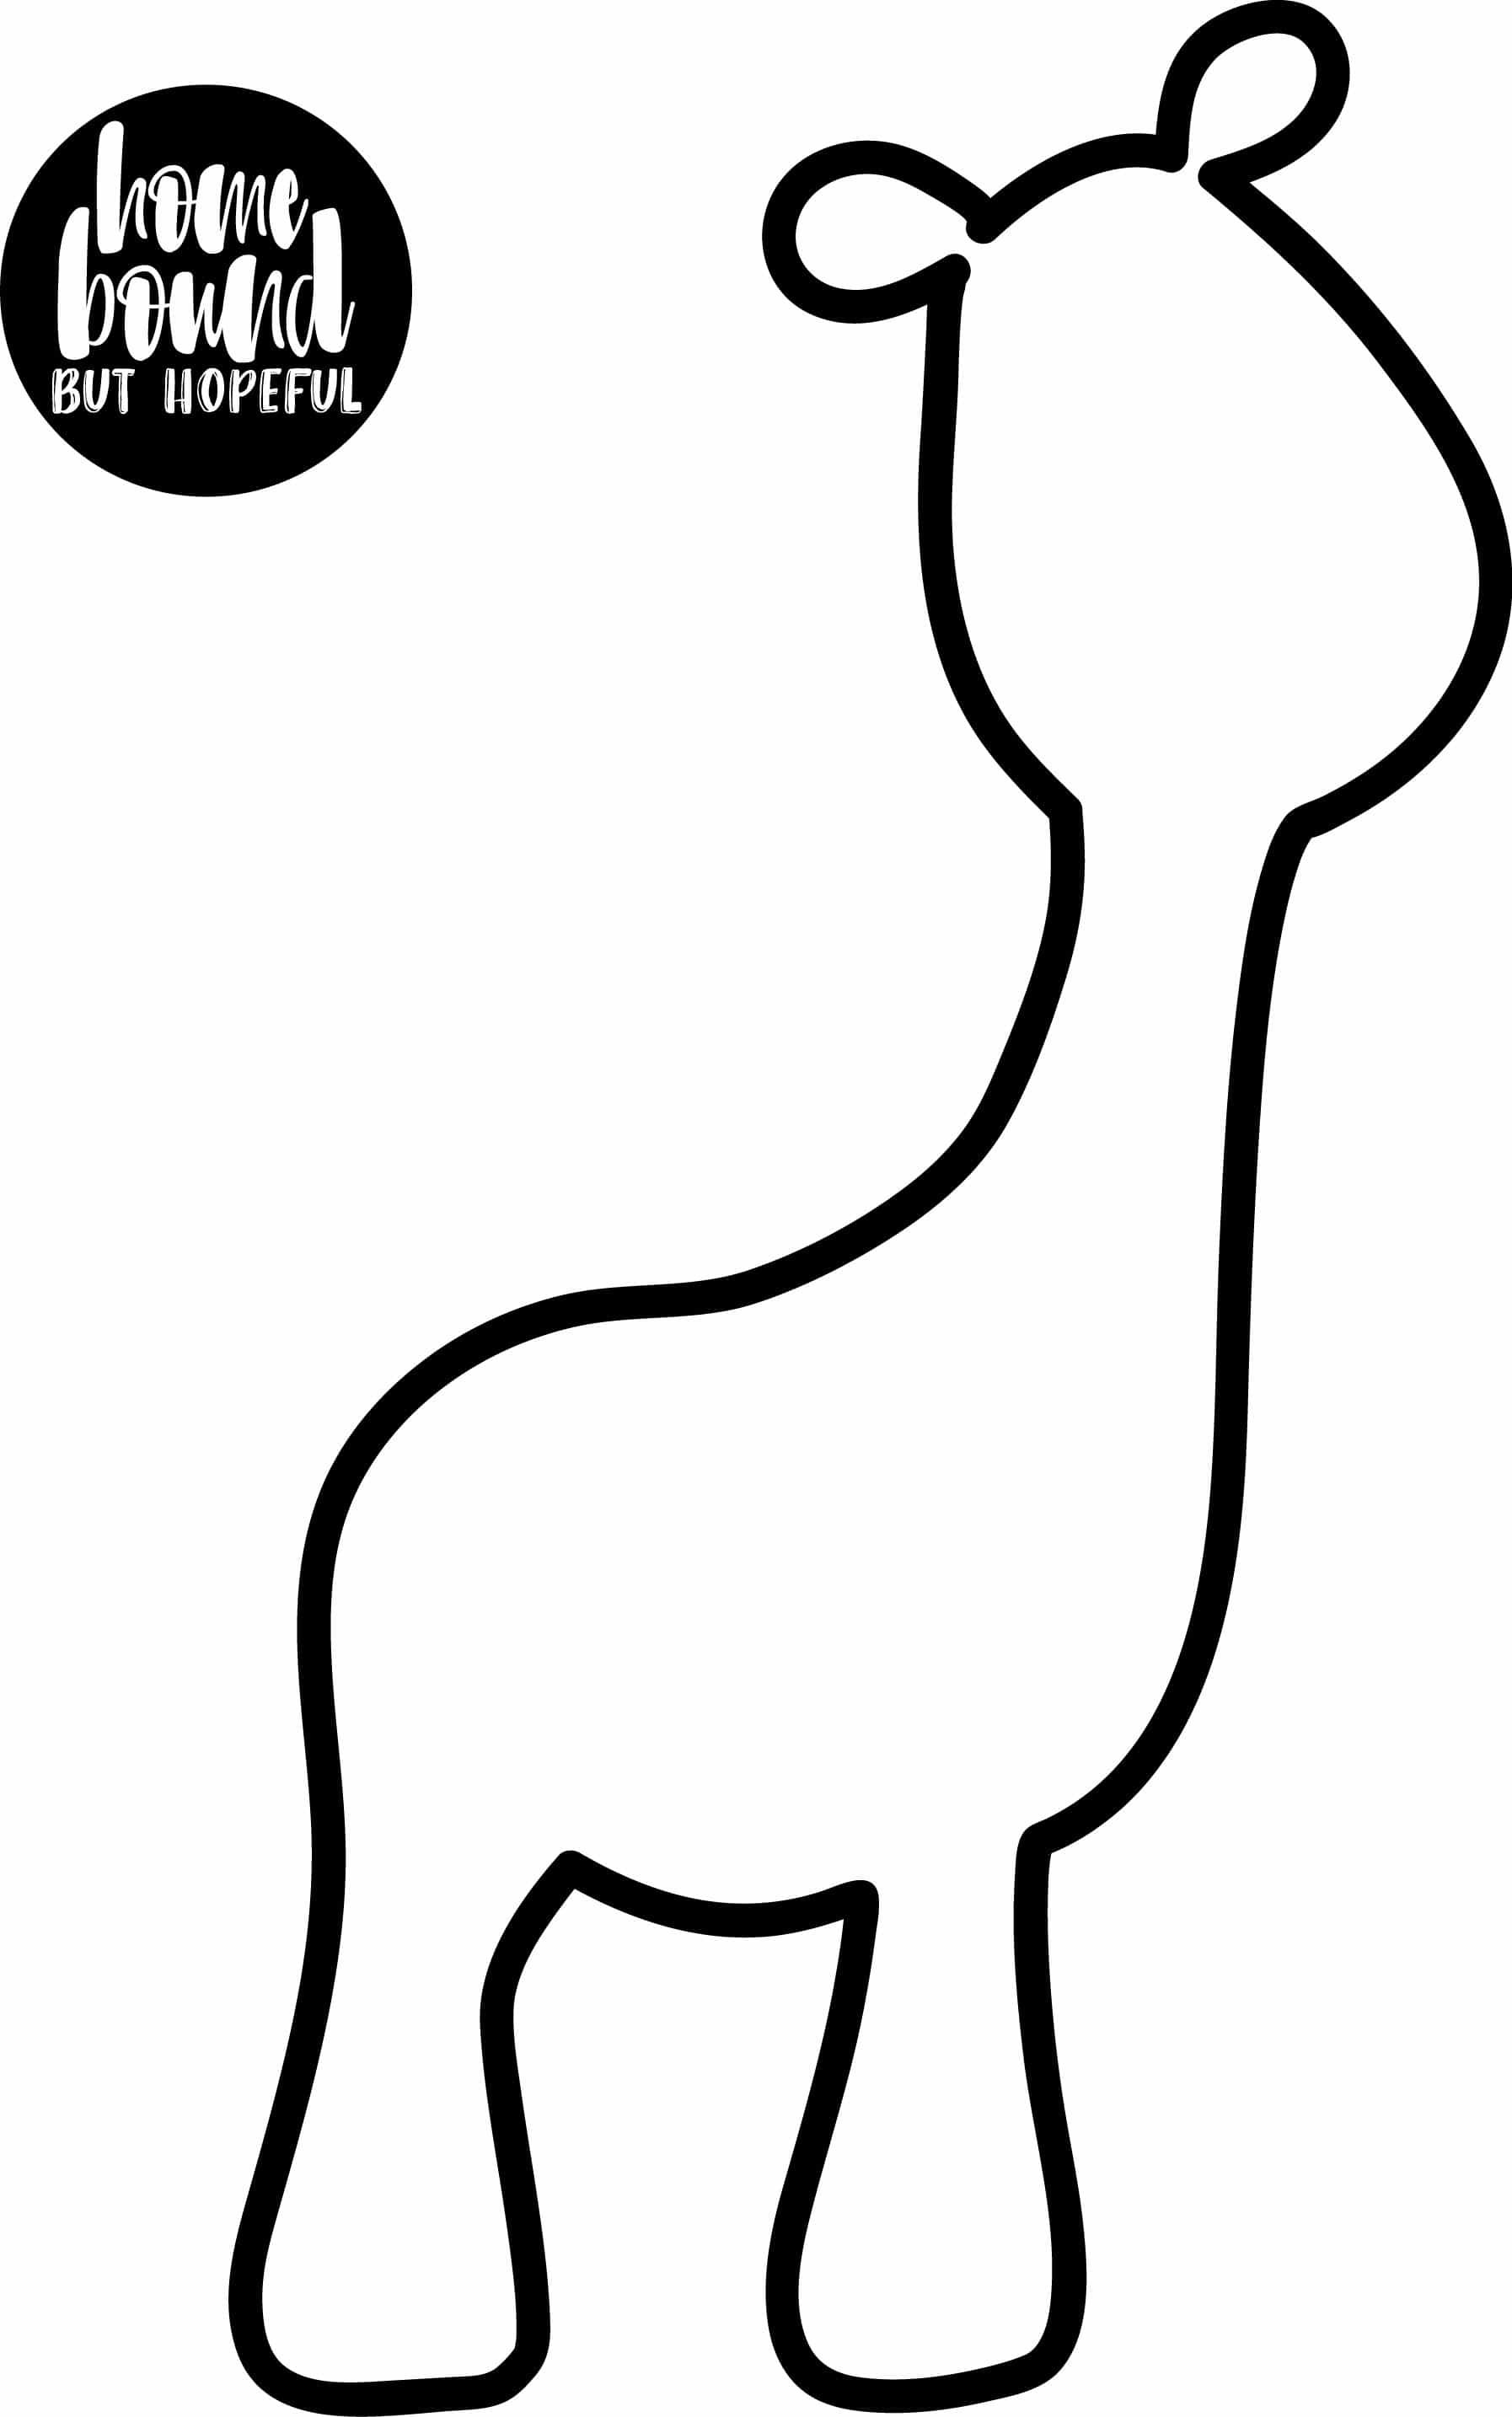
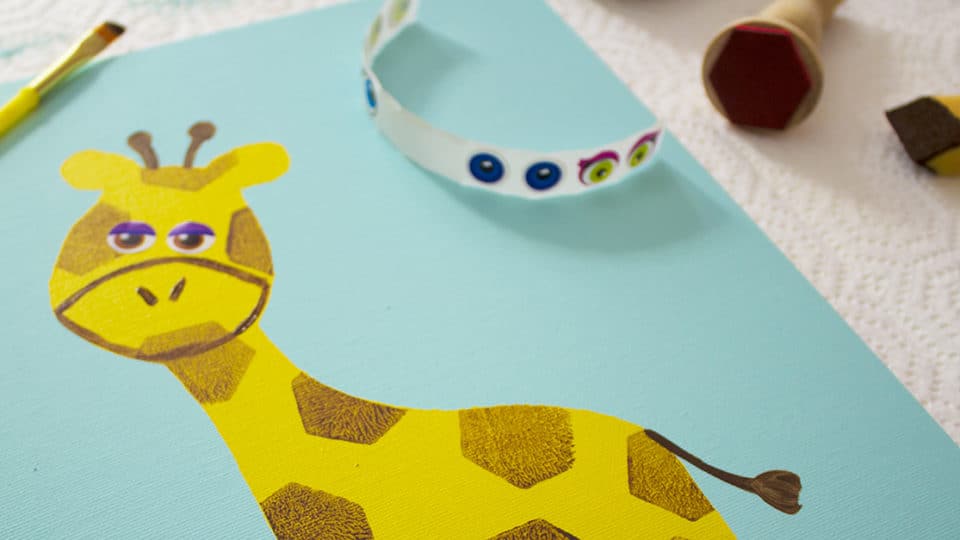
Giraffes Can’t Dance?! Stamp A Confident Giraffe!
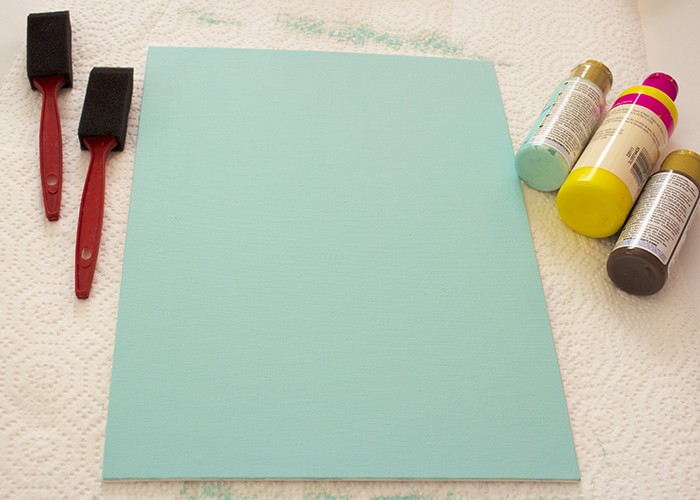
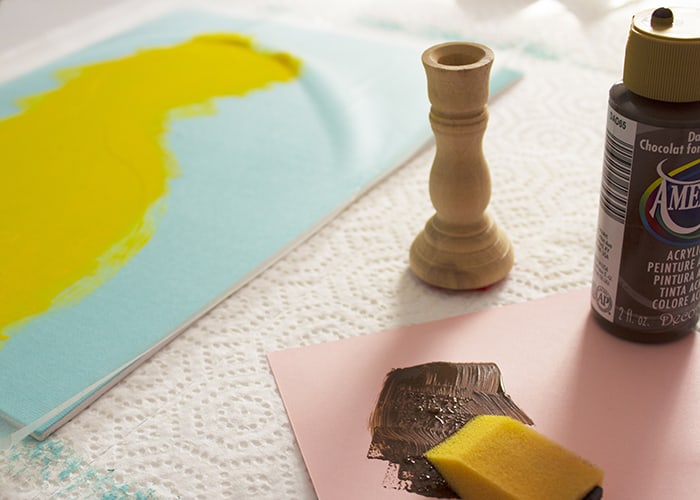
You will need:
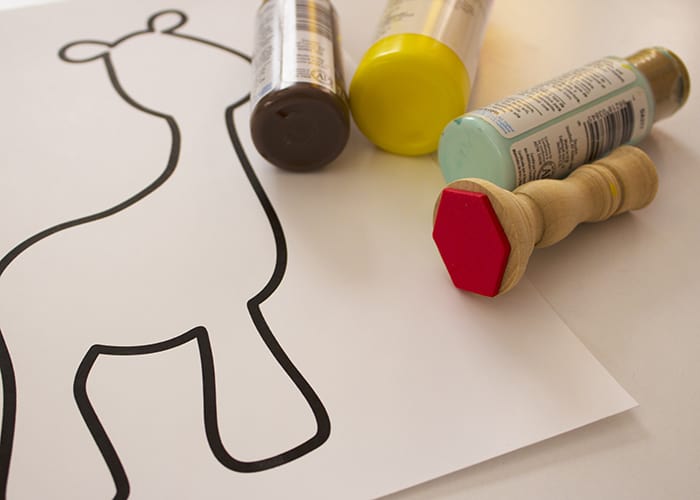
- Canvas (we used 9″ x 12″, but size is fairly flexible).
- Base acrylic craft paint (if desired). We used aqua.
- Yellow acrylic craft paint.
- Brown acrylic craft paint. (Or a brown stamp pad, if you prefer).
- Paint brushes. (We used assorted sponge brushes, with 1 small bristle brush).
- Small wooden candlestick holder.
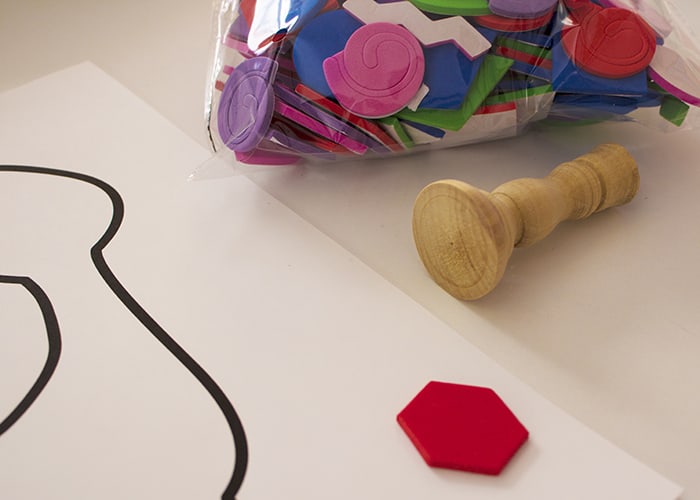
- Craft foam shape. (We used a peel and stick hexagon. You can cut your own shape and glue it on as well).
- Alternatively, you can use a ready-made rubber or foam stamp. We couldn’t find what we wanted locally, so we just made our own.
- Black permanent marker.
- Eye stickers or google eyes.
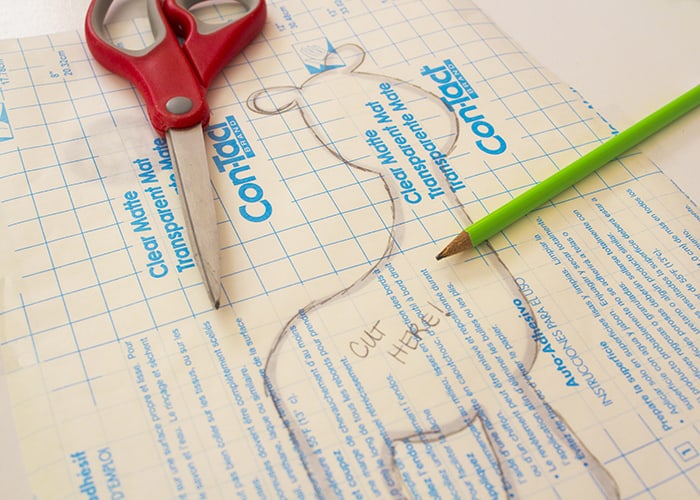
- Removable contact paper.
- Scissors.
- Printable giraffe template.
- Pencil/pen.
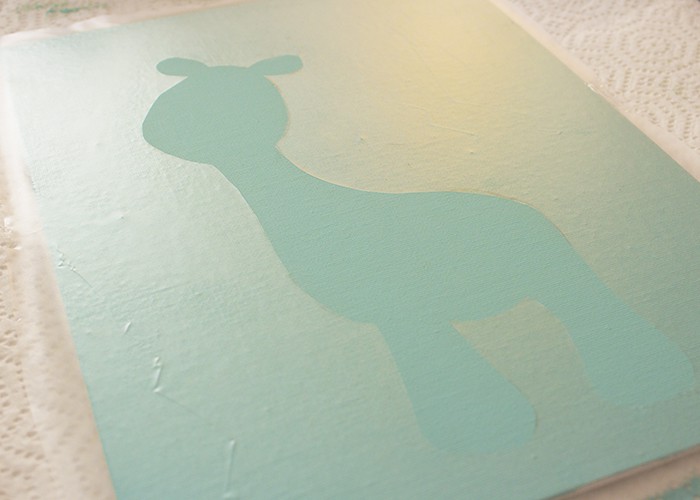
- First, paint the canvas your desired base color using a sponge brush and acrylic craft paint. Keep in mind that the yellow for the giraffe is pretty light, so you don’t want your base to be too dark. We did two coats of aqua, letting each coat dry completely.
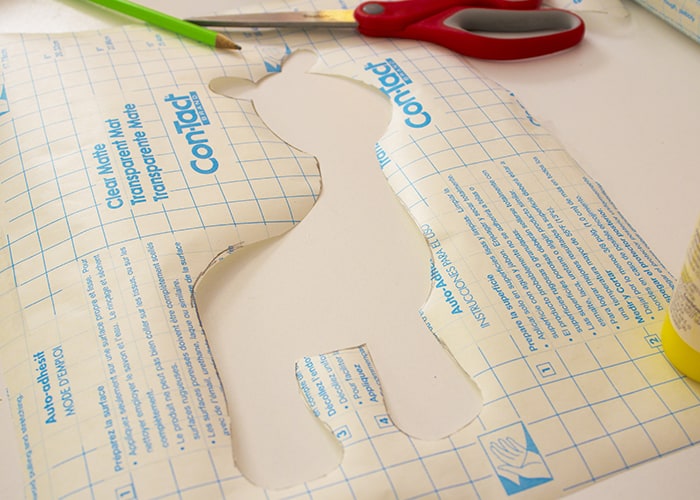
- Next, use your printable template to trace the giraffe outline onto your contact paper. Cut the inside of the giraffe shape out, leaving a stencil that covers the rest of the canvas. (Kids may need extra help with the cutting- it’s a tricky step for some!) Stick the contact paper stencil down, and make sure the edges of the giraffe are well ‘stuck’.
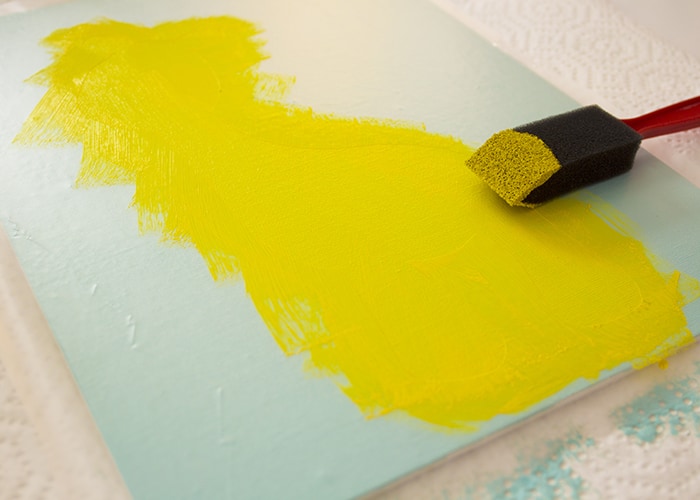
- Paint the giraffe body with yellow acrylic craft paint and a sponge brush. Depending on your base color, you may need a few coats. Allow each coat to dry completely between applications.
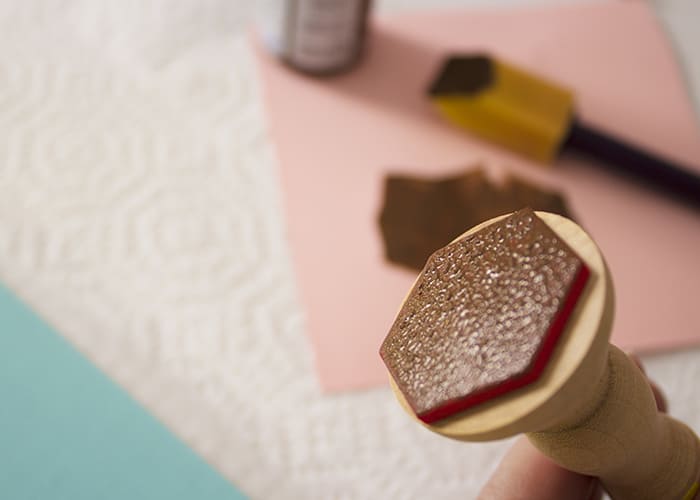
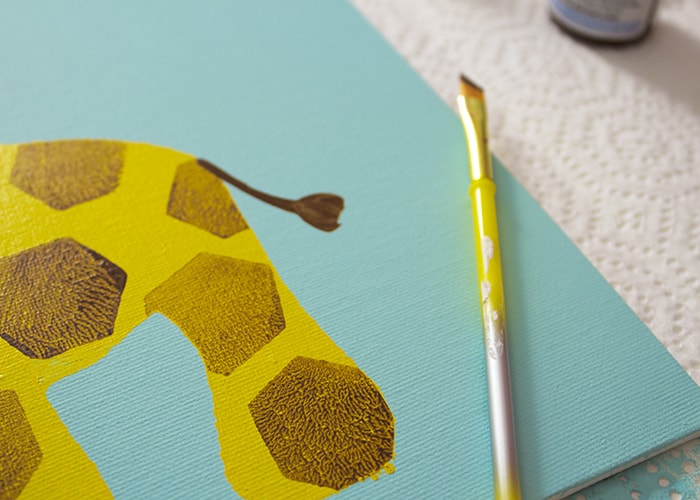
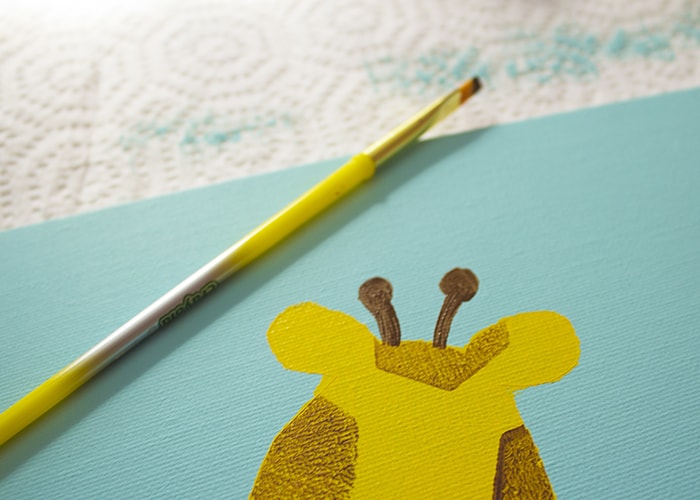
- While the yellow paint dries, you can create your stamp. Attach the craft foam shape to the flat bottom of a small wooden candlestick holder. Use a small sponge brush to add a light coat of brown acrylic craft paint to the stamp. Stamp the giraffe’s spots across the body. I suggest using washable paint, and cleaning up promptly. A damp paper towel should clean the foam shape easily, and the stamp can be used again in the future.
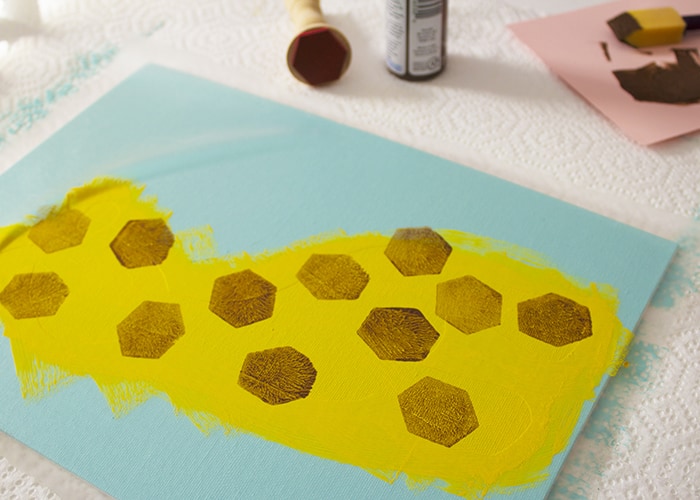
- Next, peel up the contact paper template, revealing your giraffe! Make sure to let all the paint dry completely.
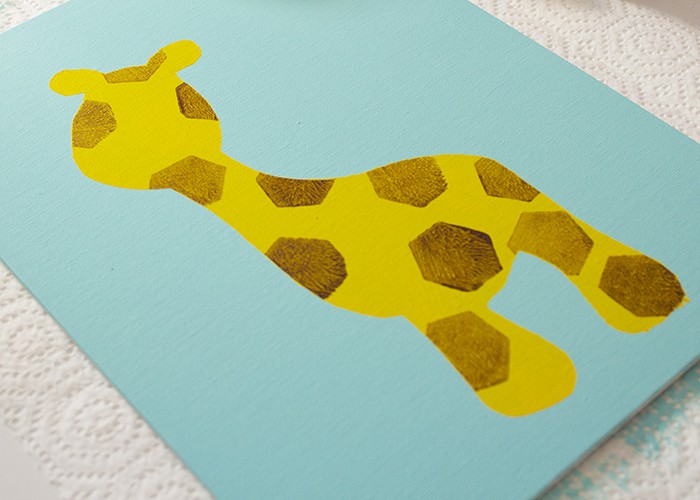
- Add details like a tail to the giraffe using a small paint brush and brown acrylic craft paint. This is a chance for kids to really add some personal touches and infuse some personality in their giraffes!
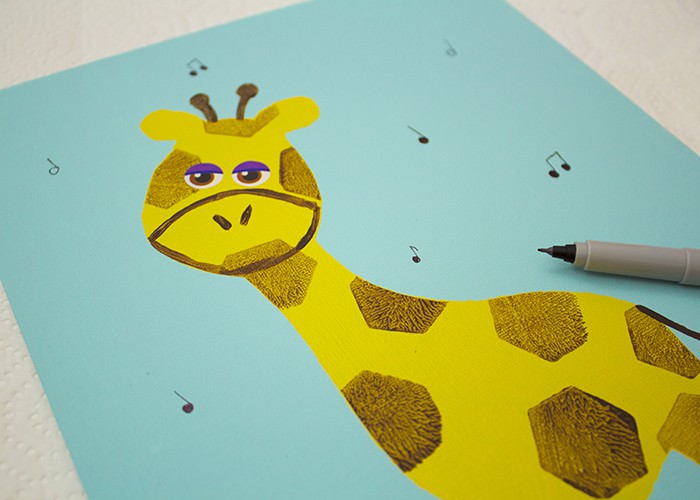
- Next, attach a pair of eye stickers, or glue down some google eyes to give your giraffe sight.

- As the final step, use a fine black permanent marker to add some music notes around the giraffe. After all, it’s easier to dance when you’re surrounded by music!
Finally- crank some tunes and have a giraffe-inspired dance party of your own!
what are your kids favorite board books? Let me know in the comments below!
Scroll on for more fun Giraffes Can’t Dance ideas!
 Babies To Bookworms
 Chocolate N Children
 Mixed Bag Mama
 The Adventure Starts Here
 Syncopated Mama
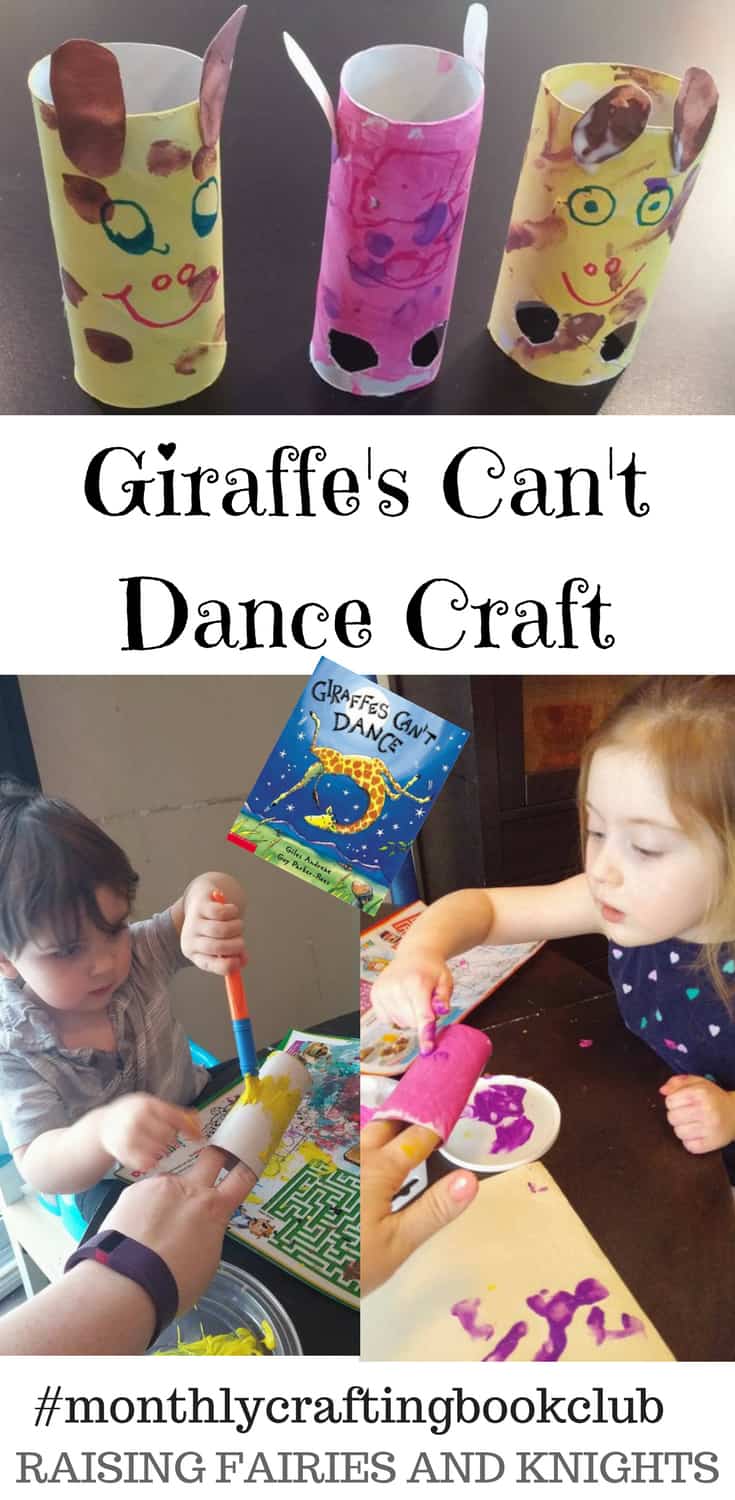
Raising Fairies And Knights